Golf - Golf Ball Stencil holder V3 (hinged & embedded magnets) - requires multi-filament FDM printer
prusaprinters
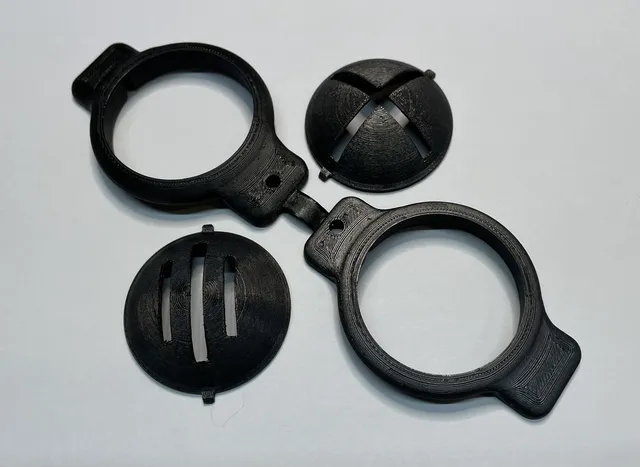
For multi-filament printers version 3 of the magnetic golf ball stencil holder designed using Fusion 360 is made up of two ball holder halves connected with a flex hinge (requires a flex filament). When the two halves come together they are magnetically held in place using 8 6mm x 2mm magnets. Into each of the two halves different stencil inserts can be interchanged (see below links for different stencils). For single filament FDM printers please use the Golf Ball Holder (V2a or b) model. UsageThis model was extensively tested and tweaked over the course of a golf season and worked really well with a number of different inserts images. Does not work for oversized Golf Balls (eg. Callaway Supersoft Max)Recommend to use a fine and/or ultrafine Sharpie marker pen or Milwaukee 48-22-3100 Inkzall marker pen for insert stencil imagery.Can be used with the following stencil logo inserts. 4 Leaf CloverBeaver stencilBlue Jays MLB Team stencilButterfly stencilCanadian Flag stencilCat Paw stencilCross stencilDog stencilFish stencilFox stencilGolf hole/flag stencilHeart stencilKNVB soccer (Netherlands national) team stencilLion Head stencil Lines stencilMaple Leaf hockey (NHL) team stencilMoose Head stencilTerrier stencilToronto Raptors basketball (NBA) Team stencilBelow is a photo of all the stencils (SLA printed) that work with the Golf ball stencil holder. Create your own stencil logo inserts using the stencil template that can be downloaded.Stencil template Video on how to insert stencils into the V3 Golf Ball Marker Holder Assembly8 6mm x 2mm magnets (available at Amazon.ca) need to be placed into preset holes during the pause in printing. I recommend marking the sides of the magnets with a sharpie marker to aid when placing the magnets into the slots so that they have the correct orientation to attract instead of repelling when the two halves are brought together.optional lanyard (not part of the model) can be attached via the holes in the handle. Printing TipsMulti-filament FDM printer (eg PRUSA XL dual head) with the golf ball holder printed in PETG and the flex hinge printed in a flex filament (eg. TPU). Requires a pause print at layer 16 (2.4mm) to allow magnets to be inserted. Place model in slicer on print bed with inside of holder facing down (as per image)Use painted snug supports (see image - blue) for TPU hinge and PETG ball marker holder underside wings.Using PETG print settings it is recommended you add a modifier over TPU print area (see image - yellow zone) to slow speed of TPU print (20mm/s) versus PETG print area.Recommend 0.2mm layer height, 2 perimeters with 10% infill for non TPU areas.TPU areas set layer height to 0.1mm from 1.6mm to 2mm model heightPrint file included is for PRUSA XL includes pause print, painted supports, print speed modifier for TPU, Version ID (text embossed on inside edge) and is set for PETG and TPU. Printed version available on ETSYThis item along with 2 inserts is also available for purchase at PrintSphereDesign Etsy store with free delivery in Canada and USA. SupportIf you are interested in the Anycubic Photon M5s Pro SLA printer (I use this one for the inserts) or other Anycubic printers and want to learn more please go to Anycubic Store. For $25 off use this CPMTPFIZJP coupon code at the Anycubic Store.
With this file you will be able to print Golf - Golf Ball Stencil holder V3 (hinged & embedded magnets) - requires multi-filament FDM printer with your 3D printer. Click on the button and save the file on your computer to work, edit or customize your design. You can also find more 3D designs for printers on Golf - Golf Ball Stencil holder V3 (hinged & embedded magnets) - requires multi-filament FDM printer.