GoldiBox Fluid Sluice Box (Model #5)
thingiverse
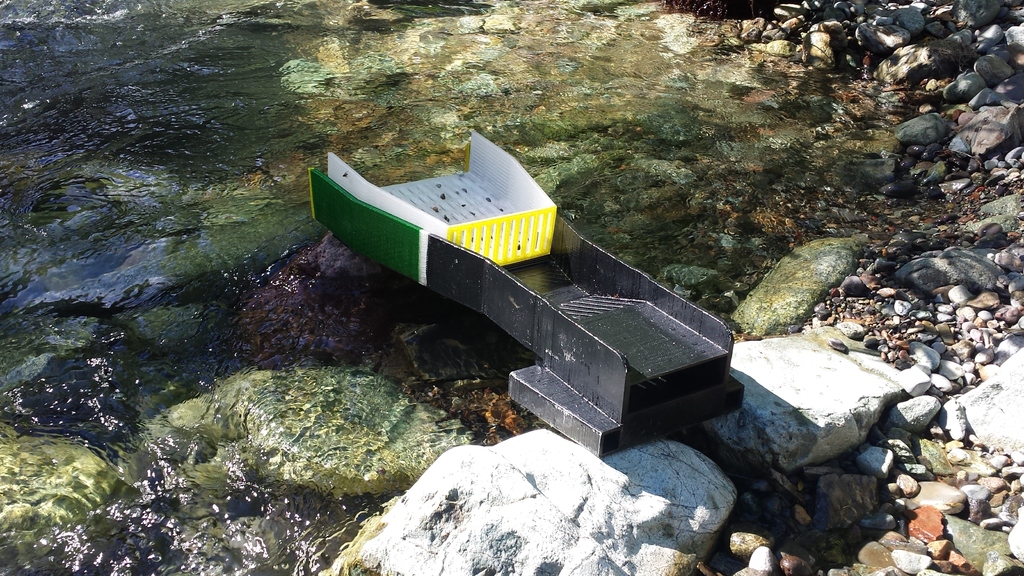
This is the GoldiBox Fluid Sluice Box, Model #5, from my GoldiBox series. It's a medium-sized fluid sluice box for gold prospecting that measures 22.5 inches in length and comes with an inline classifier and printable indicator matting. The GoldiBox Fluid Sluice (Model #5) can process a significant amount of material, and when you're done running, only heavies and concentrates remain in the trap - black sand and gold. If you like this design, please click on the "like" icon to encourage me to release my other designs. This version is simple to set up and operate, recovering both coarse gold and fine flour gold. It has been extensively tested for three years in gold rush country in Northern California and works very well. It can process about four to five buckets per hour, depending on the type of material you're feeding it. For muddy or clay-laden material, the classifier is very convenient as it allows water flow to break up the material without washing it straight out the sluice. All gold pictures are of gold that was recovered by the GoldiBox in Butte Creek, less than two miles from home. Here's a link to two videos of the GoldiBox running: Setup: https://youtu.be/10cAEvqe898 Gold in the mat: https://youtu.be/6Tbe77L9K84 Print Details: The trap and flare have integrated biscuit joints to join the sluice together. The joint requires epoxy. I recommend using Gorilla Glue Epoxy or another 2-part epoxy when joining the pieces together. There's a pocket on the surface of the sluice to accept the indicator matting. The mat fits flush in the pocket and needs to be glued in place. I use a light coating of epoxy on the bottom of the mat, but silicon would work just as well. All parts are printed in PETG. The mat is printed in PLA, but you could use any material. Black, dark blue, dark green, and purple provide the best contrast for gold. The classifier requires four M5 x 15 mm bolts that serve as legs. There are four holes modeled in the classifier to accept the bolts. All parts but the mat should be printed vertically with the following orientation: 1. Trap - The end of the trap should be placed on the build surface so the joining end (to flare) is at the top of the print. 2. Flare - The end of the flare should be placed on the build surface so the joining end (to trap) is at the top of the print. 3. Classifier - The classifier should be printed with the front wall on the build surface so the open end is at the top of the print. 4. Mat - The indicator matting should be printed flat on the build surface. If you print this, please post a picture or video of your make to encourage me to continue developing new ones. Also, please click on the "like" icon. If you'd like one of these printed for you in a custom size or color, please message me. If you're interested in a full-sized Bazooka-style fluid sluice box, check out my GoldiBox (Model #6) here: https://www.thingiverse.com/thing:4207446/files Happy prospecting!
With this file you will be able to print GoldiBox Fluid Sluice Box (Model #5) with your 3D printer. Click on the button and save the file on your computer to work, edit or customize your design. You can also find more 3D designs for printers on GoldiBox Fluid Sluice Box (Model #5).