Goblin FPV Drone
prusaprinters
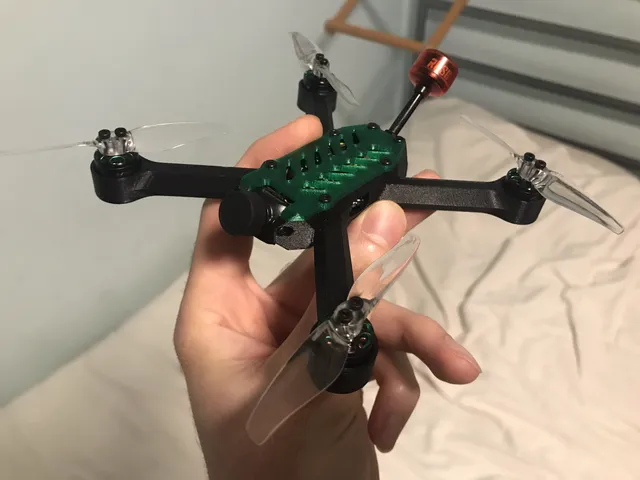
ATTENTION: as of 5/24/2023, all files have been replaced with a structurally reinforced and improved V2 version. It is highly recommended that you use these new models instead of the old ones if you have already downloaded them. ATTENTION: as of 7/3/2023, all files have been once again replaced with a structurally reinforced and improved V3 version that aims to fix an issue where the connection between the arms and body cracks during hard landings. It is highly recommended that you use these new models instead of the old ones if you have already downloaded them. I worked hard on this little guy. Poured love into every edge and crevice. Spared no mechanical consideration. And what a beautiful little goblin he turned out to be. Now to get a bit more technical:This is a 3 inch drone frame. Mine is printed using carbon fiber PETG for the body and translucent green PETG for the top. I'll list out the specific electronic and mechanical hardware that I used below, I know this combo works and pretty damn well at that. If you don't wanna choose parts for yourself, follow this list. Electronics:AIO flight controller ESC - JHEMCU GF16-BMI 16X16mm 2-4S Stack: https://www.aliexpress.us/item/2251832697381294.html?spm=a2g0o.order_list.order_list_main.4.1ad71802ASurZg&gatewayAdapt=glo2usa&_randl_shipto=USVTX - HGLRC Zeus Nano: https://www.aliexpress.us/item/3256802524762750.html?spm=a2g0o.order_list.order_list_main.55.1ad71802ASurZg&gatewayAdapt=glo2usa&_randl_shipto=USCamera - RunCam Nano 2 w/ 2.1mm lens: https://www.aliexpress.us/item/3256803814960647.html?spm=a2g0o.order_list.order_list_main.59.1ad71802ASurZg&gatewayAdapt=glo2usa&_randl_shipto=USELRS receiver - (Ok literally any micro ERLS receiver will do, but I used the HAPPYMODEL EXPRESSLRS 2.4GHZ EP2 w/ ceramic antenna) https://www.defiancerc.com/products/happymodel-expresslrs-2-4ghz-ep2-nano-tcxo-receiver?_pos=3&_sid=974c3de92&_ss=rMotors - flashhobby A1106 1106 6500kv Brushless Motor: https://www.aliexpress.us/item/2251832722738055.html?spm=a2g0o.order_list.order_list_main.89.1ad71802ASurZg&gatewayAdapt=glo2usa&_randl_shipto=USBattery - Only 2s OR 3s (At 3S the ESC can handle 3020 props at most, and the motors can't handle 4s at all) battery between 500 and 1000mah. At the moment my favorite battery to use for this drone is this one: https://www.amazon.com/TATTU-Battery-650mAh-Torrent-Lizard/dp/B071GBGBB4/ref=sr_1_2_sspa?crid=AOCXSAFRMEE3&keywords=tattu&qid=1688486035&sprefix=tattu%2Caps%2C83&sr=8-2-spons&sp_csd=d2lkZ2V0TmFtZT1zcF9hdGY&psc=1CONTROLLER - Any 2.4ghz ELRS transmitter will do. I am using the iFlight Commando 8: https://www.defiancerc.com/products/iflight-commando-8-expresslrs-2-4ghz-radio-transmitter?variant=40149241593925¤cy=USD&utm_medium=product_sync&utm_source=google&utm_content=sag_organic&utm_campaign=sag_organic&gclid=CjwKCAiAuaKfBhBtEiwAht6H73xb5lqtmJCr2-SpOMYZx0KNoJ802KjWH14zCv9fZTnCzhpVU2akDxoCWRIQAvD_BwE Mechanical Parts:6x M2x4 insert nuts4x 3020 propeller (or any another 3 inch propeller, or even 2.5 inch for that matter)10mm x 180mm velcro strap: https://www.getfpv.com/lumenier-indestructible-kevlar-lipo-strap-10x180mm-3pcs.html6x M2x6 screw (for securing top to body)18x M2x5 screw (16 for attaching the motors, 2 for securing VTX)4x M2x14 low profile* screw and 4x M2 nut (for attaching flight controller esc stack)Additional* - You will need 2x M2x4 screws for attaching the camera and 8x M2x7 screws for attaching the propellers, but at least in my case, those screws were included with the camera and motors. *low profile screws are preferable for mounting the stack because that way the heads will not protrude from the bottom of the drone and will allow you to safely strap batteries to the bottom. Total Cost Estimate: Drone: ~ $120 before tax Transmitter: $90+ Assembly Guide:(please have some prior drone experience, that said I'll be happy to help just leave a comment or something if you've got a question)Go ahead and print off both pieces. I'll wait. Oh, I should mention - use the good settings, no supports needed.Start with the motors, thread the wires through the drone's arms, then tighten the motors down with the M2x5 screws, be careful not to overtighten.Solder up wires to the VTX, if it arrived unsoldered. If you're using the Zeus Nano as I did, you can snip off all but the closest mounting points, and mount to the built in holes of in the rear part of the drone. The screws go directly into the plastic. Make sure you mount with the antenna port facing up. If you are not using the Zeus Nano, you can edit the .step files to fit your VTX or just kinda mush it in there and hope for the best.Suspend only the ESC part (there are two pieces in the stack) of the stack 2cm or so above its future spot in the drone using a soldering helping hand or some other method. Make sure the ESC module is facing forward (same for the flight controller when you install it later)Cut the motor wires down a little, so that the ends of the wires overlap the solder pads while the ESC is elevated. This will give a bit of extra slack. Be careful soldering, strip all the motor wires and (preferable) using a pair of tweezers, solder them to the ESC pads. Thread an antenna through the hole in the back of the drone, and snap the connector into its place on the VTX. I purchased the Zeus Nano option that comes with a RUSH Cherry Antenna, it is the perfect size and its stem is exactly 4mm in diameter, and the drone was designed to accommodate it, but thinner antennas will fit trough the hole as well. Prepare the XT30 connector that came with ESC (or your preferred connector) and cut the wires down to 40mm each (or whatever you prefer bro), then thread through either the left or right slit in the rear of drone. It's up to you which you choose.Solder the XT30 wire leads to the ESC, be careful to get the polarity right and not short out any component. Now, lower the ESC module into place and thread through the four M2x14 screws, pop on the flight controller part of the stack too.Using the tweezers, carefully solder the VTX wires to their proper spots on the flight controller. You'll need a wiring diagram to know what goes were, and any manufacturer who knows what they're doing will provide one to you. Excellent! We've got the flight stack and the VTX installed and wired up. Secure the camera to the frame. Whichever one you end up choosing, it must be 14mm wide and have M2 mounting holes. Honestly the RunCam Nano 2 is perfect, highly recommend. Solder the camera wires to their correct spot on the flight controller. Lastly, the receiver. If it came with wires soldered on already, great! If not, solder them on yourself. I believe all ELRS receivers use 4 wires. Once you've done that, solder the connections to the flight controller. With that, you've completed all of the electrical connections. Congrats!You can line up the cover and tighten it down. Ok ok ok. I know. There's still a lot of configuration to do. I'm, not gonna go into detail about that here, but If you are new to this check out Joshua Bardwell on YT. As far as drones go, the guy's my lord and savior. He will teach you everything you need to know. I will say, if you find that your motors are spinning in the wrong direction, you can change that configuration. And with that I'll say, good luck, druz'ya moi.
With this file you will be able to print Goblin FPV Drone with your 3D printer. Click on the button and save the file on your computer to work, edit or customize your design. You can also find more 3D designs for printers on Goblin FPV Drone.