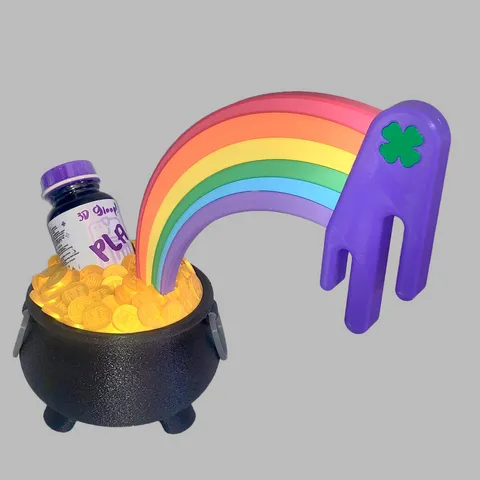
Gloop! Holiday Cauldron (St. Patrick's Day)
prusaprinters
Happy St. Patricks Day Gloopies! Our Robot Overlords don't know much about Irish folklore and yet somehow, they have managed to track down a few leprechauns only to discover that Gloop! bottles were stored in their pots of gold! - Must be some really coveted stuff eh?They did say it wasn't easy to find the end of a rainbow. Something about a guy named Snell, mathematical derivation, the number 42, spectral phase modulation, blah blah blah… All too complicated for us biological entities… The point is, the sight of all that Gloop! piled in with the shiniest gold coins was quite magnificent! So! To join in on the fun and enjoy the festivities of St. Patrick's day and Irish folklore, the Overlords generated the Gloop! Holiday Cauldron for you all to print! And we've got to say, it looks fabulous! Just a heads up, this print is not for the faint of heart. The total print time of what is pictured is around 56hours and our model uses 11 different colors of filament. With that said, the Overlords were kind enough to provide us with a few different versions of the print! First and foremost, the coins come in two versions and two options.Versions: Reduced or Detailed Options: No-Rainbow or RainbowThe Reduced coin design is the easiest to print and works well on a 0.4mm nozzle. The Detailed coin design should be printed with a 0.25mm nozzle in order to resolve the Gloop! icons on the coin faces. If all you have access to is a 0.4mm or larger, it's not worth trying to print the detailed coin design. It doesn't look very pretty… 😥Our team used the new Revo 6 hotend with the swappable nozzles to print this entire model. WOW they are impressive! For those of you who don't want to print an entire rainbow, each coin design also has the option of being printed standalone or with the rainbow locating feature. Printing TipsAll models can be printed without support material. The Cauldron is printed upside down. It does have a small contact area, so an adhesion promotor might be recommended if you have a build platform that likes to let go of prints. Our team opted for fuzzy sink on our cauldron. Default settings in Prusa Slicer produce AMAZING results. Seriously, pictures just don't do this justice. We've included the pre-sliced g-code file for the cauldron. We recommend printing that file directly, but if you need to slice for different printers, we recommend using a variable layer height on the feet of the cauldron and a fuzzy skin modifier (blocker) around the icon on the bottom of the cauldron. Colors UsedCauldron: Inland Light PLA BlackCauldron_Handles: 3DX Tech ECOMAX Dark GreyCoins: Eryone Silk Gold PLARainbow_Purple: Polymaker PolyTerra Purple Rainbow_Blue: Inland Light PLA TurquoiseRainbow_Green: Inland Light PLA GreenRainbow_Yellow: Inland Light PLA YellowRainbow_Orange: Inland PLA+ Orange Rainbow_Red: Inland PLA PRO RedDrip_Front & Back: Polymaker PolyLite PLA PurpleClover: 3DX Tech ECOMAX GreenAssembly TipsAs for assembly, it is pretty self-explanatory. Inserting the Cauldron_Handles into the Cauldron is very simple. Using a little bit of force, spread open the Cauldron_Handle and insert one side into the handle eyelet on the Cauldron body. Continue applying a bit of force to open the Cauldron_Handle a bit more so that it can enter into the other side of the handle eyelet. We opted to use our PLA Glue Gloop! for the rainbow sections just applying a thin bead down the middle of each arc. Press each arc firmly into one another when gluing ensuring that both ends align relatively closely. For the Drip at the end of the rainbow, again we used our PLA Glue Gloop! to glue the clover into the Back_Drip first. Then apply some Gloop! on the mating surfaces of both back and front prints and aligned them accordingly.To glue the rainbow to the drip, we opted for our PLA Gloop! and applied a liberal coating to both mating surfaces ensuring that both surfaces were “wet”. (Don't apply too much or you will have a lot of squeeze out!) Hold the pieces together for a minute or two to make sure they stay aligned. From there, we recommend letting the whole thing cure for about an hour before attaching the rainbow to the coins. Once you're ready to attach the rainbow to the coins we recommend finding something to prop up the rainbow so that it can sit in the locating feature in the coins without you holding it there. It will take about an hour for the Gloop! to cure and holding it in place might not be fun… Again, apply our PLA Gloop! to both mating surfaces ensuring the joint is “wet” and press the rainbow and coins together. Some squeeze out is good, and you will want to hold these pieces together for a few minutes until they set up enough to prop up the rainbow. That's it! Now it's up to you if you want to Gloop! in your coins into the cauldron. With or without the Gloop! bottle, the print is fairly stable. There is some room between the bottom of the coins and cauldron that can be filled with sand or something heavy to make the print more stable without the Gloop! bottle installed. Happy Printing! Our Overlords can say for certain, but there may be future designs coming to the Gloop! Holiday Cauldron. 😉
With this file you will be able to print Gloop! Holiday Cauldron (St. Patrick's Day) with your 3D printer. Click on the button and save the file on your computer to work, edit or customize your design. You can also find more 3D designs for printers on Gloop! Holiday Cauldron (St. Patrick's Day).
