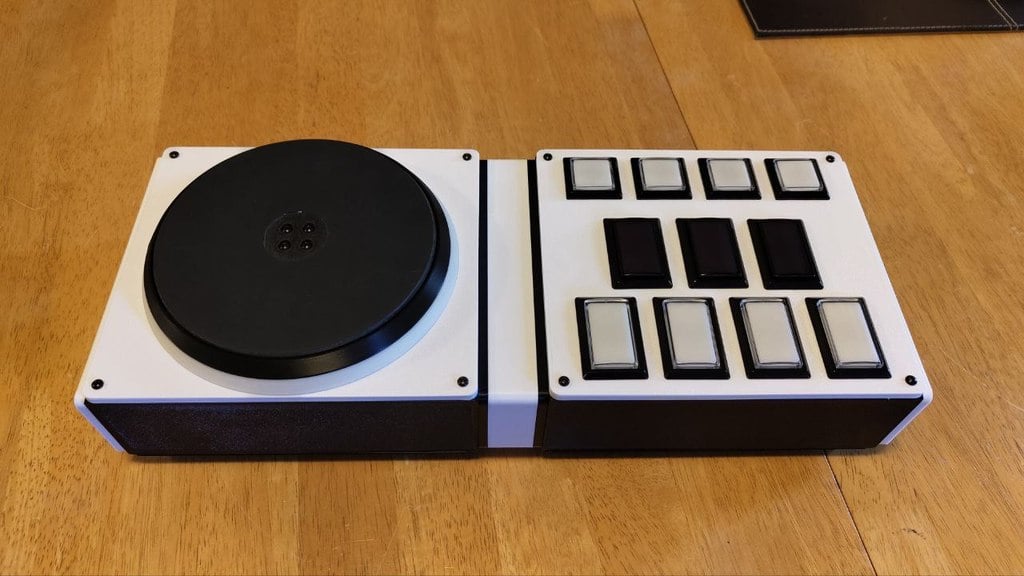
GJ-Tho Modular - Beatmania IIDX controller
thingiverse
Fully modular 3D printable case and turntable to make an Beatmania IIDX style controller..Please note this is work in progress. There might be changes to the model and files in the future. Guidance are currently work in progress, at the moment it may be messy to read. hopefully the pictures will be good enough for now.Update May 2024:Added two new 5key button panels. suitable for old school Beatmania or ez2dj.Biggest parts to print are about 170x190mm. so make sure your printer have big enough bed.Compatible buttons: Sanwa, Samducks (as shown in pictures) and chinese clones should all fit.Please also note that this project is only for the case and turntable. you are on your own to figure out the electronics and stuff... you may find some useful information here: https://rhythm-cons.wiki/w/Beatmania_IIDXYou can also join the great community of Cons&Stuff on Discord https://discord.gg/fknwz8sNon 3D printable parts you will need:Screws M3:16x 10mm - for the top and bottom panels.3x 6mm - for the encoder.4x 20mm - for mounting the turntable_top and ledmount to the panel.16x 12mm - for the turntable parts.and about 20 nuts.Screws M5:8x 15mm - for the side panels parts.4x 70mm - for the center.12 nuts.Other parts:Optical encoder and a coupler. Please see pictures and Part Resource further down.16x m3 threaded inserts for the panels (4x for each frame part). outer dimension should be something close to 4mm. length about 10mm.Ledstrip - maximum 8mm in width.Obviously you need more parts in order to finish the build. like buttons, wiring, connectors, microcontrollers etc... but you can follow other build guides for this. What I am sharing here is for the case and turntable assembly only. I rely on others work for the rest. Please refer to the wiki link for more informations about parts to complete your build.Notes:You can adjust the turntable distance to buttons by changing the height of the center part in your slicer.Note there are two types of the case frame parts. you need two of each. one have mounts for the nuts on each side, one only have a hole, which is the side you insert the m5 screw.There are also m4 mounting holes on the backcover. so get any rubber feet you like and attach it using m4 screws and nuts. There is also a ver2 backcover without these holes if you would prefer to attach adhesive rubber feets instead.Also note there are two Turntable panels. the one shown in pictures was mostly made for saving filaments when printing... but it is probably best to use the simple solid one.Print the turntable_bottom part using transparent material if you are planning to use leds. The turntable_ledring parts is intended for mounting ledstrip with a maximum width of 8mm.I made the turntable_encoder-lock part as an option. you can use this with the coupler and insert m3 nuts. this way you can attach and detach the turntable disc without disassembling.I used a Arduino Leonardo for my build. you may use the Leonardo mount and attach it inside the case using mounting tape.The side_usb part is intended for Neutrik panel mounts. but there are cheaper chinese clones with usb-c connectors you can use too.There are also some parts for the center if you wanna make a double controller. You can either use the panel with buttons or without. also includes a Frame parts with 2 neutrik panel mounts incase you would prefer the usb connection location here, and use the center chamber part as a location for the pcb.Please notice, for the lamp holder connectors on the buttons, you may have to use crimp connectors with an angle, like shown on one of the build pictures.By the way, please use flat head screws. (low profile) for better look. But its all up to your personal taste.Hopefully this information covers mostly of the build... but feel free to message me if you are struggling. Again note that this project are still work in progress.And of course, you don't need to build this using my guidance. feel free to improvise! I would love some feedback if you choose to build a controller using this design, in order to improve it further.Good luck with the build and have fun!
With this file you will be able to print GJ-Tho Modular - Beatmania IIDX controller with your 3D printer. Click on the button and save the file on your computer to work, edit or customize your design. You can also find more 3D designs for printers on GJ-Tho Modular - Beatmania IIDX controller.
