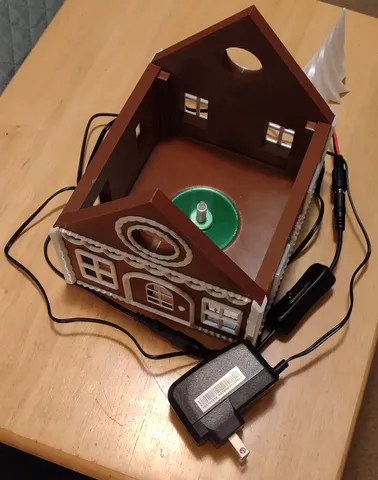
Gingerbread House LED Base and assembly components
prusaprinters
I posted this base upon request. This assembly was quite a challenge to fabricate so as a courtesy to anyone interested I am posting the methods I used. In this assembly the roof is not attached and can easily be lifted off to replace LED, etc. Printing:Note: I used coffee brown and silk white for this assembly.1) Printed the original roof, sides, chimney, chimney icing, and corner icing parts as is. I printed the original icing for the sides, front, back, and rooftop with a negative Z on the build plate to flatten the backs for ease of printing and assembly.2) Printed Aggro Magnet's front, back without windows. and two windows. Note: At the time of my printing there was a 1 layer strip across the back of the Front with windows (front_final.stl) so I simply set Z on my build plate to minus 1 layer.I also printed his front stretched with most of it below the build plate so I could create a roof support 125mm long with the perfect angle.Note: Set Z just above the window icing to get enough contact with roof pieces and still clear the chimney.3) Printed my models Assembly:Base wired with 12v LED and pigtail wire. We use a switch and 12v power supply. The LED Mount fits tight into the base by design so it stays in place without glue yet can be removed when needed. You may need to file a little to get it inserted properly.Note: I supplied my original models in case someone wants to modify them for alternate wiring.I used super glue to attach parts as follows:Note: I only attach one piece at a time and let it set before attaching another.1) Glue sides to base aligning frontNote: I ripped off the top icing on the sides because it interferes with the roof and isn't visible anyhow. It pulled off easily with needle nose plyers.2) Glue 2 windows to back using my alignment tool as needed.3) Glue front and back aligning and squaring the sides as needed.4) Glue on corner icing 4X. Note: File the angled end as needed to make sure it doesn't stick above the front and back so the roof seats properly.5) Glue roof halves to 125mm long roof support making sure the ends are aligned so icing sits flush. Make sure of orientation of icing on the roof halves.6) Glue my side ice hangers to the bottom edges to so we can attach icing and it hangs down at the right angle.7) Glue side icing onto the hangers8) Glue my rooftop peek onto the top of the roof to create a flat surface to attach top icing.9) Glue on the angled front and back icing10) Glue on the top icingNote: Mine was long so I snipped the thin end and filed it to fit between front and back icing.11) Glue the chimney icing to the chimney12) Glue the chimney in place Note: The fit up on the chimney is not good and parts of it are so thin light shines through so I caulked all around the inside of the chimney to block light (as seen in above picture).To dress up the LED I printed a Spiraled Christmas Tree 90mm high in silk white and drilled a hole in the bottom to fit down over the LED.If you use my LED Base and/or methods, I would appreciate it if you would post a build
With this file you will be able to print Gingerbread House LED Base and assembly components with your 3D printer. Click on the button and save the file on your computer to work, edit or customize your design. You can also find more 3D designs for printers on Gingerbread House LED Base and assembly components.
