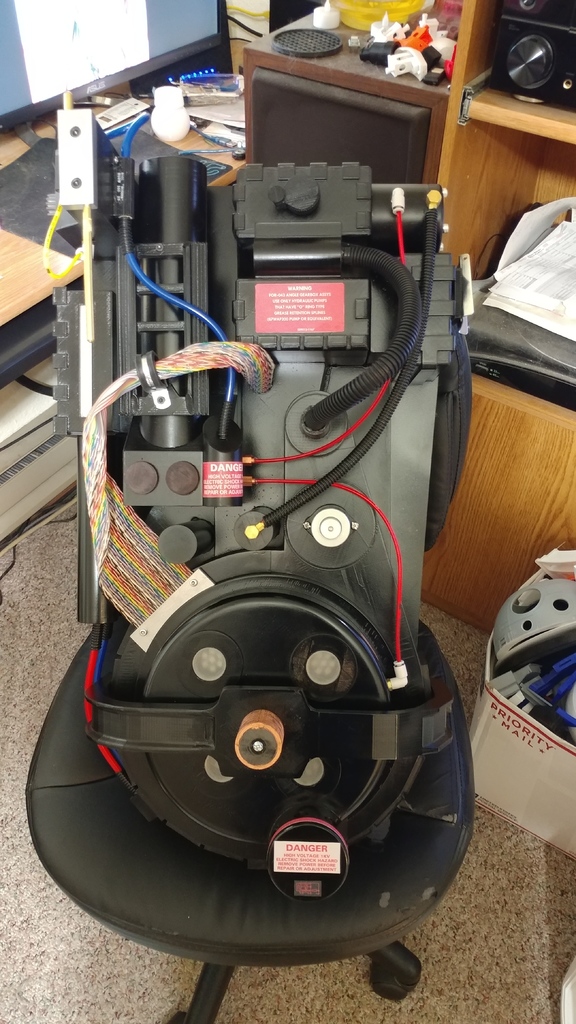
Ghostbusters Proton Pack
thingiverse
8-19-19 Update...sort of, and a sad one at that. I had been working on some small tweaks and updates on and off for a while, but sadly due to a recent hard drive failure and the resulting complete loss of all my data and related files, I have to change this to "complete" instead of "work in progress" as I don't have time anymore to restart from scratch. I wanted a proton pack so I drew one up :D Adding as a note as a couple people asked, the sync disk/Clippard valve mount is designed so a real valve can be used without any modifications. The center hole can be used for alignment with an allen head bolt while your glue dries. Once the bolt is removed, the valve will drop right in. I used Stefan Otto's plans http://www.gbfans.com/wiki/Stefan_Otto%27s_Prop_Plans The cyclotron is meant to be bolted to and held in place by the bumper so you can remove it easily for electronics. This is still a bit of a work in progress. Everything here will print and fit together as it should, but nothing is cut for any particular bed size. The gearbox knob, the booster "ladder" and the Clippard valve are not here. I used the ones from DancinFool82 https://www.thingiverse.com/thing:1128019 Any questions please feel free to ask and let me know/post some pics if you make one :) 5-21-19 Added a couple pics hoping to help show how the Syc spacer ring fits into the spacer top. 5-1-19 Added a STL and a DXF for the motherboard. 1-4-18 Added a hollowed out N Filter base. "N filter hollow". Inner diameter is the same as the top. Also for the top half, if you want to open the holes up, a 1/2 inch drill will be what you need. I left the holes closed as I found I get a nicer finished hole drilling them after. 1-11-18 Added a shorter cyclotron LED option to hold adafruit neopixels. Cyclotron LED Short, and cyclotron LED Neo. The two parts snug fit together. LED Neo has a short recess in the bottom for the neopixel to snap into. 1-12-18 Made a slight adjustment to "Crank gen 2". Made the hole for the loom a bit larger. Also some minor tweaks on the holes on the sync disk. 1-14-18 Made some adjustments to the left and right bumper mount blocks. Made them a little taller to fit a bit better in the cyclotron mount and added recesses for nuts. 1-16-18 Added a cutout cyclotron and cyclotron cover to fit with the hollowed N filter. 1-25-18 Shortened the legris fitting a bit and tweaked the EDA box to fit against the crank gen a little better. Also adjusted the loom hole in the fill tube. Turns out the 3/4" loom I had here wasn't actually 3/4". 2-2-18 Added a bumper and bumper spacer. Added lenses for the power cell and cyclotron LEDs to be printed in transparent filament. Minor update on the HGA, adjusted the sizing on the fitting and bolt holes. Also thinned out the spacer details 1x10, 2x1 and 5x1. 3-12-18 Added an updated version of the motherboard drill guide. Removed all the unnecessary holes.
With this file you will be able to print Ghostbusters Proton Pack with your 3D printer. Click on the button and save the file on your computer to work, edit or customize your design. You can also find more 3D designs for printers on Ghostbusters Proton Pack.
