Ghost Themed Clip
prusaprinters
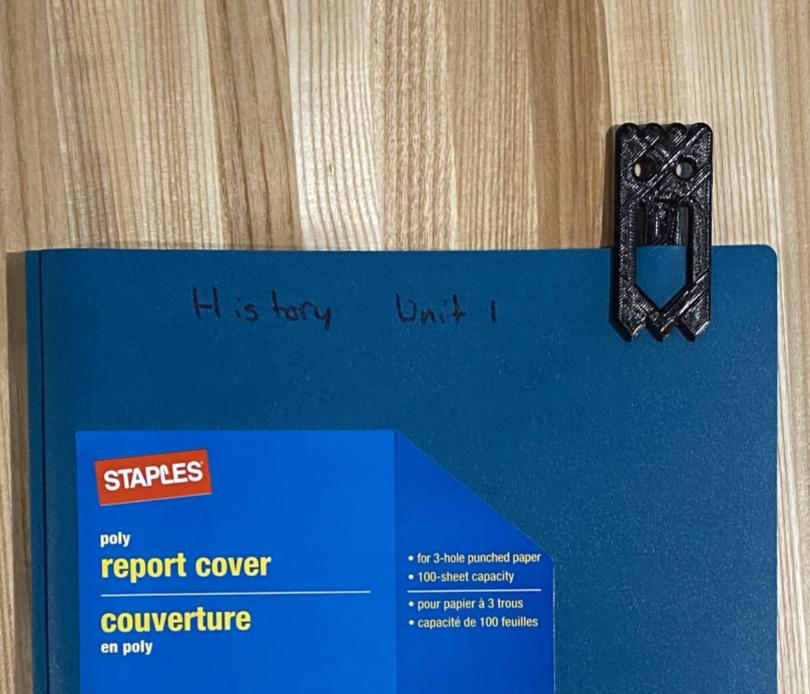
<p>Summary Cont - Yet it can function for much more in your home, office, or place of work. The overall dimensions are 6.9 cm long, and 3 cm wide. It is also 0.2 cm in height. It is able to be bent to hold paper, your page in a book, or a whole folder together. I designed this, alongside my partner Chloe. (Printables username Chloe.Z). </p><p><strong>Lesson plan/activity - </strong></p><p>With a partner, you will recreate a presented Ghost Clip using Solidworks. You and your partner must have identical files that are produced from collaborating step by step throughout the project. This was an activity for my Intro to Engineering Design Class. </p><p><strong>Design Process - </strong></p><p>The first step of our design process was to find accurate measurements of the original ghost, then reproduce these at 2 times scale on a piece of graph paper. </p><figure class="image image_resized" style="width:21.56%;"><img src="https://media.printables.com/media/prints/299133/rich_content/cf4cfa9e-facc-4712-9b59-a1ca53488a6b/image.png#%7B%22uuid%22%3A%226d5007fe-0279-4639-a6f1-45b90ebf9f18%22%2C%22w%22%3A421%2C%22h%22%3A674%7D"></figure><figure class="image image_resized" style="width:27.17%;"><img src="https://media.printables.com/media/prints/299133/rich_content/a47661ab-b800-4e28-b5af-1906ee6f3d0e/untitled-drawing1.jpg#%7B%22uuid%22%3A%22c7796277-84bd-4e9a-96d6-536fca088846%22%2C%22w%22%3A249%2C%22h%22%3A265%7D"></figure><figure class="image image_resized" style="width:31.07%;"><img src="https://media.printables.com/media/prints/299133/rich_content/5add2cf4-7cf4-4d50-b210-29c8b275004f/untitled-drawing2.jpg#%7B%22uuid%22%3A%227e8eb195-d17d-4d2e-9930-695280846661%22%2C%22w%22%3A132%2C%22h%22%3A128%7D"></figure><p>This was all designed alongside my partner Chloe, we then made a document with our plan for sketching in Solidworks made out, we then continued forward and started our sketch. To start we made a constraint box with the measured dimensions of 6.9 cm by 3 cm. </p><figure class="image image_resized" style="width:30.48%;"><img src="https://media.printables.com/media/prints/299133/rich_content/9f1fa4c8-8206-4725-8df9-4e7ab9f6427b/screenshot-2022-10-21-100607.png#%7B%22uuid%22%3A%22783a44ac-fb80-4d08-b915-61288a477bc6%22%2C%22w%22%3A541%2C%22h%22%3A813%7D"></figure><p>Following this we created the four semi-circles seen at the top of our Ghost. We did these according to our drawing, they contained a diameter of 0.75 cm, and height of 0.4 cm in the drawing. Yet these were changed, we kept a diameter of 0.75 cm and no dimension for the height. As we found these to be more accurate. </p><p><img class="image_resized" style="width:49.73%;" src="https://lh4.googleusercontent.com/_3IwpOvu3R_wOopFpByoJCFTFMYCWbSi-XHF6GK7pSJWOUBdpOSXiIy9Cuyi3XBcWks5bA5ZTt5wWanjuXrWVkH8Zmkdn1360bVltvwZqz178tck5F2tavdVk0F6iV3uKtEali5hG39mSN2Blk9MIGdgeDzL3jgAHLtIj7HEYWyd8BKWdqk5nKYLzw"></p><p>Next to create the triangles at the base of the figure, we set a construction line for the height of all our triangles to be in line with. Then set a series of points on the edge of the constraint box for the points of the triangles. This box was the whole width of the figure and 0.6 cm high. We had originally planned to make one half and then mirror them, but we were recommended to change this to make them all at once, so we did. Each triangle was set to be 1 cm wide, so the points were placed at the midpoint of each triangle 0.5 cm each vertex. </p><p><img class="image_resized" style="width:53.28%;" src="https://lh4.googleusercontent.com/nUDqe7OgGTDuNWt9gZOMGEP33WfoG3krDTw5YQju1w9eE1YMD7MOG60YyKM5PgHjTJ_qQgpHXMGAFbiT22-zTVTuc1qN3yGKXBjKhjbsRWWjpZq4bHoa8NJYsfZsakhylvlWaiIy2k49Yh35mQlO99IHHHaa39RvFYGowNz7bI7VdSF9orMLZv3CXQ"></p><p>Continuing we created the eyes of the clip next. Another issue with our design plan occurred when we decided to change the dimensions of the eyes within our Solidworks sketch in multiple ways. We changed the distance the eye was from the side of the ghost from 0.6 cm to 0.55 cm. As well the radius of the circular eye from 0.7 cm to 0.6 cm. </p><p><img class="image_resized" style="width:37.12%;" src="https://lh6.googleusercontent.com/MFuV9EQ04slyrJ85ZhxOilkuE_BvdWPEWqi602oMBOGxN-pWcrg1qhXCf5Li8Vl5vafAIZy3XbSR4fqPDpXHkSW_4oPGdOGmQsc4btMnZAN918atb7nvYrqtfi_neIWdKeVv5te8n6C9-k2Kai8arRD0fsM2kYAN73jHNpDM_TvERTUNMX9j9aRWRw"></p><p>Then we mirrored the eyes successfully flowing through these changes.</p><p><img class="image_resized" style="width:45.68%;" src="https://lh4.googleusercontent.com/2IIHtjybRiihVJx4FoI4DGH46zyTKxIRn3uJnECLMeN5H1ROfm74QMZKpoCdvlB0L_L-yJznmSWDPv5X4d21fEAj2IbTP4QNKLm5EPGT8rgUlh6LCkXtmnf8hmHHfnnOezwJvEcuvuzQGGaZBgrCDBD2i2Uk2zxd2sMw0HXRlsMva1ATU8bcmFsmSQ"></p><p>Continuing, creating the mouth of the figure is where we found the most struggle. Firstly we were to create a semicircle for the top of the mouth with a diameter of 0.35, which we later changed to 0.3 cm. </p><p><img class="image_resized" style="width:47.97%;" src="https://lh6.googleusercontent.com/Qp6e2p2mUjmQru0Vs2pyF3tJimFhdyZ0yfH8YL1xknwzKukKQnILC9p5rcN1Lb4CtZd0Kmhw2n944vMCs3tpdVBBPsOT3ARIpF7JXKeD_5F7-Pbv7kgNS16tRMwHu5VhdWzjpx93jRIRbVoOtNdbxDaGmy9k0Ds5U4kH5pPF1VQ_5fe5xs-OTWJvlg"></p><p>our idea was to design the whole mouth on one half then offset it to the appropriate distance. Yet we ended up just offsetting one line within the mouth, this was a construction line with a length of 2.40 cm in the middle of the right side of the mouth. Which was offset to 0.15 cm to form the line which created the longer side of the mouth. </p><p><img class="image_resized" style="width:44.41%;" src="https://lh4.googleusercontent.com/U6SY3aMD3BNRcu42lpTdgL0zVQSgVbbMWiwXxTIQetwXh8CMLKgF0t7wKiPfVQ3Gsgp_KWuDJH1ffu4aDoA8S-tZMgXBHx1CllPvX4qXbNKydb8EW-EK-ylMKeWiC2036OfhGUBU0LvtW0NBG8hZlExIMt2ryKAGJBxr7iV2Xymy8eX6RGK0YC4_-g"></p><p>Another change was how far away from the side of the figure this line was placed, in our sketch we said it would be 0.7 cm but it ended up as 0.65 cm.</p><p><img class="image_resized" style="width:30.12%;" src="https://lh5.googleusercontent.com/yw-8AzX4WHhcrlzMU1q8ywD0JRtfUQ7P9hbR6wOpC3RM4RdkXkScZwuco1Lz168yZVRou8o42AAJDjoDtjqrqsOt4CoMJkz6wS1ajhzz2OBGQobdcisF7WBe-LlL0u7ljjAfXMkiNFfeUA9WKTy18Cv6PHbpqELT57UmZ928Y0o0TaOn9ddt0yNhYg"></p><p> To create the shorter side of the mouth we just made a line that was 2.3 cm long, starting at the left endpoint of the semicircle and going down vertically. </p><p><img class="image_resized" style="width:12.07%;" src="https://lh5.googleusercontent.com/vu_O-lin3cdJPYI-vY9ovew_irpJ1_Ntmi3YThlqkxIkkLK-vNp1Y3FKekFaMUANwxAWDLu-YSy0dnd3U2sBLyVP_3hLhdxoYDHQfVc7Uv9akQDr0kQY8UP4KkYCj2UmnV_CcEvpC1r1vLVCL1DSjkrnUcOS1c1mcrBFO4OAqb4S_N3_ZTheYX4How"></p><p>Then we decided to make two points, measured from the point of the middle triangle which was perfectly centered, to make the lines for the diagonal part of the mouth. The lower point was set to be 0.9 cm above the base. Then we drew the line in. </p><p><img class="image_resized" style="width:36.44%;" src="https://lh5.googleusercontent.com/URIm2PF_gQ5hCAtM9WV6xbEs2XWLxQoE2ArwmBV4brBmvubQd3_7DHN5P3_oXOLJBLKXQORaSdJQOVUmfS-VSdohDuaUpGZW7erFarv6rvRTzu-ueXwbyRbATPOWNEKs6Rco-9pyanUQ7NbaGbyCJUKqAgTyVLpRRPYQFuNBBpHHRaxP5Iya85Mqag"></p><p><br> </p><p>To make the other line we ended up creating a line which was parallel to the previously created line, then manual relations these to be parallel and added a smart dimension angle to set them as fully defined. </p><p><img class="image_resized" style="width:23.91%;" src="https://lh3.googleusercontent.com/lomshMhUwYxK27Kb7exqwoniSGP671uT_8Hjh0zmAXz5HhSqx9isqbb5lXwVxwgyEf2ZInWckbgqZhDziCy3glhhf1xCt5MOI9_p7ZMjMcHOZ8wmEMpM_CViIWGuA5x7sklk84boT9duNWH5xNt0cTy0Ng7j2ndYG7A2B-BR9-RPEmca7GP0eWzLQQ"></p><p>To create the opposite side we mirrored the main lines of the mouth, than drew in the diagonal lines, with manual relations to make them equal to each other. </p><p><img class="image_resized" style="width:17.46%;" src="https://lh3.googleusercontent.com/9NjM9cVyTIIgSSViJh4JmAdIZRupVrEYPL2iu556Q8FPrDUhpIgf8ak_t3Ggx7Rj6qmGRg534ODBmmUb0vpGEnDVw83HLW6dsfAjdtI-AXp9dNr3ZLFxzKPsndcWaxJ-KcqTvgRQPXrhrVwbpj1Y6xcQNHeeOfdFvEsjXF7oDy3QxVUxyf406jVOqQ"></p><p>This is the final ghost file in total.</p><p> <img class="image_resized" style="width:40.36%;" src="https://lh4.googleusercontent.com/W2e4e-1nKWk1kPT3qsq4m4J2EboexHnYFLgat-PsqDJ-hjOW6rZHkhj3_zNruEw-avIRcDcVACGypYo9ghEJlZ5njDxRGBJxQNMc06QSJ8n7Dppkao3VixvXtjrBwqYd7HB6aghY1JDAa-T09TQAj3UabzySiYY5IW4vQJrktXNlpoPq8vlrKYKd6Q"><br> </p>
With this file you will be able to print Ghost Themed Clip with your 3D printer. Click on the button and save the file on your computer to work, edit or customize your design. You can also find more 3D designs for printers on Ghost Themed Clip.