Ghost Paper Clip (Halloween Themed)
prusaprinters
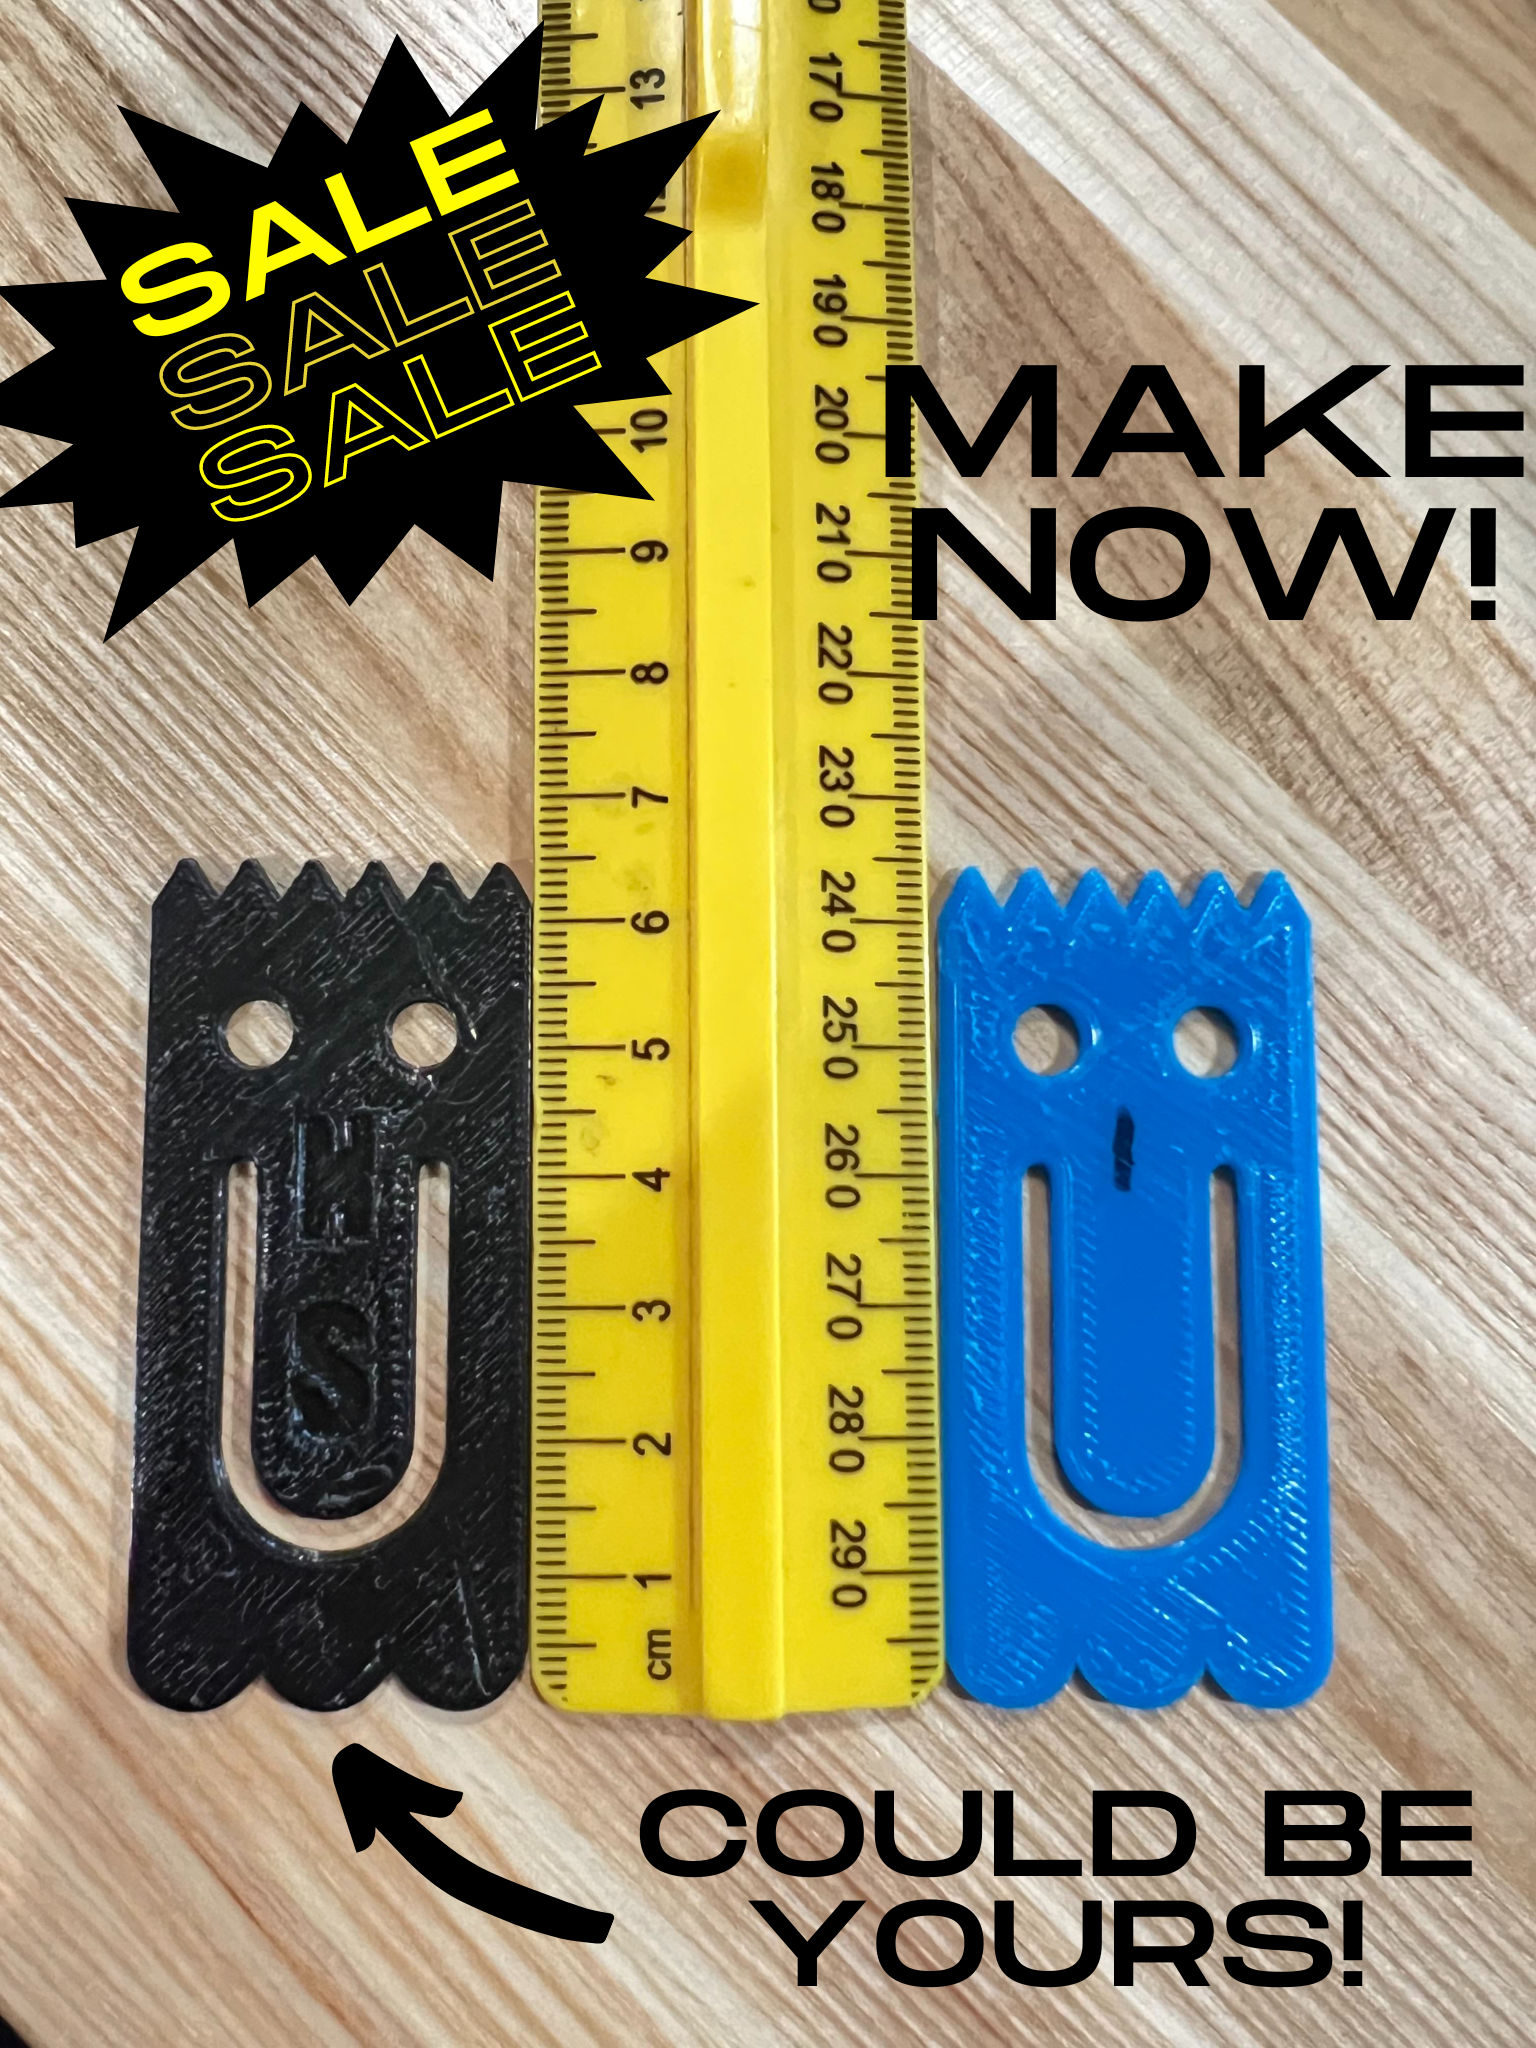
<p><strong>Summary Section:</strong> </p><ul><li>This is a one of a kind ghost paperclip. It was originally forged by The Dark Lord, Sauron, in the treacherous environment of Mount Doom. It functions as a paperclip, a bookmark, a toy, an action figure, fidget, a stencil, a pattern, a key, an in class distraction, a comb, a back scratcher, a ear scratcher, a measuring device, a weapon, a lock, a massager, a sharp object, a utensil, a hair curler etc. It is about 6.5cm x 3 cm x 0.2cm in size. Our one of a kind paperclip is not only stylish, but also conveniently fits into your pocket or book for easy transportation. You do not need to print any other parts to be able to use it, and can start having fun with your new ghost clip as soon as it is done printing. This paperclip was made in collaboration with Finn Roux. <a href="https://www.printables.com/social/395987-finnegan-roux/about">https://www.printables.com/social/395987-finnegan-roux/about</a> .</li><li>DOWNLOAD AND PRINT THIS AMAZING ONE OF A KIND PAPERCLIP</li></ul><p><br> </p><p><strong>Lesson Plan and Activity:</strong></p><ul><li>To make this amazing ghost paperclip for yourself, you must first find a partner. Once you have chosen one, you and your partner will recreate your paper sketch ghost clip using Solidworks. You and your partner MUST have identical files that you create by collaborating on each step, one at a time.</li><li>Your sketch must begin with a constraint box, and your dimensions should be detailed but efficient. The sketch must contain zero error messages, and the sketch must be <strong>fully defined</strong> when complete.</li><li>Both you and your partner must incorporate and show efficient use of Solidworks Features such as <strong>“Construction Lines” / ”Reference Geometry”, “Offset Entities”, “Manual Relations”, “Smart Dimensions”, </strong>and<strong> “Mirroring”.</strong></li></ul><p><br> </p><p><strong>Construction Instructions Section:</strong> </p><ul><li>Draw a center box off of the origin</li><li>Dimension it to match the dimensions on the drawing</li><li>Add a construction line to contain the triangles on the top. Dimensions specified on drawing. </li><li>Add a construction line to contain the half circles on the bottom. Dimensions specified on drawing.</li><li>Draw 3 triangles within the construction box at the top. Only draw them on the left side. Make points specified distances away from each other along the top two construction lines. Then connect the points in a zigzag pattern using line segments shown Each line segment should be set equal using relations. Mirror the triangles to the right side while the middle construction line is selected.</li><li>Draw a semicircle and a half semicircle within the construction box at the bottom. Only draw it on the left side of the center construction line with the specified dimensions. Use the center point arc tool. Mirror the arcs to the right side while the middle construction line is selected.</li><li>Add horizontal construction line to where the top of the mouth arc will be</li><li>Draw an arc on the left side of the center construction side based on measurements on paper. </li><li>Offset arc and connected line</li><li>Create center point circle set distance away from the top of mouth, and make the center point vertical to inner line of mouth</li><li>Make a vertical construction line to where the center of the right eye is. </li><li>Make a horizontal construction line to where the center of the right eye is.</li><li>Where those two construction lines is where the center of the eye is. We then make the eye with the specified dimension on the sheet using the circle tool. Then mirror the eye to the right side.</li><li>Then compare your ghost paperclip to the real ghost paperclip, and see if you need to change anything or troubleshoot.</li><li>Extrude your ghost with the specified dimensions.</li><li>Then make your initials using the text tool.</li><li>Finally, use the extruded cut tool to cut the initials into your paperclip. DImensions specified on the sheet.</li></ul><p><br> </p><p><strong>Design Choices</strong></p><p>To start designing our ghost, Finn and I first took the base model and worked on scaling it up on graph paper, twice the normal scale. This meant that for each measurement we took we would double it and draw it on graph paper, but still only write the original measurement, because we were only blowing up the model for a diagram, not for the actual print. We used a cm ruler to keep precision with our measurements. We began measuring the ghost starting with the length and the width. Then slowly starting to move on to the more defining features such as the semi-circles and triangles. Each measurement was always checked multiple times to make sure we were getting the correct values for our ghost. We didn't want the ghost to be inaccurate, so we made sure to double-check measurements at all times. After finishing drawing a sketch of the model on graph paper, we moved on to creating an outline to create our ghost in Solidworks. This included the steps we needed to take to make our ghost, and when and where to use the required features. Once the outline was finished, we moved on to creating the ghost in Solidworks. We started following our outline step by step. However, this did not always go as smoothly when we had to troubleshoot or change what step to do. We had to compare our ghost to the real-life version that we were making. If the ghosts had differences when we overlapped them, then we would have to redo the parts that were messed up. The edits we made to correct our figure in Solidworks are shown below.</p><p>The mouth was too wide, so we increased the length of the mouth from the edge of the ghost, to decrease the size. It went from 0.4 cm to 0.6 cm. This change was made to have our ghost just like the original. </p><figure class="image"><img src="https://media.printables.com/media/prints/298356/rich_content/04cf8175-3ef7-4ca8-88ab-0f8f96807064/image_2022-10-23_132746428.png#%7B%22uuid%22%3A%221e31d0eb-2baf-4a49-bbc5-eb01c977cc8d%22%2C%22w%22%3A678%2C%22h%22%3A215%7D"></figure><p>The height of the ghost’s triangles and circles were also too tall, so we increased both of the lengths. The lengths were changed from 0.5 to 0.4.</p><p><img class="image_resized" style="width:100%;" src="https://media.printables.com/media/prints/298356/rich_content/6b364d62-d3ea-433b-9d93-f2e13f7d6451/image.png#%7B%22uuid%22%3A%22af77478b-5b7d-4a9d-a73e-787ec1cdab4e%22%2C%22w%22%3A896%2C%22h%22%3A269%7D"><br><br> </p><p>Another change was made with our circles at the bottom, which were too small because of the decreased height. We had to remake the circles using the 3 point arc tool, and this made it look closer to the original. None of our lengths were changed, and these were just creative changes.</p><figure class="image"><img src="https://media.printables.com/media/prints/298356/rich_content/f97b673c-6807-4e96-a690-79de34b6efaf/image_2022-10-23_132701532.png#%7B%22uuid%22%3A%22ef7f7425-bf02-4934-918a-0abc72704fd5%22%2C%22w%22%3A676%2C%22h%22%3A169%7D"></figure><p><br> </p><p>Once our ghost was finished and overlapped the other ghost perfectly, we extruded it. After that we extruded and cut it to engrave our initials. Overall, I think this project was a success, and I recommend you guys to try it.</p><p><br> </p>
With this file you will be able to print Ghost Paper Clip (Halloween Themed) with your 3D printer. Click on the button and save the file on your computer to work, edit or customize your design. You can also find more 3D designs for printers on Ghost Paper Clip (Halloween Themed).