Ghost Paper Clip and Bookmark
prusaprinters
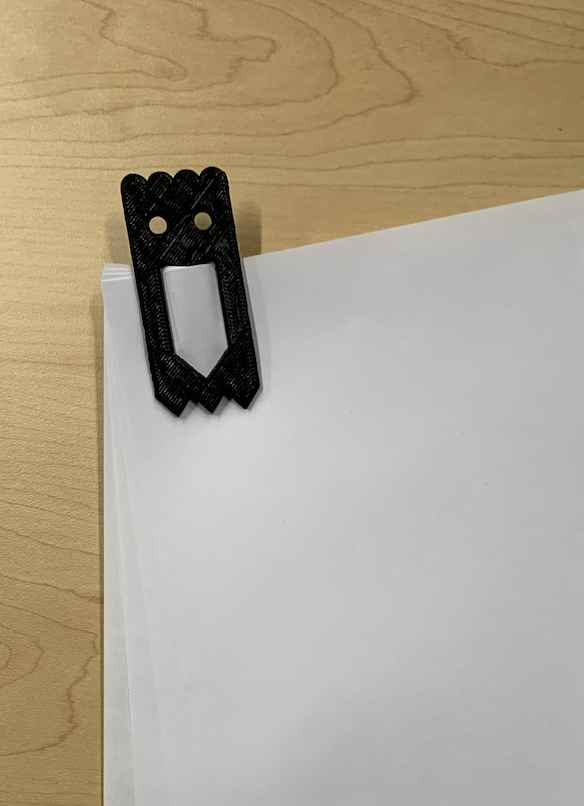
<p><strong>Partner's link:</strong> https://www.printables.com/model/299133-ghost-themed-clip</p><p><strong>Lesson Plan and Activity:</strong></p><p>With a partner, we were tasked to recreate a provided ghost clip using SOLIDWORKS. Together, we not only had to get our design as identical as possible to the example, we also were required to keep our project uniform and exact with our partners'.</p><p><strong>How We Designed This: </strong></p><p>To tackle this project, we started out sketching the provided clip in 2x size; measuring each dimension and recording them so that the conversion into SOLIDWORKS would be as smooth as possible. </p><p>However, while bringing it over, we realized that some of our dimensions were inaccurate. Thus, we started adjusting. </p><p>While we were originally going to make half the mouth and then offset it to other side, we ended up just offsetting one line from within the mouth. We offset it 0.15 cm to form the line which created the longer side of the mouth.</p><figure class="image image-style-align-center image_resized" style="width:35.65%;"><img src="https://lh6.googleusercontent.com/TekREiq3GEBGRrxRi7Mpd-UiVIdUumNk5AZUXpZmCOtZOF0VE66GNvvuK3AuU57IKq_5oVWVw9ohywq-tViwo2o8_L7SNX4f8Lv223OSQKuodIMUIp1iGIaX-vWGb6bqw4aqtGXxW82Jv2ZIV1pAlFkHM6bwPcX87RoVk5p_Co0lLPkrBgX_K7sd5g"></figure><p>The ghost’s eyes were too wide with a diameter of 0.7cm, so we changed them to 0.6cm.</p><figure class="image image-style-align-center image_resized" style="width:52.66%;"><img src="https://lh6.googleusercontent.com/k4GbJN0mgj71aC0qgbqUFWJdZKBonOcyQWvg3sa03m_wJXuGYP9A-J3K47BsH2DQIzwqt35skKTadomW1zbEya_nEAJFya-ATb2vD5pko9I4dK2wCgQIc1-ZPhXEbweEJVs-8y0V0Ll7BgPdGJpOLYfFJcYqF6VXUkUUOPFg0BSADHZQGUt-LHFRIw"></figure><p> Its mouth was also too wide, meaning it had to change from 0.35cm to 0.3cm. </p><figure class="image image-style-align-center image_resized" style="width:57.06%;"><img src="https://lh6.googleusercontent.com/Jia0iEZM9VnCBBIq1Ri4duSBflN-4guiZpxvS-kIrWRiQsrPrchKZsBX4yphJ5OwRN918IhGHm8jpvaLI6wmF4l99uBUQa_KkQbzI1TXUZBXbpXHlhv6OxjpbnS8onI-jq4ipEdGxJCxL_5Gj3p0guiMpGSU_vh-NBjqK_T9iGvgZ7g6jzJFE347uQ"></figure><p>We encountered another error when we tried to extrude into the third dimension, an error message stating our design couldn’t be extended, meaning something was wrong. We discovered that it was the semi circles at the top of our clip overlapping that was the issue. This was a quick fix, adding a construction line connecting the top corners of our ghost and anchoring the semicircle’s midpoints to it solved the issue.</p><figure class="image image-style-align-center image_resized" style="width:48.1%;"><img src="https://lh4.googleusercontent.com/z3jejPfA1v7Zz3toqnXGVyJy_QplGZ42ZR7o2oHyLZA4tcQDlFkGlLn1rkqhxeD5Fa2eUpj5KvBBECBaB0m_iqC8X_Sb1mtzfhsjs7WIJ9q0HcmrawJ_yWQOzw-ffU1sS-9swcNIU8KMumFOX0QBksdMZ3wXObYZW44gxR1BzIZMSiVc2q0cLVFVqg"></figure><p><br><strong>Construction Instructions:</strong></p><ol><li>6.9 x 3cm Constraint box, a center rectangle that is centered on the origin and made for construction. <ul><li>Dimension according to drawing</li></ul></li><li>Create a construction line at the required height for the semicircles</li><li>Create four semicircles.<ul><li>Dimension diameter and height according to the drawing. </li><li>Manual relation both semi circles radius to be identical</li><li>Position them left to right resting with the center point on the construction line created at the top of the constraint box. </li></ul></li><li>Make construction lines near base of constraint box, set at the required height above the bottom side, for constraining area for the triangles</li><li>Make a set of points in the correct area within the construction lines, which are set at equal length from each other according to the drawings dimensions. </li><li>Create a midpoint between the points that is placed on the bottom of the constraint box. </li><li>Connect these two points with lines to create a single triangle with two equal length legs with manual relations. </li><li>Create a third point that is on the lowermost construction line, and on the line that divides the constraint box in half, in the center. </li><li>Connect this third point with a line that is equal to the legs of the other triangle. </li><li>Create circle for eye<ul><li>Dimension diameter</li><li>Place at correct location from the top and side of the constraint rectangle</li></ul></li><li>Create semicircle for top of mouth<ul><li>Dimension according to drawing</li><li>Place at correct location from top and side of constraint rectangle</li></ul></li><li>Make a vertical construction line going down from the center-point of the semicircle mentioned in the above step. <ul><li>Dimension according to drawing</li></ul></li><li>Offset outside line going down vertical from construction line, according to the dimensions in the drawing. This offset will form the outer (rightmost) line of the right side of the mouth. </li><li>Add vertical line on the inside edge going down from the leftmost point of the semicircle<ul><li>Dimension according to drawing</li></ul></li><li>Mark two points vertical to the origin, going up from the bottom of the constraint box according to drawing</li><li>Connect the points made in last step to the endpoints of the vertical lines that were created </li><li>Finish any last smart dimensions and manual relations</li><li>Mirror the eyes and mouth over the middle, centerline of the constraint box</li></ol>
With this file you will be able to print Ghost Paper Clip and Bookmark with your 3D printer. Click on the button and save the file on your computer to work, edit or customize your design. You can also find more 3D designs for printers on Ghost Paper Clip and Bookmark.