Ghost Clip Partner Project
prusaprinters
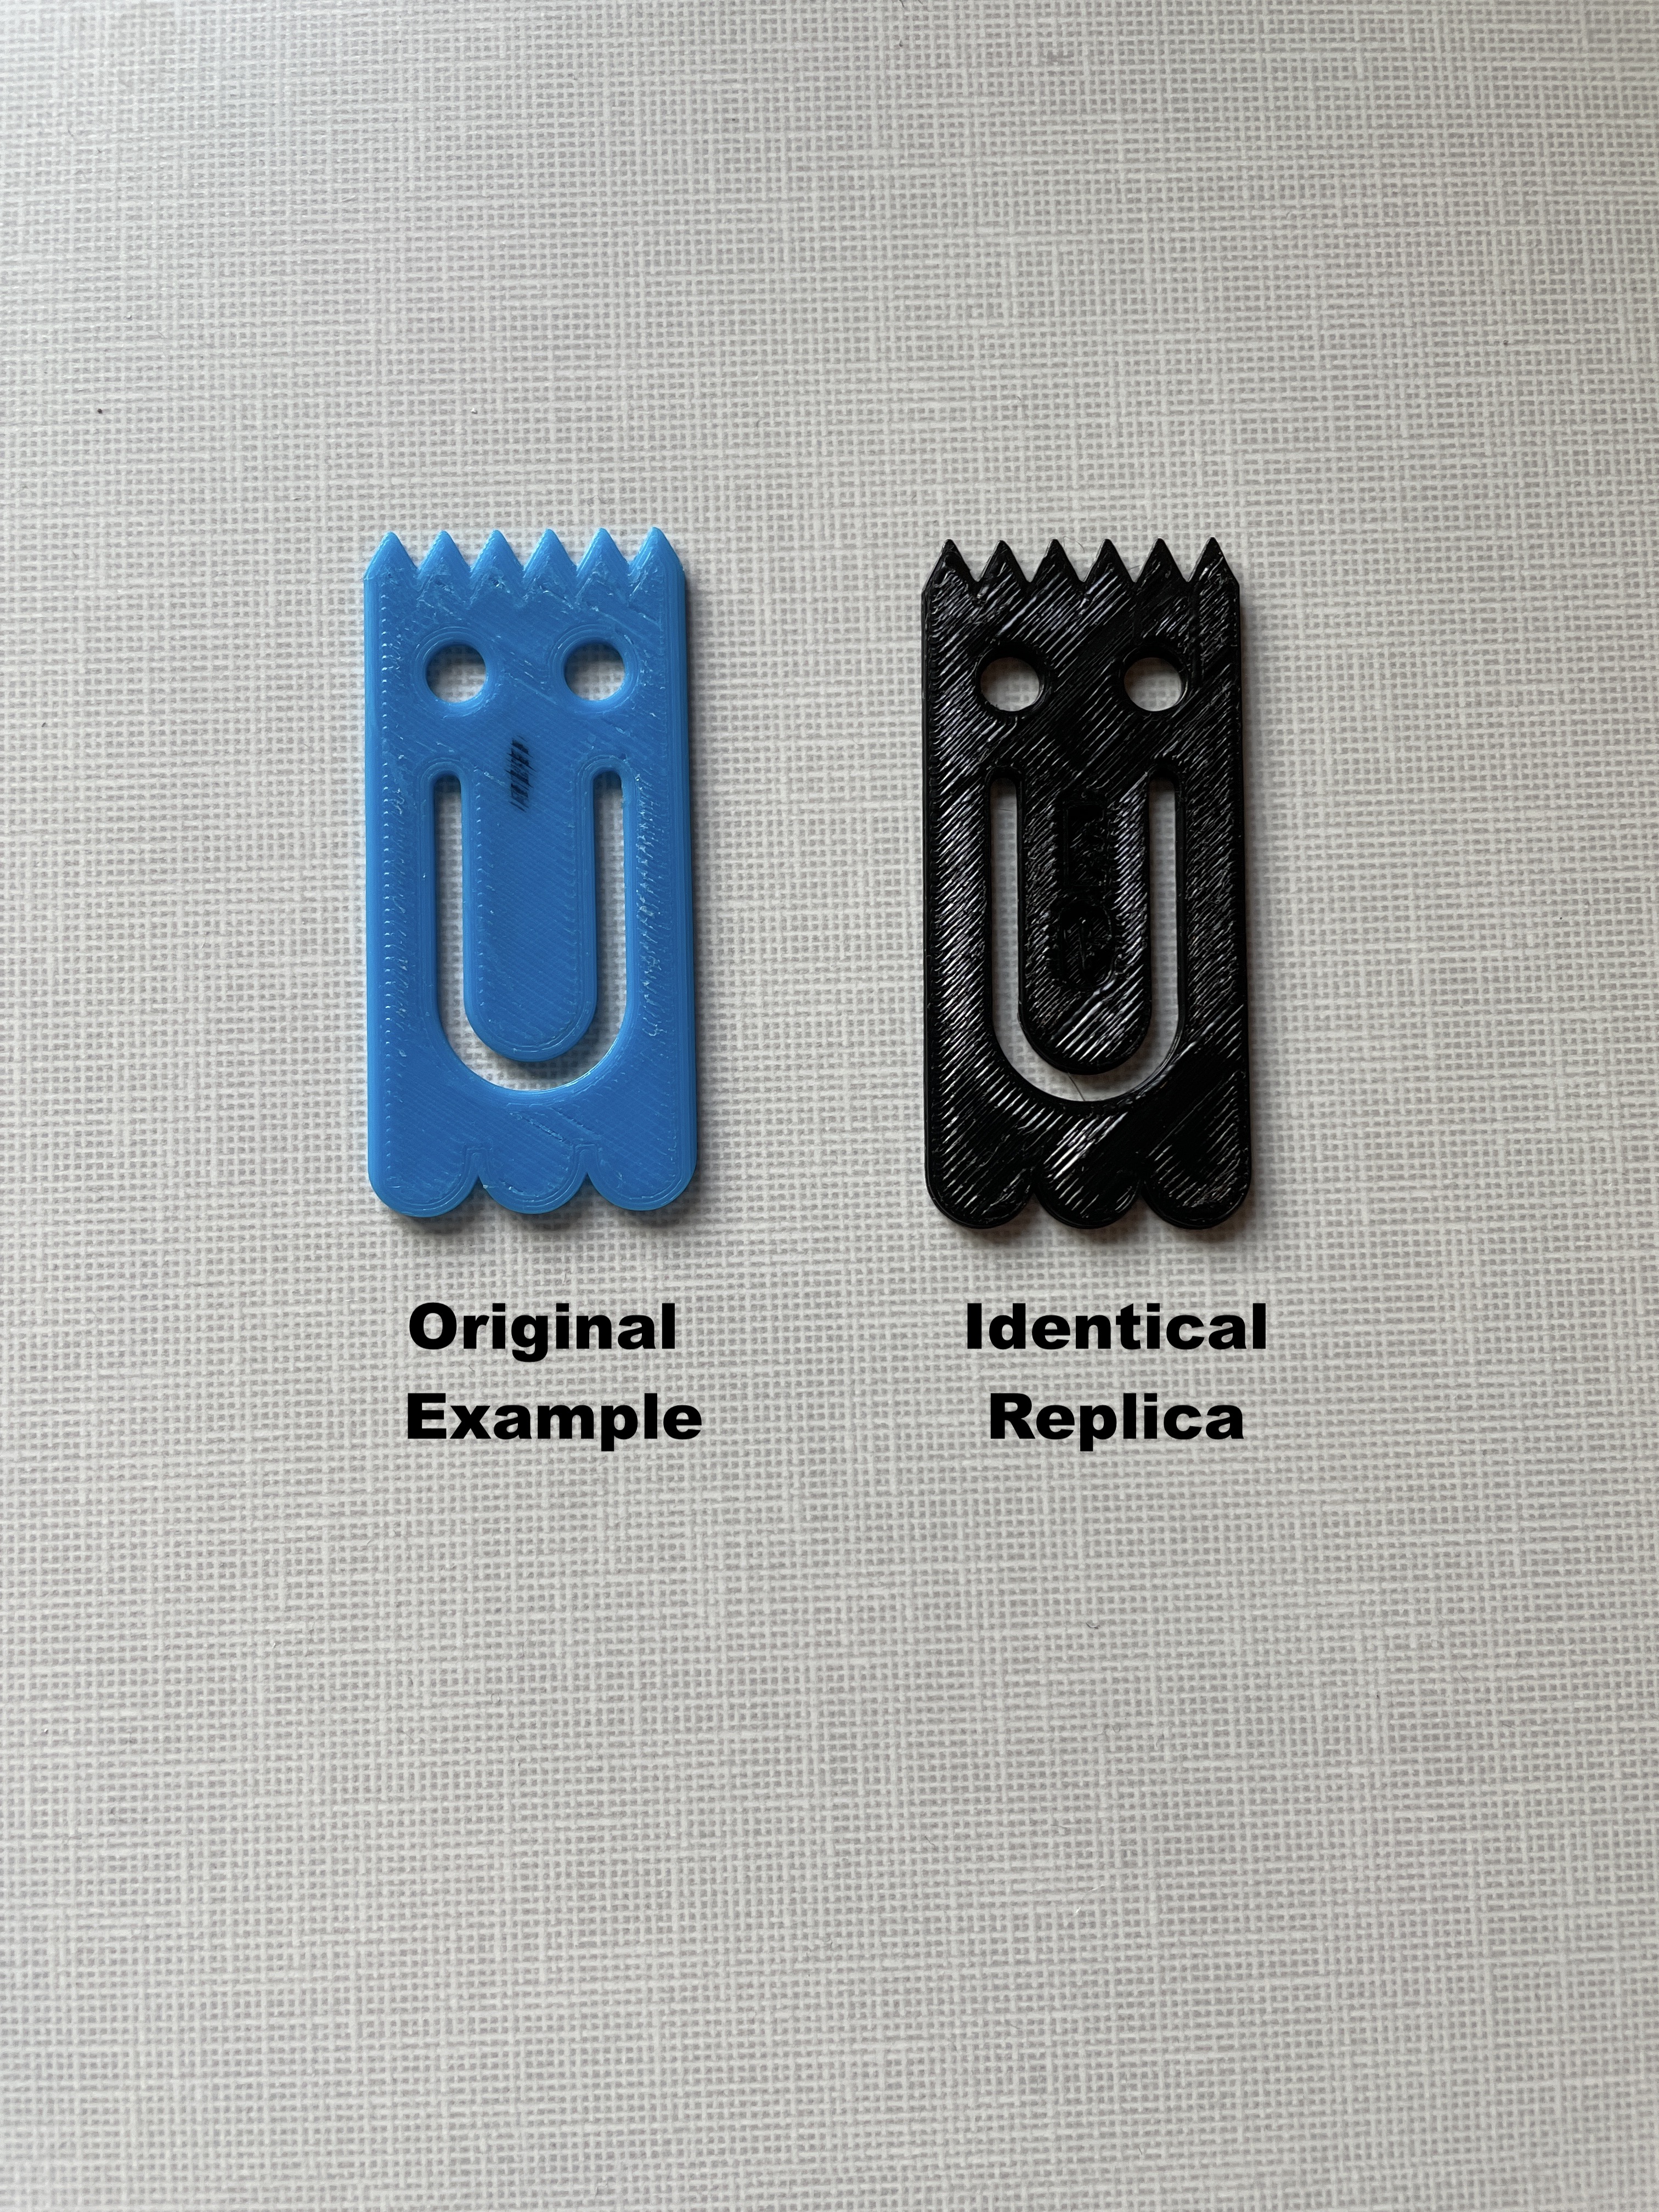
<p><strong>Summary Section:</strong> </p><ul><li>Created an identical Ghost clip with a partner using a series of steps including: measuring the original clip, creating a 2x blown-up image on paper with original dimensions, Creating a 2D sketch on Solidworks based on the paper, extruding it into 3D, making an extruded cut to emboss initials into the clip. </li></ul><p><br> </p><p><strong>Lesson Plan and Activity:</strong></p><ul><li>With a partner, recreate a ghost clip identical to the one provided. Both partners MUST collaborate on each step and create identical files/drawings. </li></ul><p><br> </p><p><strong>Assembly/Construction Instructions Section:</strong> </p><ul><li>Use a centre rectangle (construction geometry) with the centre locked to the origin, with horizontal and vertical construction lines. The top will be equal to the bottom, and both sides will be equal. Dimensions are set as per drawing.</li><li>Draw a line (construction geometry) offset from the top by units as per drawing.</li><li>Then we mirrored that line about the X-Axis</li><li>At the top of the sketch we drew a line segment from the intersection of the 2nd horizontal line and the left vertical line, to a random point on the top horizontal line. We smart dimensioned it based off the X-Axis with a length as per drawing and dimensioned</li><li>Make a line segment from the diagonals right endpoint to any point on the second horizontal line. Smart dimension from the point of intersection of the 2nd horizontal line and the left vertical line to the bottom endpoint of the second diagonal. Set the value as per the drawing.</li><li>Then using the pattern tool, we then used the linear pattern tool to create six identical triangles along the top of the sketch</li><li>Make a three-point arc, intersecting the 2nd to last horizontal line twice, and the last line once.</li><li>Smart dimension the diameter as per the drawing.</li><li>Linear Sketch Pattern tool the arc until you have three identical arcs</li><li>Add a coincident relation between the point of intersection of the last two arcs and the 2nd to last horizontal line.</li><li>Make a line from the leftmost endpoint of the triangles to the leftmost endpoint of the arcs.</li><li>Make a line from the rightmost endpoint of the triangles to the rightmost endpoint of the arcs.</li><li>Make a corner rectangle from the top left corner of the figure, to a random point inside the figure (construction geometry). Smart Dimension as per drawing.</li><li>Make a circle centred on the bottom right corner of the construction rectangle, and smart dimension the diameter as per the drawing. (This is the eye)</li><li>Mirror the circle about the X-Axis.</li><li>We will then start on the mouth by creating a vertical construction line with dimensions as per drawing</li><li>We will then mirror the construction about the X axis to form the other side.</li><li>Create another construction line to connect the ends of the two vertical lines (This will be the bottom of the arc)</li><li>Following this, we will use a 3-point arc by selecting two random points on each vertical line and then the midpoint of the horizontal construction line at the bottom. </li><li>Connecting both endpoints with a horizontal construction line (with horizontal relation) will constrain the arc</li><li>Following this, we will offset the two vertical lines and the arc by dimensions as per the drawing, with cap ends selected. </li><li>All geometry is fully defined following this final step and has all necessary relations</li></ul><p><br> </p><p><strong>Design Choices:</strong></p><p><br> </p><ul><li>We first traced and took measurements of the original ghost clip</li><li>This information was then transferred to a piece of graph paper in a 2x scale drawing of the original ghost clip</li></ul><p><img class="image_resized" style="width:40.1%;" src="https://lh6.googleusercontent.com/uUE0cZLUaxczONUHVVLMZHo10yIWCqfyUlm5EdUnThLYNVmzbcw8tuVtYZWkyOxX6D2BoN_1sUHRIoY80oAmd7-l9YZkzgyRF1wWP_zQHwVyynBY8lry1Yjbld5KUW8GVY2_zEaCJhkFtv7Ax3X03jKNg3ARhgFCYNkD1iYQucDDjmksZyJrDmIlFw"></p><ul><li>All of the <strong>original </strong>dimensions were listed on the 2x scale drawing to make it easier to transfer to Solidworks</li><li>Once in Solidworks, we started by creating the main box and its dimensions to which the other geometry would go inside</li><li>Moving to the top of the box, we created a triangle which was then patterned to the right for the width of the drawing</li></ul><p> <img class="image_resized" style="width:57.15%;" src="https://lh3.googleusercontent.com/mUy9-xkFbamPL0YgoWYQteTY9xud0qLlGuej5KDAGAqThHuiBkZXRFyR3EOk2XjZxoN-5d5MZhzEjX2wWcWyfc0eIcZkj0zLRFVd53Fn6VJosucUoAbMgKB5UTsOXMdTLwjVTavEqAMHvuynu-dXk610Mg_A_e5-FbRERArdXwgmWneEjgbIEmUTig"></p><ul><li>We used smart dimensions and manual relations where needed to add constraints.</li><li>At the bottom of the box, we created an arc with dimensions as per our paper sketch. This was then linear patterned twice to fit the width of the drawing</li></ul><p><img class="image_resized" style="width:46.93%;" src="https://lh5.googleusercontent.com/My5_y4ccqmpNgjcEkDhzICpeYZ2eOr8sHa5xVqs3v5bT4WOEYvmI8IbMmxuS6l5aP1M61kiwNwwbY4AR8xU1kmyIY190IOMYtfh8ZNDt850ktFD_o1uX365ZBkcaqYKMit_r0QPQBlDHnVdMUgQeFUvJm6CqXwwVShtJFyUqdOZ1WmPqIhO8BGAaEQ"></p><ul><li>Our original plan for the mouth and eyes of the ghost had been to create one side of the drawing and then mirror that geometry across the centerline; however, we differed from this plan.</li><li>To create the eye, we found the center point of where the circle should be, and then created a circle with dimensions as per the paper drawing. We then mirrored this geometry to the other side, creating both eyes. </li></ul><p><img class="image_resized" style="width:40.96%;" src="https://lh5.googleusercontent.com/B2mTgyGd7NGhT-xavecC1furBLKoqRT0S2EyEK5R2oOn0uF2W0sCVLsArxRTV53T_fhWtV7FHFwmGYy38VpcKTKAjoTB4IXi0DSXgyzyMxB24byQcvQMkGgInb62Hmuk9Nb1-rGgxastq8CvUp_V9jdNQJ4zeMPfn-5687iuOHrUVgsdqPXSjOvyKg"></p><ul><li>Moving down to the geometry of the mouth, we abandoned the original idea of creating half and then mirroring it, instead opting to create the arc and two vertical sides of the mouth. This was easier because making ½ of the arc we needed in the right place would have been more complicated and had a bigger possibility of not working correctly.</li></ul><p><img class="image_resized" style="width:41.36%;" src="https://lh6.googleusercontent.com/17nD-GW8oXC2mN-BQS1GMantL1PVRIilmCFy8NG2-x-uWYJ4meAKWDqw896wtOwqpJsN-dOG5UXmQOjPBuobAsvI4IQoMe30d2cMqBTkgHA79aqjx3MkyCh45mY-JVXkHPdoO6h62AvkB2z1meOFpV4egocB1FJvvxK3g1crnaNW_hZqYQ9Yx90f8Q"></p><ul><li>After those lines were in the right location, we used the offset tool with cap ends selected to finish the mouth sketch.</li></ul><p><br> </p><p> <img class="image_resized" style="width:63.34%;" src="https://lh6.googleusercontent.com/afy0sZ1HnQS_99cHIMa-JeqjiXVpxBTLfLb8JE8Yj5EEDr6HiSBYFsa5VY0GTx8j9fbog8JqQPpblUnRUu9ysBESxXXn_T7Ypx0s70tX0_pkKZyoaIJYq7kcHMmOqUspgk-8GkkOrw_X-Tat9LUZSfOzdlHf4dNnd3scEXjjPCXJSgrjr_7h85p0Tw"></p><ul><li>Using the extruded boss base tool, we brought the sketch into 3D, and then used the extruded cut tool to emboss our initials on the finished ghost</li></ul><p><img class="image_resized" style="width:55.5%;" src="https://lh4.googleusercontent.com/os_LRyn4pluYUiap4opVYHlOeqiqCfufsCkCeTnQVEPN12Tmfwu1rUp7kvd1tf5J-K8REfyAobqMUJ4QcK7k43s5EYnNacjmV8RxLbfFESjUiZbFXLCpDK7myPo1IWoTkL1MWY0EV5nQW9mpcBr5ruCi-jLkEtFFyG-DlLxta6ZxKZq5pr-Mm62iKg"></p><p><br> </p>
With this file you will be able to print Ghost Clip Partner Project with your 3D printer. Click on the button and save the file on your computer to work, edit or customize your design. You can also find more 3D designs for printers on Ghost Clip Partner Project.