Ghost Clip
prusaprinters
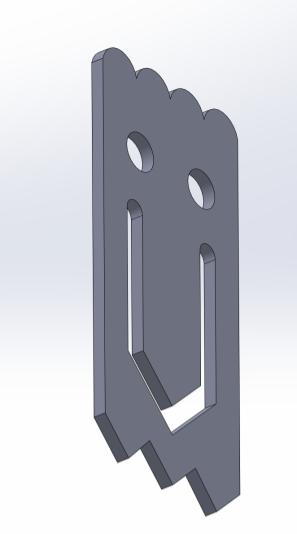
<p><br> </p><p><strong>Summary</strong></p><p>The use of the ghost is to be a multi-use clip. The design is very versatile, with functions ranging from clipping papers together to holding chip bags closed. The clip works by sliding the desired object in between the slot that the mouth forms. There is no other design that is downloadable that will function so well while looking so good. The construction of the piece wouldn’t have been possible without the help of Andreas. <strong>LINK TO HIS PAGE</strong>. </p><p><img class="image_resized" style="width:28.52%;" src="https://lh4.googleusercontent.com/KVXY4EmeVXoVEo2o5HApZuqBwvdvyDTY4BKIkyyzfuA2Jv7yGgZo-xO3I-mCrt_t3Ho3pPqFszJOOSViczFMvThw4lGVn5Z9Kfril_xkK1PL8I9paCCIm69Vzqo_UjH5eBunibZinGcA0gKSabH7J2uZKP47nsC7doNSR4No1NnLf_3TymWk6-Y8pg"></p><p><img class="image_resized" style="width:28.71%;" src="https://lh5.googleusercontent.com/ontr0YDrVQtzR5VoP966gXQ7yp4EtFur66pG4hfprJs-QbrxWWbEIz6S5dp3m9PZ0dJ0aJOBWt3huHhdaF7o-zWeKrg8LcCgZ5GTFeR4dYUtQ1jUa6-zqwtUsaPy8ZtYL1jxCBcDHU2XyCihTxSF-qcEx6YhlN4_2YC4S7jMm62hIcD28ZxHvR6aFQ"></p><p><img class="image_resized" style="width:26.48%;" src="https://lh3.googleusercontent.com/ldKxeOsYu8cMze1Qi0bmnMAzpkLZw0C1xPX1Jwo02IEDocp6uljb0b_wL9qkR0GDq2ngQ7Ony83JIpYSMwFxZnxVUumAVH2pdM6XSzXkxv5M9oZ-0tuvTU0fnRwD6IK-8pQKXxklfSM2m3aQc9Y4HV9mxDpYTCKCs3tHqOB150XZS0r2nz3mZlOYyA"></p><p><img class="image_resized" style="width:46.25%;" src="https://lh5.googleusercontent.com/X_VpWNfun5mSDLZ-EQEDITs-9Y-MIfTnrwn9h2eGf4zt-_LgNzx9dglKXzTkX1ywIVGkkqmsIbP_seATIdWavXES1uKiKmDo1Akr3HSLRlILeTz4knks1cLjBCOVUElJxRGIxnNYjKIg9eEordR7TIv7KVwz7NWHAeDPjf3gseSkqSTyUFgi1tIQcQ"></p><p><img class="image_resized" style="width:46.94%;" src="https://lh5.googleusercontent.com/u0x8vmfhEeaNLfYgS_JyGHWk2lykGok8RQOn7OksFsK4idyArWHnwjD6hMRouq7jxktH-ul42FEZ7jmE6QmE21tPq1_p2SDtAo3vNruixZfehBMpx2pJPJ1CKtXVE3uwaQGoGdK0MUouFko88vCllp45cEDDYMbA-KIFQr_Tidu-9bwOrppOuHFZvQ"></p><p><img class="image_resized" style="width:48.2%;" src="https://lh5.googleusercontent.com/sN8feqFNzHdLZCLT_vJn7K6imxVMTgmm00F60MAVuBRK_E9DwohXDBAGU5uPDPsjEqCagGpSpXKKmHrZ2QiklPOC5oXZq9gsEGy0t5muy7jkEfV8LkBn9Z1Ev1Kz9NZAzo5_OJg6pC7LgfeKfd27JoW8v8mUuij17ipDZBLR8U2WUcXJVxCWyTnuzg"></p><p>(My clip on the left partner's on the right) </p><p><img class="image_resized" style="width:32.89%;" src="https://lh4.googleusercontent.com/S_Dh4iLg61JvetXICSFlLhr6eDFtQeEBpaLC1DfEiT5VJbYbryDNfoinbSddixrxXMsXGc_I62gNta9O3qYSQ6LZ-Wcf6dS4cTtOHMA-HtkEQSBGem2-uDFZv3NuodaWpM15j75UIzA-MVRiHdpkF8oj3mj3SEO4o7qhzTLaUU2nQrZ2GQROwi7Mpg"></p><p>(Clip compared to model)</p><p><strong>Lesson Plan and Activity</strong></p><p>With a partner, you will recreate your ghost clip using Solidworks. You and your partner MUST have identical files that you create by collaborating on each step, one at a time.</p><p><br> </p><ul><li>The sketch must begin with a constraint box, (center-rectangle created from the origin)</li><li>Dimensions should be detailed but efficient.</li><li>The sketch must contain zero error messages.</li><li>The sketch must be fully defined when complete.</li><li>Demonstrate efficient use of “Construction Lines” / ”Reference Geometry”.</li><li>Demonstrate efficient use of “Offset Entities”</li><li>Demonstrate efficient use of “Manual Relations” </li><li>Demonstrate efficient use of “Smart Dimensions”</li><li>Demonstrate efficient use of “Mirroring”</li></ul><p><br> </p><p><strong>Assembly/Construction Instructions Section</strong></p><p><strong>Create constraint box</strong></p><ol><li><strong>Create a center-line construction box with dimensions according to the sketch with center on origin. </strong></li></ol><p><strong>Create bottom spikes</strong></p><ol><li>Create a construction line from bottom left corner going horizontal according to sketch to connect the spikes to</li><li>Create a diagonal line between the top of the vertical line and the end of the horizontal line. </li><li>Connect the line to another one going diagonal in the opposite direction. </li><li>Continue steps 2b and 2c x2, connecting each new line to the endpoint of the last. </li><li>Create 3 center-lines so that each spike can relate to one. </li><li>Make all of the lines on the spikes equal so they lock into place. </li></ol><p><strong>Create top Arcs </strong></p><ol><li>Create a vertical construction line from the top left corner according to the distance on the sketch.</li><li>Create a horizontal construction line from the endpoint of the vertical line that has a distance according to the sketch. </li><li>Create an arc from the end of the vertical line to the end of the horizontal line and stretch to top bound and stretch according to the sketch. </li><li>Do the same step again, this time attaching the corner to that of the arc previously created.</li><li>Repeat steps 3b and 3c again, connecting the new arc to the endpoint of the last. </li><li>Create 4 center-point lines for the arcs to relate to</li><li>Set the arcs equal to lock them in place. </li></ol><p><strong>Create Outer Line</strong></p><ol><li>Create a line from the leftmost point of the spikes vertically to the leftmost point of the arcs created in the last step and set the value of the one on the sketch. </li></ol><p><strong>Create mouth</strong></p><ol><li>Create a construction line up from the point furthest right of the bottom spikes and measure vertically the distance measured on the sketch. </li><li>Make a line parallel to the first line of the spikes from the endpoint of the construction line from the previous step and measure it to the length displayed on the sketch. </li><li>From the endpoint make a vertical line, parallel to the outer line, and measure it to that on the sketch. </li><li>Mirror the two lines over the y axis</li><li>Offset the 4 lines using end-caps and set the distance offset based on the measure on the sketch. </li></ol><p><strong>Make eyes</strong></p><ol><li>Create a midpoint circle with a radius seen on the sketch. </li><li>Position the circle with dimension stated on the sketch. </li><li>Mirror the circle over the y axis over point (0,0)</li></ol><p><br><br> </p><p><strong>How I Designed This</strong></p><p>The design process started by a two times scale sketch using the original model. Measurements were written down to the best of our ability and from there my group labeled every part of the sketch that we would need to make the sketch defined in Solidworks. </p><p><br> </p><p>Once the unscaled model was finished, my partner and I wrote instructions on how to design the model in Solidworks. Once the model was created in Solidworks, we scaled down the model to match the original size of the model and put them side by side one another on the computer screen to see where the measurements differed. We found that the most notable change that had to be made was the position of the eyes and the width of the mouth. </p><p><br> </p><p>We changed the height of the eyes relative the the top of the mouth to 1.15 cm, and the width from the side of the sketch to 0.82 cm. </p><p><img class="image_resized" style="width:29.86%;" src="https://lh5.googleusercontent.com/3hz5U4S3DFo8YsonkYRP09gbfZJszp88G3o0Ws3t6NjZD69WAp4dSNMlDeHYL4sMP1OtLsCX3dNgzUhubzlI6YmIBk-WdSS5IyTRPjIrXJGfQCTUoeu7p2TTM6DvNTdM3kUok8RenNqLcquu_E1EwfrH0HNS_8zx873TLqjlCISVS2_W2PEKdwhSiw"></p><p>The width of the mouth was also changed to .34 cm. </p><p><img class="image_resized" style="width:30.07%;" src="https://lh5.googleusercontent.com/3hz5U4S3DFo8YsonkYRP09gbfZJszp88G3o0Ws3t6NjZD69WAp4dSNMlDeHYL4sMP1OtLsCX3dNgzUhubzlI6YmIBk-WdSS5IyTRPjIrXJGfQCTUoeu7p2TTM6DvNTdM3kUok8RenNqLcquu_E1EwfrH0HNS_8zx873TLqjlCISVS2_W2PEKdwhSiw"></p><p>The last change that was made was at the height of the intersecting corner of the left side of the mouth. We changed the measurement to 1.73 cm. </p><p><img class="image_resized" style="width:30.46%;" src="https://lh5.googleusercontent.com/3hz5U4S3DFo8YsonkYRP09gbfZJszp88G3o0Ws3t6NjZD69WAp4dSNMlDeHYL4sMP1OtLsCX3dNgzUhubzlI6YmIBk-WdSS5IyTRPjIrXJGfQCTUoeu7p2TTM6DvNTdM3kUok8RenNqLcquu_E1EwfrH0HNS_8zx873TLqjlCISVS2_W2PEKdwhSiw"></p><p>All of the changes were functional changes for the aesthetics to match the original product. The last part of the design process was engraving my initials into the middle of the product, to show a personal touch. </p><p><img class="image_resized" style="width:21.88%;" src="https://lh3.googleusercontent.com/qOHuJUCBpO1gg_17WJHgUbe7X4tk76VIHMuQGTJAB2-pRmAcFDgJSLON9jYBM-vcoyUKxtvcjyIJIgqUdBrIodffFadZ9e73M4dQv_YeReMZkgThKBq7D1JyUJNNWegj232O_Ey0XxjaJ5FU9dr0ThXKrywPCuiUsYZquOagnEBY0ArQ_XQVuuWYjQ"></p><p>At the end of the process, our model was the exact same as the one we were referencing compared to the start when the features of the ghost were in the wrong place and the wrong size.</p><p> </p><p><strong>Assembly Instructions</strong></p><p>No external modifications need to be made. The product will come complete off the 3d printer. </p><p><br><br> </p>
With this file you will be able to print Ghost Clip with your 3D printer. Click on the button and save the file on your computer to work, edit or customize your design. You can also find more 3D designs for printers on Ghost Clip.