Ghost Clip
prusaprinters
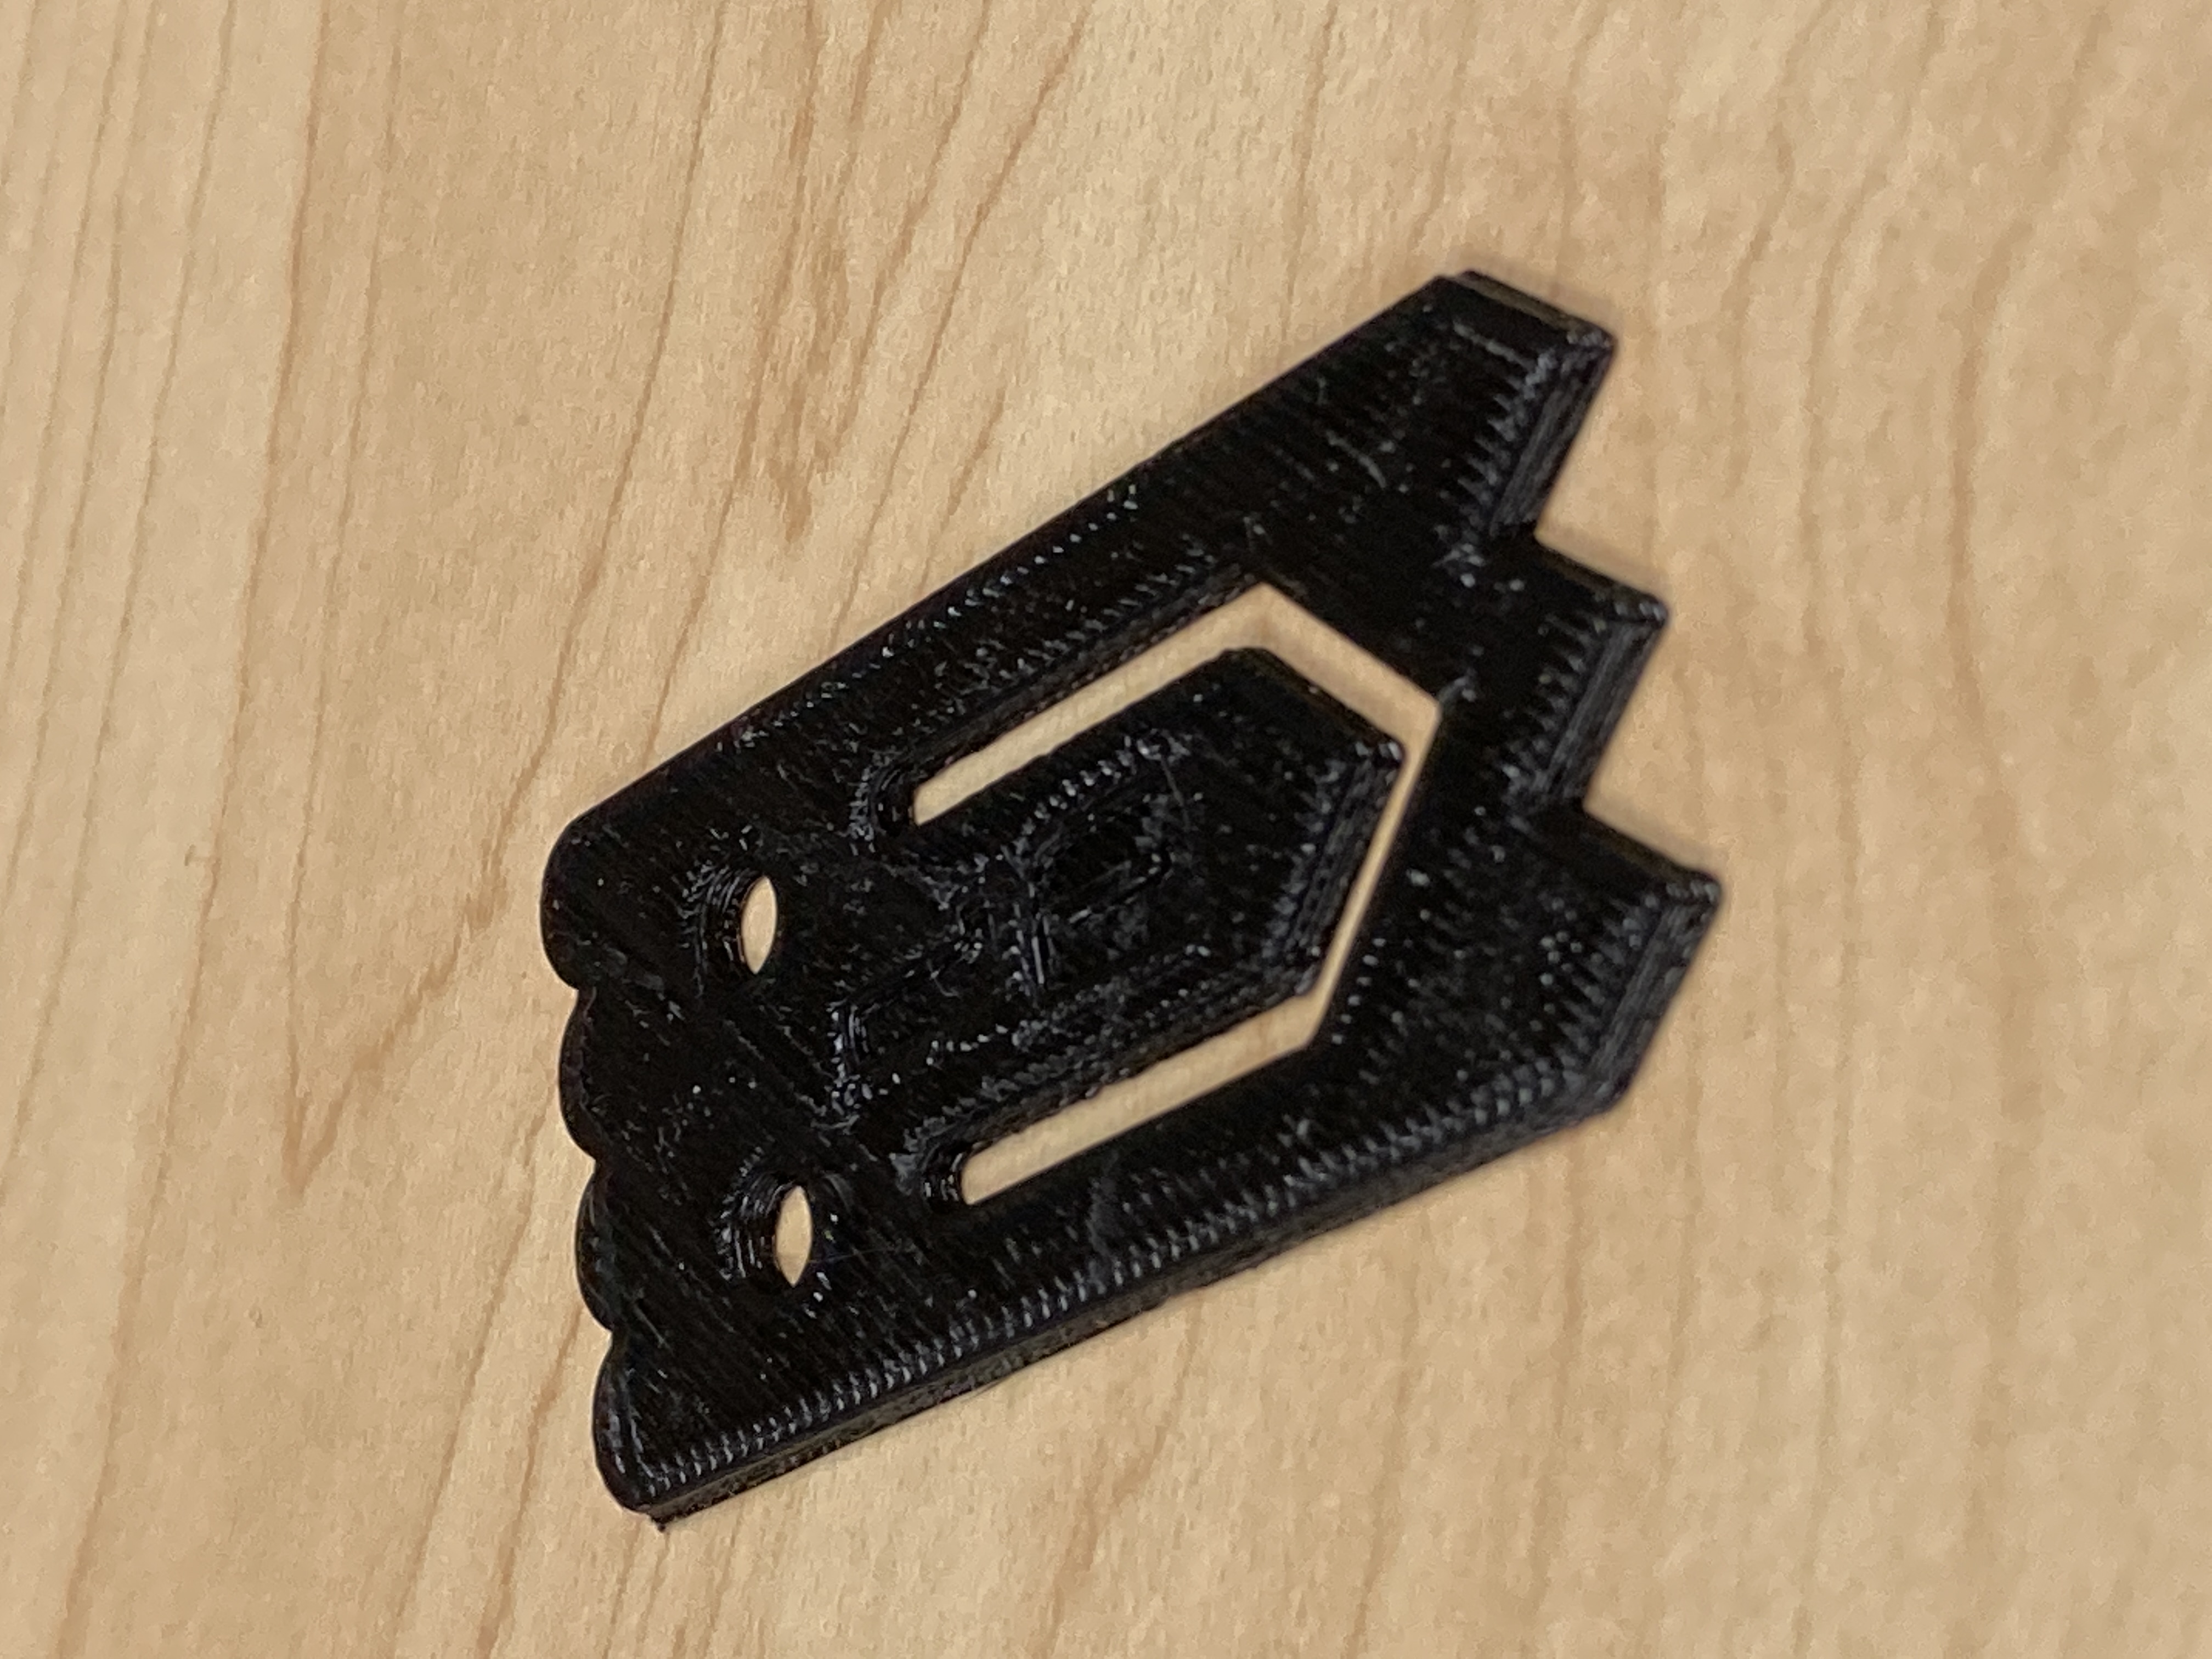
<p><strong>Lesson Plan and Activity:</strong></p><ol><li><strong>You and your partner should develop an agreed-upon plan for your figure:</strong><ol><li><strong>Each person will make a single front view sketch of your piece at 2x scale so that dimensions can be clearly labeled. </strong><ol><li><strong>Start with your constraint box.</strong></li><li><strong>Even though your hand drawing will be twice as big, record the ACTUAL 1x scale dimensions of the plastic piece in front of you.</strong></li><li><strong>You may end up making changes to these as you go. You MUST keep track of them all in these drawings.</strong></li></ol></li><li><strong>A bulleted/numbered list of the order you will create your model to be updated as you work through completing your design. Make this a GoogleDoc in your team folder. This plan MUST be approved before you begin making your figure in Solidworks.</strong></li></ol></li><li><strong>Create your model in Solidworks in tandem at the same time with your partner. Click for click. Save your file a TeamName_FirstInitial_Ghost (ex. Dassier_A_Ghost).</strong></li><li><strong>Each person should submit their completed “.SLDPRT” file AND their “.STL file” at the end of the project.</strong></li><li><strong>Extrude Your Ghost</strong><ol><li><strong>Save your sketch by clicking the blue sketch icon in the top left of your screen.</strong></li><li><strong>Select your sketch in the “Feature Tree”</strong></li><li><strong>On the “Feature” tab (instead of the “Sketch” tab), select “Extruded Boss/Base”</strong></li><li><strong>Change the dimension in the menu to 0.20cm</strong></li><li><strong>Click the green check mark</strong></li></ol></li><li><strong>Engrave Your Ghost</strong><ol><li><strong>Click the top face of your ghost.</strong></li><li><strong>On the Sketch tab, select “Sketch” to start a new sketch.</strong></li><li><strong>Draw a horizontal construction line from the left side of the inside of the ghost’s mouth to the right side.</strong></li><li><strong>Select this line and click the “Text Sketching Tool”, (The capital A)</strong></li><li><strong>Type your first initial and change the font to “Impact”.</strong><ol><li><strong>Click the “Center Align” button</strong></li><li><strong>Increase the size until the letters mostly fill the tab</strong></li><li><strong>Repeat for the second initial (on a different line and sketch text)</strong></li></ol></li><li><strong>Save your sketch by clicking the blue sketch icon in the top left of your screen.</strong></li><li><strong>Select your sketch in the “Feature Tree”</strong></li><li><strong>On The “Feature” tab (instead of the “Sketch” tab), select “Extruded Cut”</strong></li><li><strong>Change the dimension in the menu that has replaced your “Feature Tree” to 0.10cm</strong></li><li><strong>Click the green checkmark</strong></li></ol></li></ol><p> </p><p><strong>Solidworks Outline:</strong></p><p><strong>Recreate a ghost clip using Solidworks. Make identical files created by collaborating on each step, one at a time.</strong></p><ol><li><strong>Make a construction rectangle with the center at the origin. </strong><ol><li><strong>Dimensions listed on drawing.</strong></li><li><strong>From here on out, work on the left side of ghost face</strong></li></ol></li><li><strong>Make Horizontal Construction lines (to center)</strong><ol><li><strong>Bottom of arch construction line - 2 congruent, horizontal</strong></li><li><strong>Top of eye line - horizontal (snap to)</strong></li><li><strong>Bottom of eye line - horizontal</strong></li><li><strong>Top of mouth line - Horizontal</strong></li><li><strong>Mid-mouth line - horizontal</strong></li><li><strong>Bottom of mouth line - horizontal</strong></li><li><strong>Top of spikes line - 3 congruent, horizontal</strong></li><li><strong>Mirror</strong></li></ol></li><li><strong>Make Vertical Construction lines </strong><ol><li><strong>Left bottom arch to bottom eye line</strong></li><li><strong>Right bottom arch to bottom eye line</strong></li><li><strong>Right top mouth to top spike line</strong></li><li><strong>Left top mouth to top spike line</strong></li><li><strong>Mirror</strong></li></ol></li><li><strong>End-end-height arch - 2x, congruent, to center</strong><ol><li><strong>Mirror</strong></li></ol></li><li><strong>Bottom spike</strong><ol><li><strong>Line 1 - from edge to (snap to) across from construction line 1</strong></li><li><strong>Line 2 - from Line 1 to end of construction line 2</strong></li><li><strong>Line 3 - from Line 2 to bottom of Vertical center line</strong></li><li><strong>Mirror</strong></li></ol></li><li><strong>Making Eye</strong><ol><li><strong>Find center of construction box for eye</strong></li><li><strong>Make center radius circle with radius the length from the center of box to top center of box.</strong></li><li><strong>Make circle tangent to construction eye box.</strong></li><li><strong>Mirror</strong></li></ol></li><li><strong>Making Mouth</strong><ol><li><strong>Make a construction line in the middle (center) of left and right vertical mouth lines and below top mouth horizontal line.</strong></li><li><strong>Make line from bottom of 7a to center of mid-bottom-mouth line and bottom mouth line</strong></li><li><strong>Offset line</strong></li><li><strong>Mirror</strong></li><li><strong>Adding Mouth Relations</strong><ol><li><strong>Left mouth and right mouth lines - parallel - Includes mirrored entities</strong></li><li><strong>7b line and 7c line - parallel - also mirrored entities</strong></li></ol></li><li><strong>Extrude Ghost - 0.20 cm</strong></li><li><strong>Engrave Initials in center of Ghost - 0.10 cm</strong></li></ol></li></ol><p> </p><p><strong>How I Designed This: (How did my final design differ from the plan?)</strong></p><figure class="image image-style-align-right image_resized" style="width:63.1%;"><img src="https://lh3.googleusercontent.com/5RWcMvsKGylWgHpcaUNs_YblWEI3c4iS408Hg4IDK6Kd4sYsNfYsVFCwKV9jEmRQ5vjR6dKWGBcjiK063CbfMeL9JUUZ3VynkAeAlcfrHHlD1GxXE7cDX5VBzKckCEjSzBrhmchDT_I0fQwBoK2OYXu4Mv75TODy6FABzHr3I1KS5BX17lceJ0V1iA"></figure><p><strong>- Upon comparison with the original, the eyes seemed too big: roughly 0.7 cm. So we reduce the size of them to a diameter of 0.55 cm.</strong></p><p> </p><p> </p><figure class="image image-style-align-left image_resized" style="width:57.04%;"><img src="https://lh4.googleusercontent.com/xmXQ6125UP8uHKB79cZMqnMSabQjmZOuhppIaszyxV_HYXBbG-MrJcd5laMyZ0XLFqtuzQBlRscmstEi0H8UzL-9A_JVOEv1SeWSS-ELm9PeqmDdedb5NoIhsFLxR1ouJ0uHD__NoSeIVzsXxSD9pmYpkE1etrBsiQWJg7o9S-D6KpMy6FC4lCn5Gg"></figure><p><strong>- The measured distance between the edge of the face to the center of the eye ended up being too small, so we adjusted the distance between the edge of the face and the center of the eye to be a bigger value. (0.6cm → 0.87cm)</strong></p><p> </p><p> </p><figure class="image image-style-align-right image_resized" style="width:19.21%;"><img src="https://lh3.googleusercontent.com/TRuYd495OJZReZWx5avwvfqgI03OUIidrmXtK5NVLr9vIWJA1dtyvj0VLia6KS0WrOzePBqgivTzftv6nalmm2Ge8hcIiw7Yb3OdU6CIeRxbj1hhRbq5y3qPPk16A84b0lZ4hg33_F3ekajxmuhJk2m9EHJESwcX4g3YJa-wXKGmSo08yGYxDa7CQw"></figure><p><strong>- We incorporated offset entities on the mouth instead of the original plan, so we had to remeasure the center of the mouth and try to find the radius of the mouth. Before we measured the radius of the mouth to be 0.175 but since that ended up being too big, we resized it to 0.16.</strong></p><p> </p><p> </p><p> </p><p> </p><figure class="image image-style-align-left image_resized" style="width:59.29%;"><img src="https://lh5.googleusercontent.com/a-ee9b_3K8g5Bj7QUHSUvQQV3BgatUebC-bdcdyaHE4I2BzNeBLhCwtc68BvfA9KuYLdwVhmmCS_xlWRbQ7JctLFZIJyayg2YwsM00VKrV05Q5VaaCPhNGN2YyWKLLXCzjMgrdebFvB4q85KY93l7WoV6_btzpC6bgG9RIo6AO3PL5-ExV5_Kmx3GQ"></figure><p><strong>- Originally, the half of the arches were meant to be drawn and then mirrored. That caused one of the arches to be erased or elongated, so we resorted to drawing the left most arch, mirroring it across the center, then drawing the two middle arches on our own without the mirror tool.</strong></p><p><br> </p><p><br> </p>
With this file you will be able to print Ghost Clip with your 3D printer. Click on the button and save the file on your computer to work, edit or customize your design. You can also find more 3D designs for printers on Ghost Clip.