Ghost Clip
prusaprinters
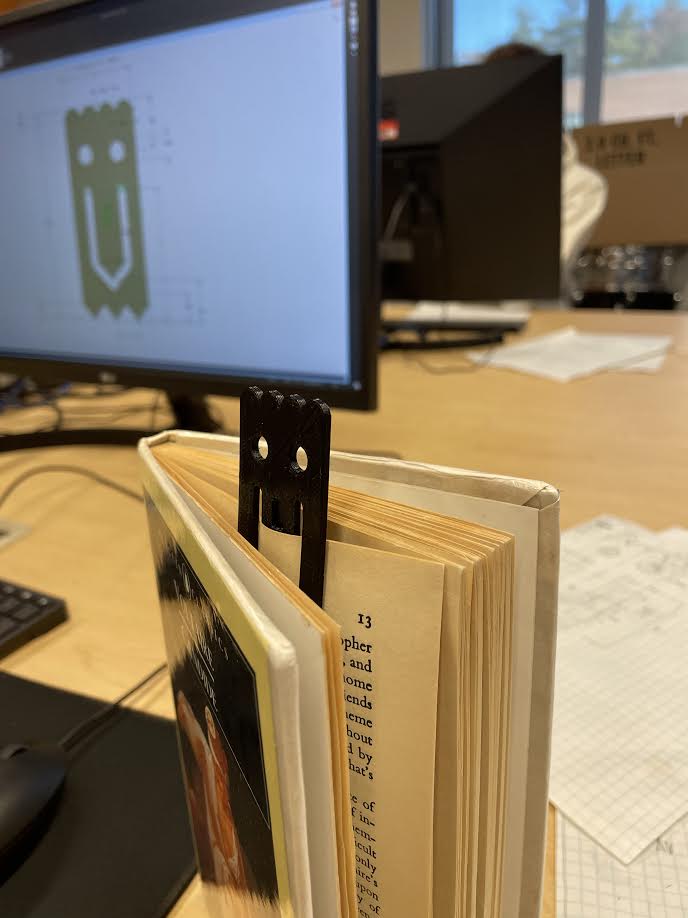
<p><strong>Lesson Plan and Activity: </strong></p><p>The goal is to, with a partner, create a ghost clip in Solid works. The ghost clip must be made with BOTH accuracy and collaboration. </p><p><strong>Construction Instructions Section:</strong></p><ol><li>Draw a center box off of the origin</li><li>Dimension it to match the dimensions on the drawing</li><li>Add a construction line to contain the half circles on the top. Dimensions specified on drawing. </li><li>Add a construction line to contain the triangles on the bottom. Dimensions specified on drawing. </li><li>ONLY DRAW ON THE RIGHT SIDE OF THE CENTER VERTICAL CONSTRUCTION LINE!!</li><li>Draw two half circles within the construction box at the top. Only draw them on the right side of the center construction line with the specified dimensions. </li><li>Mirror the half circles to the left side of the center construction line</li><li>Draw a triangle and a half within the construction box at the bottom. Only draw it on the right side of the center construction line with the specified dimensions. </li><li>Mirror the triangle and a half to the left side of the center construction line. </li><li>Draw a circle on the right side of the center construction line inside the construction box in the general area of where it is in the drawing. </li><li>Dimension the circle to have the specified diameter in the drawing. </li><li>Dimension the circle to be the specified distance from the top of the main construction box.</li><li>Dimension the circle to be the specified distance from the side of the construction box. </li><li>Mirror the circle to the left side of the center construction line</li><li>Make a horizontal construction line for where the arc starts on the top of the mouth. Dimensions are specified on the drawing</li><li>Make another construction line above the mouth where the arcs peak. </li><li>Start the mouth 1.3 cm from the bottom of the constraint box. </li><li>Draw a diagonal connecting the tip of the inner part of the smile to where the inner vertical edge of the smile will begin.</li><li>Then draw a vertical line from the inner point of the smile to the bottom of where the arc begins.</li><li>Smart dimension the inner connecting point between the vertical and diagonal line of the mouth to be the specified distance from the center construction line. </li><li>Offset the vertical inner part of the smile outwards the specified distance from the inner line.</li><li>Draw a diagonal line. Add manual relations to make the diagonal part of the smile parallel. </li><li>Draw a 3-point arc connecting the outside and inside edge of the smile at the top</li><li>Smart dimension the bottom most point of the smile to be the specified dimension from the very bottom point of the construction box. </li><li>Mirror the right side of the smile to the left side of the center construction line.</li><li>Add the sides of the ghost</li><li>Double check</li></ol><p><strong>Design Choices: (This is probably the most important part)</strong></p><ul><li>My partner and I started by sketching the ghost at a two times scale</li></ul><p><img class="image_resized" style="width:51.23%;" src="https://lh4.googleusercontent.com/he0gWpdlkLZc0_WYbIOVXGA9DHKnPlFdl41_dVeSlgJQFMIORRAg8sFXUE7Xto3T4QGnjZnkjnF-zSiEX8qGsiTUhUjudXnnwj4gSXN6dbu_BluGqvTDZIdldwpnk_GPVSbuaWLM3aLbbP4YkDS_VzZtXmvm8m3dh5R0qBn5uxpkmN5KY1wWdCbeYQ"></p><ul><li>After making our constraint box and adding in the dimensions for the triangles and circles we started drawing everything in. </li><li>For the triangles at the bottom, instead of using .5 cm as the distance between the edge of the constraint box and one triangle, we used 1 cm as the distance between two triangles. </li></ul><p><img class="image_resized" style="width:36.66%;" src="https://lh6.googleusercontent.com/PVEDZZSAo6DLNA2Tu9aHKvMdirPGJnvQtk1vqBLMSr1_z9i_RevK1X0lQf9geGGu02CsvbPqSaJNhCoQZynGkxzreGPuZgdP_3WdQRlAAmhTHSYOTAZaOk16YXtqyMkJGhhNRtrNgstlsJyPToYkNjQpZPtfjqXk-8QcN45p3lCqJCYGD8yL5lzGRQ"></p><ul><li>Instead of mirroring the entire sketch at the end, we were informed that it would be more efficient and easier for Solid Works to only need to mirror small groups of things at a time. <ul><li>After each feature (triangles at the bottom, semi-circles at the top, eyes, and mouth) we mirrored them to the other side of the center line in the construction box. </li></ul></li><li>When making the eye we combined the radius of the circle and the distance between the right edge of the circle and the right edge of the constraint box (distances was 0.8 cm) instead of having two separate measurements. </li></ul><p><img class="image_resized" style="width:26.85%;" src="https://lh3.googleusercontent.com/CXX46G4DQUQb1DMk_2rpz9WMXnbQZ9HrQCnpESjBitisTTxsZtyMJSzOs2oq5n-7_qk1qwUYryOoHeqaPZuwO-S0Y7-wK3-5M97YAc6dURh9EEttydaTTIoKlg9CorvhjjKBOm6tlYj_e0GvLFQqEevuDVqTjRPoBNnwybc_PJkPxiqSSpInmiTraQ"></p><ul><li>We combined the radius of the circle and the top of the circle to the top of the constraint box (distance was 1.4 cm) instead of having two separate measurements. </li></ul><p><img class="image_resized" style="width:32.87%;" src="https://lh3.googleusercontent.com/w3Z0MHVv12y-IpMP22jVR_DyrKR68UiyCWyxOwA8-xRACCGPE7MV_Ew9FxX-l_S3DWtA81wyR-2NeTRrqUYycRIH8FTBGa0i5ncNe4xl-EBiaFlQPyo0lOtA6bnGskgN0mDQ6D_9uxxHyXx-rHI_8V7qHJx_p5b0oKpLbs3-nnSHFWKhGB0_CwSylA"></p><ul><li>We didn’t specify the distance between the left side of the eye and the center line in the constraint box because the dimensions that were already put in place when making and positioning the eye would automatically give a dimension for that distance. </li><li>Because we were mirroring in smaller sections it wasn’t necessary to use 1.2 cm as a measurement to specify the distance between the inside of two mouths. Instead we used 0.6 cm. </li></ul><p><img class="image_resized" style="width:30.55%;" src="https://lh6.googleusercontent.com/5mJDT0zep3od1pA24qN7WqGt5L4dtRVFLJWkyaJKkQp3FipQSHO6UVVYAfaSN4vWaW_FX1HSIIUpqUQGlvUfwn5vibWYjmAuy61pZZhC4A2z4rSg90QPUccW73XiIqM3tjl0KoCxRr-5RxffWW2q1re79oha5dRFn4IwlRzcBqXLZHgClKV9kuOk0A"></p><ul><li>When drawing the mouth, we added an extra measurement (1.3 cm) to determine where the inside edge of the mouth would make contact with the center line in the construction box. </li></ul><p><img class="image_resized" style="width:62.14%;" src="https://lh5.googleusercontent.com/Pq6YEoCH4zRokbqttz1deLbdknZ4jt5mgVJI1gzlssWzQmPY8X4acM8m-LdIcXV38CZbb7J2P2MEQu_NrnIXf4_GIRcRMuXYQkZ2Q8v0rYWjBbQl9jSKksePwQeDMXRFXCxGAI7MkNGm7PaYyazKNhY-KG6OxH89smGX6rcKQYGd-Ea8vKNXFswHqw"></p><ul><li>We didn’t use 4.3 cm to measure the dimensions of the top of the mouth to the bottom of the construction box because it would have been automatically set with all the dimensions already set. </li><li>When capping the ends of the mouth, my partner and I decided to use the two-point arc tool to draw the ends of the mouth instead of capping the ends. We made this decision because it was easier for us. </li></ul><p><img src="https://lh6.googleusercontent.com/0O0NVKYiN7b8Qso2um2Nj56Ls6w0Y8ViiimXXeAhwLxD8MY6UQPb3wP1tIvhU36NLyKA-6Y1pUxkbluR9_o46WaYwwoSSOAHX7RAJgd78mRMcaJMWMaMEhX6CYV2RsUmnvEiF95z9OvHpfHV7At_XmasVLuEr7tmh21FyYOX3Nazz98eZm-YKeAwSw"></p><ul><li>We didn’t specify the distance between the side of the mouth and the side of the ghost because it was not a necessary dimension. </li></ul><p><br><br> </p>
With this file you will be able to print Ghost Clip with your 3D printer. Click on the button and save the file on your computer to work, edit or customize your design. You can also find more 3D designs for printers on Ghost Clip.