Geo-parametric coaster + holder + modifiers
prusaprinters
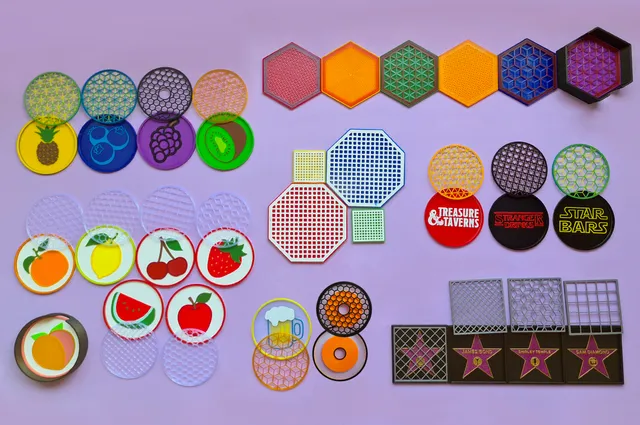
Main featuresTwo-part (base and cover) parametric coaster.Fully customizable.Customizable modifiers for the parts.Several predefined grid types, that can be combined, and a do-it-yourself "infill" coaster cover using the modifiers.Z-based color change, works well with PrusaSlicer automatic color change —no MMU requiredIntegration with the Name Tag creator A lot of pre-made, ready-to-print STLsOverviewThe coasters are designed in two parts: a lower base that serves as a condensed water reservoir, and a top "cover" that has some kind of grid to allow water to drip. Both have a "flat U" section by default; but you can use a "full thickness" grid cover, that is, one whose "floor" (top of the coaster, actually) is as thick as the cover itself, with no "perimeter borders". Usually, the material-saving flat-U shape will be enough to hold your drink containers, but heavier or bigger ones (like metal mugs, 2-liter jars, and so on) may need a full thickness cover.You can also, of course, forego the cover; but that will mean that the bottom of your glass will be wet and dripping any time you pick it up.If you want fully flat, simple coasters I suggest you use the Name Tag creator straight away; the integration mentioned above is just to make a fitting cover and holder.If you're new to OpenSCAD customizer, please read the bundled PDF “Using OpenSCAD customizer” first.The main parametersThis panel is for the parameters that affect more than one type of object (base, cover, modifier) and also for the modifier output control. You select here which object to create (base, cover, a modifier for either, or the coaster holder). Modifiers can be "scaled" here (and you'll keep their self-centering fillet in place and size), and you can make "ring" modifiers, that is, voided of a part in the center (if "Inner modifier XY scale" is greater than 0). This means that you can make, say, a ring that goes from 100% to 75% of the grid area, another from 75% to 50%, etc., or any other number and combination you want. This allows you to create changing angle patterns, or different percentage (lower in the center so it can be seen better), etc.But of the main parameters, likely the most important is the shape type. Each shape has its own panel of parameters —make sure you're using the right one, as the other will have no effect.Shapes and sizesThere are two shape types: one is the circle or regular n-gon, and the other is a square or rectangle whose corners can independently be rounded, straight or "chamfered" (with a circle or n-gon cut, that is, the inverse of "rounded").For the n-gonal, first you have the number of Sides; this can be anything from a triangle to an extremely well-defined (and memory-intensive) circle. Then is a "Basic size", or "reference size", which is a measure of… something. The third parameter in the Ngon/circle shape parameters tells what is this "something". It may be a side (which is useful to make "mosaics" of differently-shaped n-gons, like squares and octagons), a "biapothem" or twice the apothem (the diameter of the circle inscribed in the n-gon), the diameter (diameter of the circle inscribing the n-gon) or the sum of radius and apothem (like the height of a regular triangle). And all these can be either of the base, the cover or the grid (which is the "useful area"). You'll be likely using the grid biapothem, which is the diameter of the "useful area" circle, but this array of choices covers most, if not all, use cases.The box shape has simpler parameters, yet more of them. Width and depth (in y-axis) are for the base, and all the other element dimensions are taken from these. You can specify the radius and type of each corner, and how many segments will they have; unchecking "Limit corner radii" allows for more freedom in shapes, but results can be... strange. This is exactly the same style of definition used in the Name Tag Creator, so its parameters can be used here as a drop-in replacement.Base parametersThere are three simple parameters for the base (independent of its shape): The (total) height, the thickness of the walls (which should be, at least, an integer number of perimeters) and the thickness, or z-height, of the base floor. This should be thick enough to allow for at least some waterproofing.Combining grid patternsOne of the most visually attractive possibilities is to combine several grid patterns into one -as some do, geometrically, "fit". There are specific options to fit hexagons and triangles to rhombille, so this gives 4 combinations: tri + rhombille, hex + rhombille, tri + hex and tri + hex + rhombille. Circle centers are in a triangular grid, and so they fit with an hexagonal pattern. Also, squares and diamonds can be made to fit.There are 2 ways to combine grid patterns: overlapping and overhanging. Overlapping allows the build-up of transparent colors (maybe with one opaque color at the end), and overhanging clearly separates colors. The basic process is basically the same: instead of a single grid, we make several that fit and adjusting the cover height and cover floor thickness. We then add the one that's nearest to the bed to the slicer, and add the other(s) as part(s) so we can adjust their z and make a single piece with the overall dimensions.In the "overlapping" method, all patterns can start at the bed. In the "overhanging" method, they don't; so we have to adjust both their cover floor thickness and cover height.Example: If you want to make a rhombille-hexagon overlapping cover of total 3mm height and total grid height of 1.2 (leaving 1.8mm free below it for the base), start by creating a rhombille cover of 3mm height and 0.6mm cover floor thickness. Then make a rhombille-fitting hexagon grid cover of 3mm height and 1.2mm cover floor thickness. Load in the slicer the rhombille, and then add as part the hexagon and drop it to bed (z=0). You'll have a cover that will be rhombille up to 0.6mm and hexagon from then up to 1.2. (You could also do the successive "parts" of shorter cover height and move their z as part, much alike the overhanging method explained right away; this can allow you to create less parts and save work.)To make an overhanging square-diamond, we'd do a square grid cover with 0.6mm cover floor, 3mm height, and a diamond grid of 0.6mm cover floor thickness, and 2.4mm cover height; we're substracting the square cover floor thickness, since we'll be putting over it. Load the square, add the diamond as part, drop it to bed and then raise it by 0.6. Overhanging style works better with square-diamond and rhombille-triangle, as all the vertices of the most dense tiling are in the less dense one, avoiding in-mid-air vertices which may not stick to bed. Besides allowing separation of opaque colors, it gives a woven-y look, as the overhang drops to the bed.The round covers have plenty of combination examples, both in .3mf to show how it's made, and in .stl as a final file. The default round cover is 3mm tall, with a 1.2mm thick grid. The pattern closest to the base has usually a thickness of 0.4. The successive patterns are added with a thickness so as to fit the 1.2mm total (so we have all the coaster covers with the same specs) and a smaller height, subtracting the height of all the patterns that will go below (f.i., 2.6 and not 3 if it's going above a 0.4mm thick pattern). We start loading the bed-facing pattern in the slicer, then we add as a part the other(s) and move them in Z accordingly; since we adjusted the heights, the final result will still be 1.2mm thick grid, 3mm tall overall. We add the color changes we want, and done!The "Infill" gridsAll you need to do is to create the solid cover and the modifier or modifiers for the area you want to have grid (or hole). You can “pile up” several modifiers scaled in z to have different “layers” of infills (which may, or may not, correspond to printing layers), and take advantage of the “ring” style of modifiers to combine several infills, or infill angles, in the same layer. Remember that you'll have to set both top and bottom layer count to 0 in the modifiers to show.Step-by-step:Select "None (use modifier)" as "Grid type" and create and save the STL the upper part grid piece (select it in "Object type")Create the modifier selecting it in "Object type" and save its STL.In PrusaSlicer (or other slicer that accepts modifier meshes), load the grid piece with the flat part, that will be the top, touching the bed (the default orientation).Right-click it and select "Add modifier"->"Load", and load the modifier file.Make sure it's centered at 0,0 and "dropped to bed" (its z-position in PrusaSlicer will be half its height)Now, select the modifier in the object list at the right, and choose "Add Settings"-> Infill. Select 0 top layers, 0 bottom layers, and the infill type and percentage that you want.Double-check that everything is right in the Slicing preview window, and you're done!Advanced modifier useNote that you can use the grid modifiers as parts and modifiers for the base also! That's how the "spool-ish" coaster base was made. We simply add the grid modifier we want as a part, move it to the right Z, and then add again the very same modifier, but this time as an actual modifier —move it so fits the modifier-as-part and you're ready to have nice transformations and objects on the base. So, for instance, you can add the grid modifier to the base and move it so it's at the top of the inside part. Set it to 0 top layers, and make the base with a different infill percentage than the cover. You'll have a mesmerizing pattern just by fidgeting the cover. Note that this may make it harder to empty the water —but if it's to be used in a hot environment, maybe it won't affect that much; evaporation might do the job.Remember —any object can be used as a "part", a "modifier", or a "negative volume".Nested coversIf your cover has some "border" (i.e., the height of the cover is greater than the cover grid thickness), you might want to do one or more nested covers; that is, smaller covers that fit under the cover, which have under them even smaller covers... and so on. Just pass the data of the cover (displayed in the console) to the coaster, and the "Grid clearance" parameter to "Part clearance". Then you will be able to generate a smaller cover that fits exactly on the grid of the bigger one.N-gonal mosaicsAnother of the nice (and useful) visual effects that you can achieve with n-gonal coasters is using them to make tilings, or "mosaics", with two or more different sized glasses; for instance, regular tall glasses and shot glasses. Here the hexagonal and octogonal-square tilings are used, but there are more. The key to tilings is the ratio of side lengths; usually, one or two different n-gons of same side length will be used. You can make one to fit a glass (usually, the smaller one), using the "biapothem" measuring type (which is the incircle) and the other taking the side of the smaller one, and "side" measuring type. The console will output the dimensions of base, cover and grid so you can make them fit.Just for reference, the "useful area diameter" (polygon incircle) relationships for equal-sided n-gons is as follows:An hexagon has about 3 times the useful diameter of a triangle.An hexagon has about 1.7 times the useful diameter of a square.A square has about 1.7 times the useful diameter of a triangle.An octagon has about 2.4 times the useful diameter of a square.Integration with the name tag creatorThis is likely the most powerful feature of this coaster creator, and allows for a huge array of designs with quite a "wow" factor. In short, it means that we will be using the Name Tag creator to make the base (and thus be able to add text, image files, &c), and then create fitting covers and holders in this program. (A mixed approach is to also create the base with this program, and then add as a part something made with the Name Tag creator, but it's actually more hassle and basically the same process.) Note that the Name Tag creator works well alone if you want to make single-piece coasters, like the Stranger Prints ones, that also can have a flat, no-MMU multicolor surface using the “print-on-print” technique.Except for the "spool" coaster, which is made using modifiers, all the coasters with images or logos displayed in the pictures have been made with the Name Tag creator. The "fruit" (and beer) coasters are, as you may have guessed, emojis from the Noto Emoji set. The SVG version has been taken, extracted some drawings as color layers, and then mounted in the name tag creator using the black & white version of the SVG as a temporary guide. (Some use just the black & white version, and some use the default Windows Segoe UI emoji set.) The “layers” used are provided.You can download the full SVG Noto set from Github. If you're going to use the provided layers and presets, note the folders that the files are supposed to be: in the subfolders Emoji/svg_layers and Emoji/svg_bw of your Name Tag Creator folder.The easiest thing to do is to use the tag frame as walls: give them uniform thickness and the height for the full coaster. Then, you can enter the data displayed in the name tag creator (width x depth x height) into the coaster generator. If you're using rounded corners, enter in the coaster generator the data used for the frame corners in the name tag generator, not main area corners. For circle/n-gons, remember that the width and depth in main area of the tag creator must be the same, and the thickness/width of the frame uniform; the "Precision" parameter marks the number of sides, so a low value for n-gons (3 for a triangle and so on), and a high value for circles (although the coaster creator can reach a higher definition that the name tag creator, this doesn't matter much in practice). Use that width/height as a diameter in the coaster creator, either as of inner part or outer diameter (remember to include 2* frame thickness if using the outer, maximum diameter). That will work even if the n-gon is odd-sided and has no colinear diagonals (no "diameter" as such).To make a n-gonal name tag from the data of a coaster, you need to enter in the name tag generator as (total) width and depth the diameter of the coaster, minus the frame width and depth (the wall thickness). Remember to use twice the value of the frame thicknesses for the substraction; that is, the tag main area depth is the diameter of the coaster minus the top frame and bottom frame, and the tag main area width is the diameter of the coaster minus the left frame and right frame. Then:Set all the corners as rounded, both in frame and main area. Set all the frame radii as half the coaster diameter, and the main area radii as half the diameter minus wall thickness/frame width, or to the same value as the frame and check the "Limit corner radii" checkbox (which is checked by default). Set the "Precision" parameter in the name tag to the number of "Sides" in the coaster.Done!
With this file you will be able to print Geo-parametric coaster + holder + modifiers with your 3D printer. Click on the button and save the file on your computer to work, edit or customize your design. You can also find more 3D designs for printers on Geo-parametric coaster + holder + modifiers.