Geeetech Acrylic I3 Auto Bed Level BLTouch Mount
thingiverse
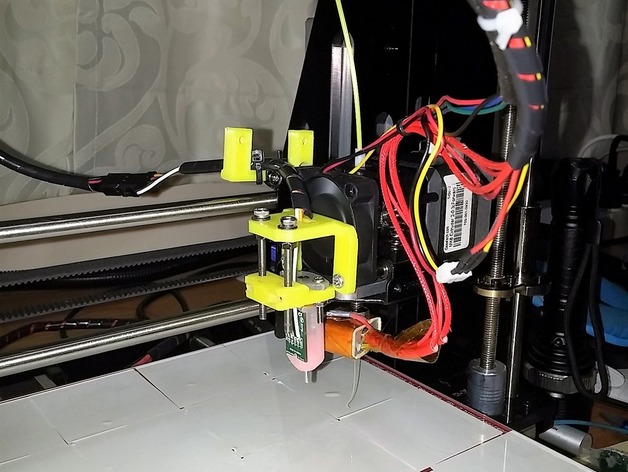
Wanted to get rid of that annoying manual bed leveling hassle. Bought a BLTouch and couldn't find anything suitable for my printer, so I designed something myself.\nCAUTION - THIS PROJECT REQUIRES A GOOD LEVEL OF SOLDERING SKILL for the GT2560 board.\nPrint Settings\nPrinter: \n Geeetech Acrylic I3 Pro B\n \n Rafts: \n Yes\n \n Supports: \n No\n \n Resolution: \n Used a 0.4mm nozzle with great results\n \n Infill: \n Standard, but could be increased for added detail\n \n Notes: \n A 0.3 or 0.2 nozzle may produce finer details that require less post-printing touch-ups.\nPost-Printing\nNeeded to install\n A few M3 screws, I used some spare 40mm ones\na couple of 45mm+ M3 screws (shorten 50mm ones to fit)\nSome M3 washers\n4 M3 hex nuts\nA soldering iron as the BLTouch needs to connect to pins on the GT2560 board.\nAnd make sure you connect the Z axis end stop wiring correctly\nYou may also need a 2.5mm drill and/or fine flat file. The two slots for the M3 hex nuts on part 1 might need widening or slight height adjustment to fit the nuts properly, depending on resolution and printer performance. A 0.2mm nozzle could do better.\nPush 2 M3 hex nuts into each slot of part 1 and align with screw holes\nMount part 2 on the fan (using modified M3 50mm screws)\nAttach BLTouch unit to part 1. The unit's wires can go either way, but will still fit through the slot in part 2.\nInsert M3 40mm screws through holes in part 2 overhang, add one M3 hex nut and screw them up almost to the top\nFeed the BLTouch wires through the slot of part 2\nSlide parts up the M3 screws and screw until the base of the BLTouch complies with the specified offset distance (it comes with a sheet)\nFollow the installation guide for the rest. Check out this link to get the guide, plus ordering info: https://plus.google.com/communities/109126963511513081214\nHow I Designed This\nDesign was through trial and error, but Mod 3 worked best.\nWhy the screws? The guide says that any mount should be height adjustable. While the actual variation in height is small, I made it extremely variable for extra flexibility.\nIn case you're wondering what's between the heated bed and glass top, it's self-adhesive thermal transfer tape (3M brand from Ebay) - very thin, great thermal transfer characteristics, and not permanent adhesive (you'll need 16 x 50x50 pads or one 200x200 pad). No more clips holding the glass on.
With this file you will be able to print Geeetech Acrylic I3 Auto Bed Level BLTouch Mount with your 3D printer. Click on the button and save the file on your computer to work, edit or customize your design. You can also find more 3D designs for printers on Geeetech Acrylic I3 Auto Bed Level BLTouch Mount.