Geared Extruder
pinshape
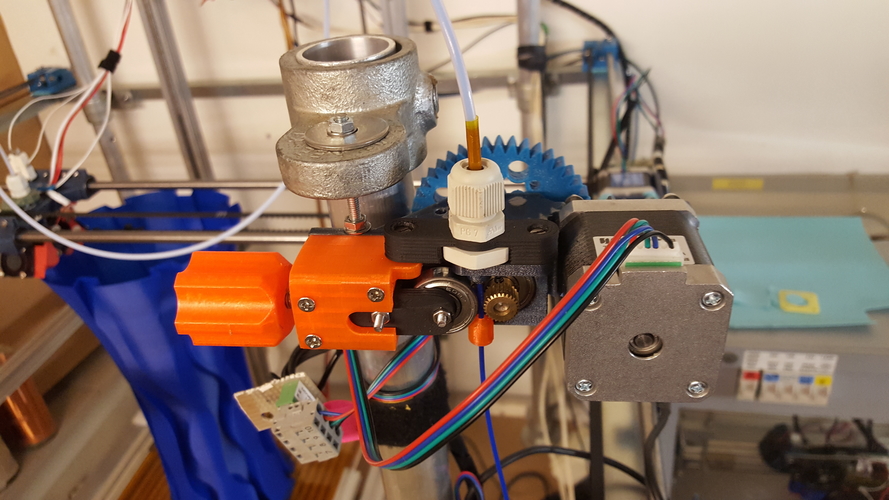
I wanted to create a new extruder for my printer that I had converted to a bowden setup. My goal was to make it simple, robust and ensure that the filament could be pressed firmly against the driver gear. The filament can be guided with an adjustable guide, and I kept the gland nut but included parts for regular Teflon tube holders. On the printer shown in the pictures, the gland nut works well. This extruder and tube setup has survived a 20-hour print test. However, on another printer of mine, the gland nut doesn't work as well because it prints at much higher speeds (60mm/s and above) and the gland nut can't hold up anymore. I discovered that applying Kapton tape to the tube helps. I'm still experimenting with other tube holder methods. The small filament driver (11mm diameter) is mounted on an M8x50mm bolt that I had lying around. On my lathe, I turned the end of this M8 bolt down to 5mm so the driver can be mounted on it. See pictures. This model is designed for 1.75mm Filament. For 2.85mm and 3mm Filament, the holes need to be bored out to the correct size. The small gear has 10 teeth and the large gear has 43 teeth. If you have any questions, feel free to ask. Teflon Tube Holder Upgrade February 22, 2018 This upgrade is about replacing the gland nut with tube holder clips. See pictures. I experimented with these clips and realized that the diameter of the hole where the clip is placed in is very important because not all Teflon tubes are the same size. The Teflon tubing I have is between 3 – 4 mm, so for me it works best to bore out the hole with a 6.5mm drill bit. However, I recommend starting with a 6mm drill bit and increasing if necessary. April 8, 2018 Spring Update After using this extruder with great success without a spring, I encountered problems with a specific filament that was not equally round on its length. This resulted in extruder failures because the filament bar didn't flex with the filament. When it reached a part of the filament that was slightly thinner, the filament slipped on the driver gear. So I decided to incorporate a spring. Yes, I know I should have done this from the beginning, but at the time I wanted to make this extruder as simple as possible. Now I know a spring makes it more reliable. Also, the spring makes adjusting the pressure on the filament a bit less critical. Please see additional pictures. The new pressure bar holder is a bit longer to make room for the spring. The new knob and M5 bolt are used, along with an 8mm x 20mm spring (beware that the old bolt was an M6!). However, it took up too much space.
With this file you will be able to print Geared Extruder with your 3D printer. Click on the button and save the file on your computer to work, edit or customize your design. You can also find more 3D designs for printers on Geared Extruder.