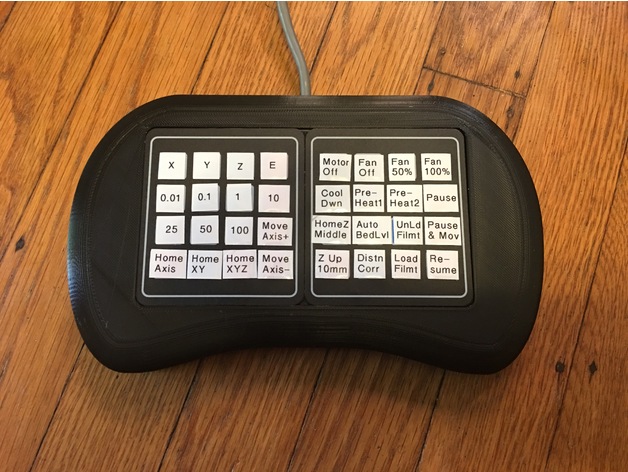
Gcode Sender (editable 32 button remote control for your printer/CNC)
thingiverse
A new wireless version can be found here: https://www.thingiverse.com/thing:2313781. The wireless version utilizes serial Bluetooth modules. This project shares similarities with using Pronterface or Repetier Host manual control to send Gcode instructions to your printer while connected via a USB cable, but instead employs an Arduino Nano connected to a small keypad for sending the Gcode scripts/macros. The Gcode sender is designed to work for 3D printers as well as CNC mills and laser engravers - any machine that uses Gcode. This setup enables one to send highly customized Gcode scripts/macros to the printer with just the press of a button. I've thoroughly tested all of the scripts included in the sketch, and each can be replaced or edited. The sketch includes numerous comments to facilitate tweaking the code according to individual needs. Communication between Gcode Sender and printer occurs through serial communication (Tx, Rx). On RAMPS style boards, the AUX-1 port can be utilized. Specific details on wiring can be found in the Wiring.zip file. It's essential that the Tx out wire from the Gcode Sender is connected to the Rx on the printer, and the Rx is connected to the Tx. In Repetier firmware, I had to enable Bluetooth serial port to utilize the AUX-1 port. The STLs print without support. It's worth noting that the STLs were designed with a low infill in mind. The infill serves as the body's support structure while printing. Maintaining a low infill helps prevent waste of filament. Once assembled, the Arduino Nano board is hidden inside the STL body within the cavity under the keypads. The keypads feature a sticky backing that adheres to the insert STL. This insert can be removed later (a print removal tool works well) if reprogramming the Nano becomes necessary at any time. A Fusion 360 file is provided for further tweaking of the Keypad holder parts. I encourage users to share their own alternative designs for the Gcode Sender. BOM: * Two 16-key, 4x4 membrane keypads * One Arduino Nano Development Board (it has sufficient i/o pins for two keypads without any additional shields). One keypad can be used instead of two. * A desired length of 4-wire cable (I utilized a short piece of Cat5 cable and the four twisted pairs since I had it readily available) to connect the Gcode sender to the printer. * Two short 8-pin jumper cables to connect keypads to the Arduino nano board. Left keypad explained: The idea is to first select which axis to work with (e.g., x, y, z, e) then choose the movement resolution amount (e.g., 0.1, 1, 10, etc.), and finally select the movement direction button (+ or -). The movement direction button can be held down to continue movement in that direction. Credits: A big shout-out to Slavulj at https://www.thingiverse.com/Slavulj, who had a hidden gem on Thingiverse. His design at https://www.thingiverse.com/thing:1563410 served as the inspiration for this project. Print settings: Printer: HICTOP Prusa i3 Rafts: No Supports: No Resolution: 0.2 Infill: 10-15% How I designed this: STL was designed in Fusion360, and the sketch is an Arduino sketch.
With this file you will be able to print Gcode Sender (editable 32 button remote control for your printer/CNC) with your 3D printer. Click on the button and save the file on your computer to work, edit or customize your design. You can also find more 3D designs for printers on Gcode Sender (editable 32 button remote control for your printer/CNC).
