Garuda
pinshape
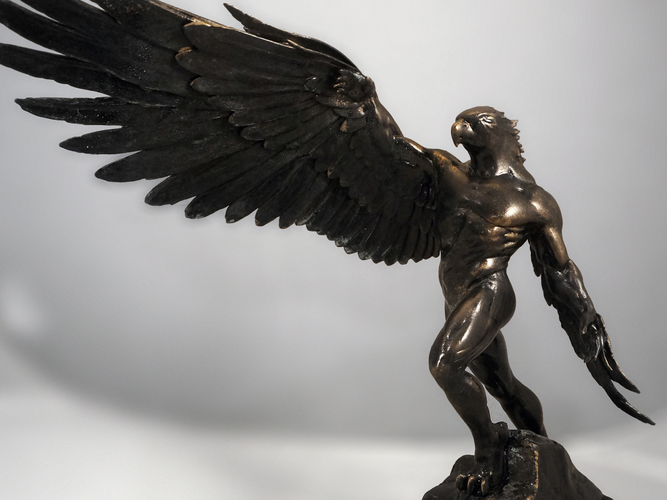
Garuda - a majestic bird-like creature that soars through Hindu and Buddhist mythology. -Stage 1 - Design We envision Garuda as a man transformed into an eagle-like being by a bionic suit. Our sculpture captures this transformation in progress, making it a fine art piece rather than a mere 3D printed toy. We chose to make it monumental, so we started with character concept artist Emre Lee drawing loose sketches of the design. The final detailed concept illustration was drawn after selecting the pose and design. I then sculpted the character symmetrically in Pixologic Zbrush, using one of my standard humanoid meshes as a starting point. Pose was introduced as a layer, allowing for easy changes to the design. Feathers were created and laid out in Maya, with overlapping UVs that made it easy to detail all of them at once. The final design was cut into pieces and keys added. All parts were processed with Dynamesh to produce uniform, watertight, and print-ready meshes. The pieces were also hollowed. -Stage 2 - Print The model is printed in 7 pieces, which allows for ease of assembly while printing on a large scale and reducing the amount of supports needed. Since the models have been hollowed with resin escape holes built-in, this project is suitable for both SLA and FDM printers. If printing with FDM, use 80-100% infill, 5 top, and 5 bottom layers. Any filament will work, but I recommend PLA at 190 degrees, 30 mm/s, and 0.1mm layer height. For SLA, orient the parts to have escape holes near the platform, reducing suction forces. After printing, soak in IPA, wash with dishwashing liquid, and leave it in the sun for an hour, rotating the parts every 10 minutes. The original scale is meant to be 35 cm high, but you can easily double it if printing on a delta or go smaller if printing by SLA. The scale and orientation will determine the amount of supports needed. -Stage 3 - Assembly & Post For best results, some minimal cleanup with emery boards is recommended. If your printer is calibrated correctly, all pieces should fit together perfectly. Using regular hardware store epoxy glue, wet the keys, insert, press, and hold for about 2 minutes. Don't worry about extra glue; it's easy to file down. Any seams can be touched up with model filler such as Bondo or Milliput and smoothed with nail files. You can also use epoxy. If printed by FDM, depending on the accuracy of your machine and layer height, you might want to smooth the result with Acetone (ABS) or Chloroform (PLA) at this stage. Please do it outdoors in a well-ventilated area! Next comes spray painting into desired color. I decided to go for faux bronze, so I primed it with black spray paint and applied a second coat of Modern Masters oxidizing bronze paint with a brush. The last step is to spray some patina activator. It can be purchased or made at home with vinegar and salt. You might want to fill the base with something heavy to make the sculpture more substantial. Anything works, wax, plasticine, or in my case plaster of Paris. Enjoy!
With this file you will be able to print Garuda with your 3D printer. Click on the button and save the file on your computer to work, edit or customize your design. You can also find more 3D designs for printers on Garuda.