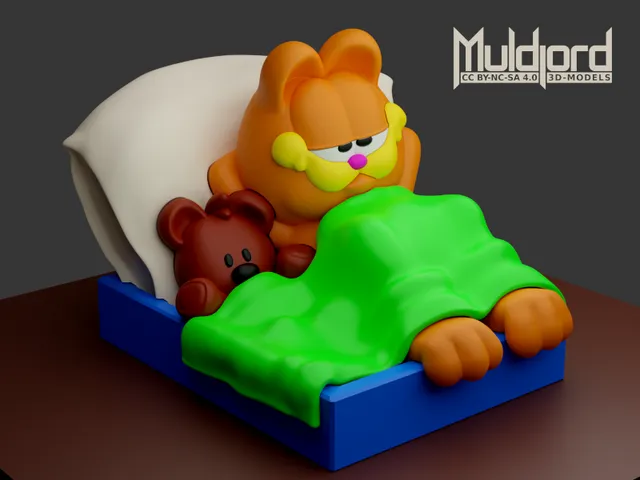
Garfield and Pooky, Expert version
prusaprinters
As I am a huge fan of Garfield I wanted to recreate the classic scene of Garfield resting in his bed with his beloved Pooky by his side. There are only a few “constants” throughout my life - Garfield is one of them, and I love him dearly.This is the expert version of this model. Intermediate and beginner versions are also available.This expert version of the model has most parts of the model split into separate colors. This allows you to print the model in color without the use of an MMU. But it does require some gluing and attention when assembling and printing the smaller parts.Printing instructions and notes:Print in PLA.I recommend either printing the gcode files directly, or loading and slicing the provided 3mf files with the included supports. They are hand-tailored to get optimal results.Each filename designates a part or parts and what color they should be printed with.Larger parts are 0.2 mm layer height.Smaller detailing parts are either 0.15 mm or 0.10 mm layer height.Remember to wear eye-protection when removing the supports! Especially for the blanket as small pieces tend to go flying. This is of course a tip for all 3D printing, not just this model.Other info:You can stop reading now if you don't care about how this model was created. Please consider sharing a make if you end up printing it. I would absolutely love to see your result! :D You'd make my day! Thanks. :)Cutting pieces of a 3D model to allow for multicolor printing without an MMU is quite a challenge (at least at my current Blender skill level). The result you see here is by no means perfect - but it does work. The challenge mostly lies in “inflating” each piece to make room for it when inserting / fitting it into the other pieces. I did not find a non-destructive way of doing this as there are no “inflate” modifier. Rather I had to rely on Blenders “edit mode inflate".I would start by separating each part that required a specific color from the main meshes. For instance Pooky's nose and eyes. I would then select the backside of the part, pointing inwards towards Pooky's head and use extrude to give it more room to fit into the main mesh. I'd then use the scale tool to align the vertices of the back of the part to become a flat surface.I'd then create a copy of the separated mesh using shift+d → right-click mouse to leave it in place. Apply scale and recalculate normals outside (this is important!). When in edit mode I would then select all vertices and use the inflate tool on the mesh. I'd start by dragging with the mouse to start inflating. This pops up the tool-overlay in the lower-left corner where you can input a precise inflate value. Now, 3D printers have different tolerances, so only use this as a rule of thumb:For a piece that needs to be glued to a separate piece I'd inflate by 0.01 and add a boolean to the original piece with “difference” to this inflated piece.For a piece that needs to fit with but still be removable (no gluing) I'd inflate by 0.02In some cases the mesh is a mess (pun intended) you can / will run into trouble with inflating and / or adding the necessary boolean towards the “mother piece” where you want it to fit into. In these cases recalculating normals outside can be the solution. It might also be that you need to remesh it completely for it to work properly due to self-intersections that you either can't see or haven't thought about. It can be quite frustrating and it often feels like you are ruining your model. So be sure to create plenty of backups before applying destructive changes. :)Some background info on why this model exists:I am currently learning to model / sculpt in Blender. I plan to recreate some of my favorite comic characters while learning the ropes. Modeling in 3D is hard. But it is also a creative process where there are basically no right answers. This is what I love about it! As long as a 3D model does what I want it to do, it is correct. And for 3D printing you don't really have to care about whether the 3D topology is perfect for rigging and animation since it is “just” a model for printing. I like that, as it allows me to focus purely on the look of the model rather than the functionality of it.This is only the second 3D model I've ever made in Blender. Knowing this, I hope more people decide to “Just go for it!”. I have been hesitant to look into it for years as I was convinced it was just too hard to do.Turns out, it is! Haha, but it's also a lot of fun and with persistence I've learned more about 3D modeling over the course of the past month than I have throughout my entire life as a creative person.Blender is such an amazing tool I cannot recommend it enough.
With this file you will be able to print Garfield and Pooky, Expert version with your 3D printer. Click on the button and save the file on your computer to work, edit or customize your design. You can also find more 3D designs for printers on Garfield and Pooky, Expert version.
