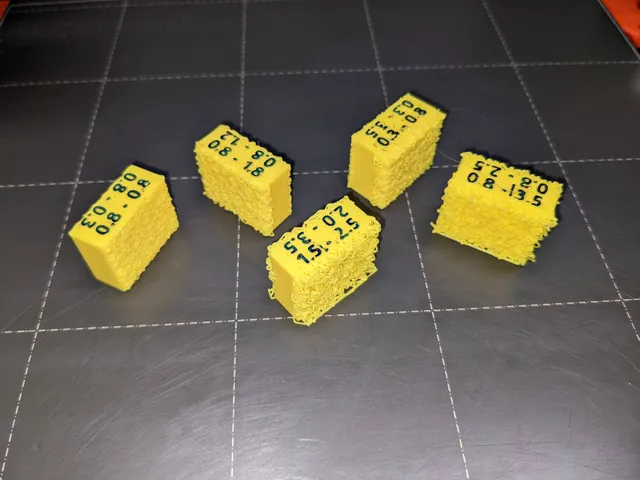
Fuzzy Skin Test Blocks
prusaprinters
Update Jan.3, 2022 : The labels for the 2D and 2E blocks were incorrectly reversed - these have been replaced by corrected files. Just to be clear, although the fuzzy skins for these blocks printed correctly, the top labels were switched around.PrusaSlicer 2.4 introduced a new setting - fuzzy skins (originated by Cura, I believe). The effects for this print were created using Prusaslicer 2.4; if you want to make any modifications you will need version 2.4 or later.See an explanation of fuzzy skins here:https://help.prusa3d.com/en/article/fuzzy-skin_246186/Recently I tried out the new setting on one of my pen holder prints, and I really liked the effect. The meaning of the fuzzy skin settings is pretty straightforward, but the actual results obtained are hard to visualize. So I created these test blocks to provide actual physical examples of various fuzzy skin settings combinations.Each block includes two combinations of settings, and the settings are printed on the top of the block. This enables the blocks to be kept as a visual reference for future use.Block NumberPoint distance #1Thickness #1Point Distance #2Thickness #22A0.80.30.80.82B0.81.20.81.82C0.82.50.83.52D1.52.52.03.52E0.30.80.33.5In addition to the above, a “blank” block is provided (with the two sides labeled A and B). This block can be used to test additional settings combinations. Additional observations :I have found that the visual impact of the fuzzy skin effect varies depending upon the type and color of the filament used. The texture is more visible on lighter colors, whereas darker colors tend to emphasize the highlights - both effects are very nice, depending on the look you are going for. The effect seems to work particularly well with “silk” type filaments - it literally brings a new dimension to the silk effect. Print Instructions :Print the blocks in PLA using the 3mf or gcode files provided. Files are provided to print each block individually, or all five blocks at once. I used a felt tip pen to highlight the settings printed on the top of each block.Note that the fuzzy skin does not “exist” in the STL files - it is an effect created in the slicer. If you simply load and print the STL files all you will get is a smooth block. This is also why you do not see the effect in the CAD screenshot.The fuzzy skins are added to each block by creating two modifier blocks (one for each side), and adding a fuzzy skin setting to each modifier block.If you want to try additional settings combinations, load this file into PrusaSlicer : TestBlock2 - Box.3mfThe above file is already set up with the necessary modifier blocks; simply change the fuzzy skin settings as desired. CADThe OnShape 3D CAD files are here :https://cad.onshape.com/documents/d87c231cc131ead5e71b74cc/w/0b522bfa162c1752f7e22c3c/e/afa085f780f5e5afe057c863
With this file you will be able to print Fuzzy Skin Test Blocks with your 3D printer. Click on the button and save the file on your computer to work, edit or customize your design. You can also find more 3D designs for printers on Fuzzy Skin Test Blocks.
