Futuristic Desk LED Strip Lamp
prusaprinters
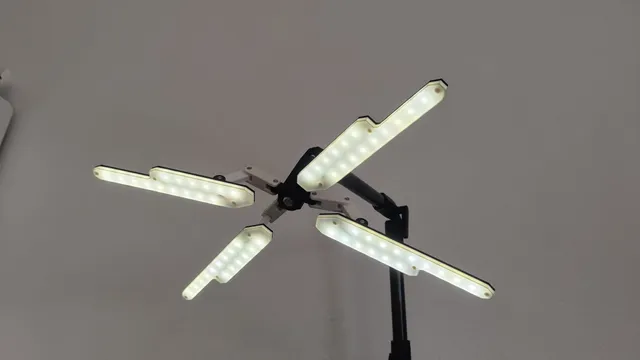
Introducing my LED Strip Lamp, designed with a futuristic aesthetic and concealed cables.Originally crafted for a display arm stand, this versatile lamp is perfect for various settings such as workshops, offices, bedrooms, or living rooms.Its sleek, modern design makes it an eye-catching decorative piece, blending seamlessly with contemporary interiors.Stay tuned for upcoming updates/ accessories like:Clamp mount for tablesHinge without TPUI envision integrating an ESP32 or Raspberry Pi Pico for the option to add customized RGB lighting effects and incorporate it into a smart home system. Part List:1x 1m Carbon Rod 25mm Diameter12x M2 Heat Insert (ruthex)3x M4 Heat Insert (ruthex)3x DIN 933 M4x25mm hex head screw12x DIN 912 M3x16mm Cylinderhead screw12x DIN 912 M2x5mm Cylinderhead screw12x DIN 934 M3 Nut1x M12 Power Push Switch 1x DC Power Jack socket 5,5 X 2,1 mm 1x 12V Power Supply1x 1m LED Strip 10mm width (should be able to cut it every 10 or 50mm)For the diffusers and hinges, there are two versions available:HingesPrint both versions of the hinge first and see which fits the rod best:26mm Diameter (Standard File)25.5mm DiameterDiffusersAfter finishing the build, test each version to see which looks best to you. Different materials or manufacturers can have varying levels of transparency, and LEDs can differ as well:0.8mm1.2mm (Standard File)1.6mm2.0mmBuild Guide:Print all parts in your preferred color (I'm excited to see your color combinations!).Carefully remove all supports to avoid damaging the printed parts.Cut the carbon rods to 250mm or shorter as needed (remember safety precautions, as carbon dust can be harmful if inhaled or gets in your eyes).Cut two wires (one for positive and one for negative) to at least 1000mm (1m) and thread them through the hinges and carbon rods. It may be tricky; using a small rope to pull them through the cable routing can be very helpful.Insert the M4 hex head screws and adjust the hinge to determine the required wire length for each hinge.Use glue to assemble all carbon rods with the hinge parts.Solder two wires (at least 250mm long) to the LED strips (4x 100mm, 4x 150mm) and thread them through the cable routing on the LED panel.Attach the panel arms with M3 screws and nuts, and guide the wires into the lamp head.Solder or clamp together all LED wires in parallel, and add one extra wire to connect to the power supply wire and the switch.Screw the switch into the lamp switch eye and plug in the lamp hinge 12V plug.Solder the wires to the power supply and to the switch (connect the switch to the positive side).Insert the heat inserts into the hinge handles and the LED diffusers.Screw on all the hinge handles and LED diffusers securely. For your own customizations, you can obtain the STEP file on my Ko-Fi page.STEP File: https://ko-fi.com/s/399f85200c Updates:29.06.2024:Added Basestand (Don't use rods longer than 200mm for the arms, as it tends to tip over. I am currently working on a larger version.)Added mirrored parts for all diffusersCorrected print orientation for all .STL Files Updates:04.07.2024:Added diffusers without heat inserts Updates:30.07.2024:Added Basestand Legs Medium (M) and Large (L)
With this file you will be able to print Futuristic Desk LED Strip Lamp with your 3D printer. Click on the button and save the file on your computer to work, edit or customize your design. You can also find more 3D designs for printers on Futuristic Desk LED Strip Lamp.