Fume Extractor with 140mm PC Fan
prusaprinters
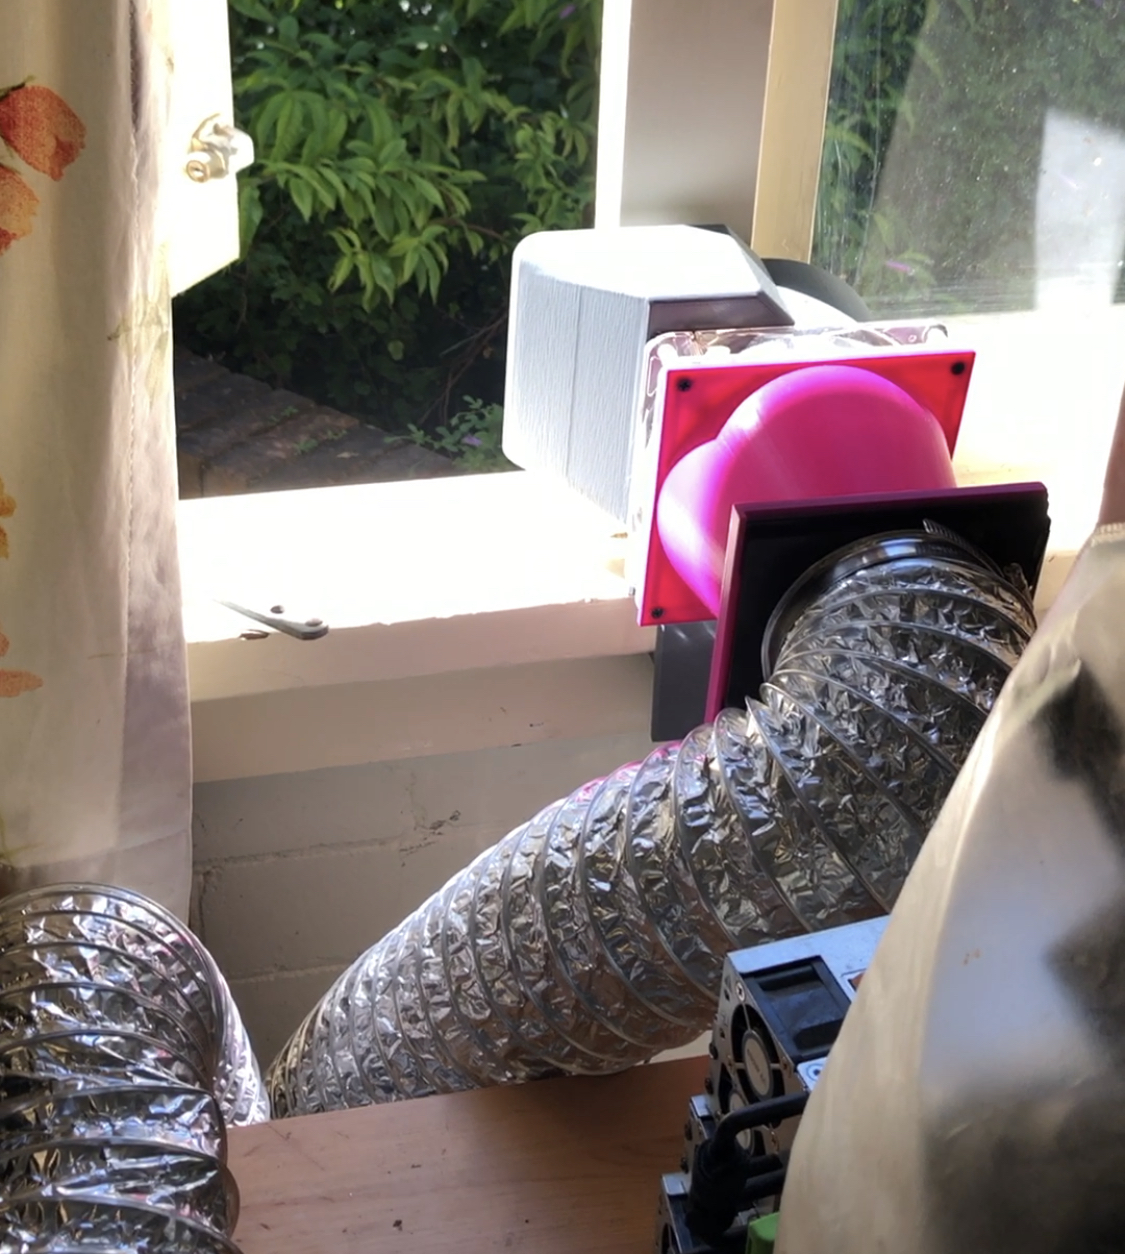
<p>This design's goal is to use a 140mm PC case fan and a 100mm diameter vent tube to safely extract solder fumes to a windows and outdoors to prevent you from breathing it.</p><p><strong>The pipe side of the set requires the files:</strong></p><ul><li>Vent_Pipe_Clamp_Tilt_v2</li><li>Vent_Pipe_Clamp_Outside_Top_v2 <i>(Use supports)</i></li><li>Vent_Pipe_Clamp_Outside_Bottom_v15 <i>(Use supports)</i></li><li>Vent_Pipe_Clamp_Inside_v7</li><li>Vent_Pipe_Clamp_Base_v11</li><li>Tightener_Ring_v4 <i>(Optional)</i></li><li>Inlet_Reduced_v7 <strong>or</strong> Inlet_Curved_v5 <i>(Both work, choose the best for your setup)</i></li></ul><p> <strong>The fan side of the set requires:</strong></p><ul><li>Fan_Clamp_Jaw_v5 </li><li>Fan_Clamp_v13</li><li>Fan_Screw_v9</li><li>Flow_Director_v20 <i>(Large so use 0.8mm nozzle)</i></li><li>Jaw_Pad_v2 <i>(x2 in flexible filament)</i></li></ul><p><strong>Build Instructions:</strong></p><ol><li>Print everything (duh)</li><li><strong>Fan Side:</strong><ol><li>Screw the flow director and the Fan_Clamp part onto the back of the fan.</li><li>Glue the soft Jaw_Pad onto the Fan_Clamp_Jaw and the Fan_Clamp parts. (<i>I used 5 minute epoxy)</i></li><li>Thread the Fan_Screw into the Fan_Clamp loosely.</li><li>Place the Fan_Clamp_Jaw onto the Fan_Screw and then use the Fan_Screw to clamp it to the windowsill.</li></ol></li><li><strong>Pipe Side:</strong><ol><li>Force the Vent_Pipe_Clamp_Inside into the tube, this will take a lot of force and tools may be necessary.</li><li> Use a piece of filament as the hinge pin to connect the Clamp_Outside_Bottom and Clamp_Outside_Top.</li><li>Thread a long-ish M3 bolt down through the Clamp_Outside_Bottom and leave it there.</li><li>Clamp the pipe and inner part between the hinged section and use an M3 bolt and nut to tighten them together. If the pipe is loose inside the clamp with it all the way closed then use the Tightener_Ring parts to make the clamp smaller.</li><li>Attach the Pipe_Clamp_Tilt by sticking the M3 bolt that is sticking out of the Clamp_Outside_Bottom through it and tightening a nut on the other side.</li><li>Attach the Pipe_Clamp_Base by seating them on top of each other and threading a long M3 bolt through them both and tightening a nut on the opposite side.</li></ol></li><li><strong>Attaching the pipe to the fan:</strong><ol><li>My tube came with another fume extractor so had a plate that attached to an adaptor I made (The pink thing in the pictures) but most of you will not have one of them.</li><li>I recommend that you use <a href="https://www.thingiverse.com/thing:4931911">this</a> (not mine) part to attach the tube or find something similar.</li></ol></li></ol><p><strong>Build Notes:</strong></p><ul><li>The largest parts of the print were printed with a 0.8mm nozzle to reduce the print time.</li><li>The Vent_Pipe_Clamp_Inside part will be really hard to fit inside the ventilation pipe, this is intentional and you might have to use pliers to force it in.</li><li>The Tightener_Ring is designed to reduce the inner diameter of the clamp to allow pipes with thinner walls.</li><li>The Flow_Director is designed to allow the fan to be offset to the window so that it still can be opened and closed.</li><li>I used a 12V power supply to run the fan at full tilt to provide the best airflow.</li></ul><p> </p>
With this file you will be able to print Fume Extractor with 140mm PC Fan with your 3D printer. Click on the button and save the file on your computer to work, edit or customize your design. You can also find more 3D designs for printers on Fume Extractor with 140mm PC Fan.