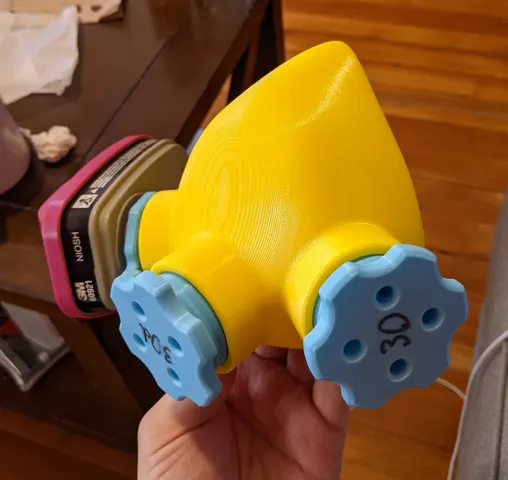
Fully Printed One-way Respirator Exhale Valve w/ NATO (40mm) Threading
prusaprinters
FullyPrintedValve This valve was designed to be completely 3D printed, in the event that few other materials are available. Currently it requires aluminum tape or duct tape, both of which are available at hardware stores. The seal is pretty good, but not perfect, and still requires testing to determine whether it will fully protect the wearer.(for more 3D printed parts as well as adapters for most commercial components, see Scotty from Strange Parts' project https://github.com/strangeparts/gasmask )OverviewThe valve comes in 3 parts:The main body which consists of the threads, tightening knob, and valve chamberThe diaphragm, which is a 0.2mm thin disc with a ring of holes around the edgeThe inlet plate, which is a 1.8mm thick disc with a hole in the center Building MaterialsIn order to build this valve, you will need:3D printer with a smooth print surface (Flexible smooth PEI spring steel preferred, glass should work)Aluminum foil tape, 3.9mil preferred (Duct tape or Gorilla tape can also work, albeit less effectively)Scissors or means of trimming the tape (Aluminum tape can be trimmed by tearing carefully)A sharp object such as a craft knife (A fingernail can work for Aluminum tape) Print ParametersPrint Time: Approximately 2 hoursNozzle Size: 0.4mmLayer Height: 0.2mmInfill: 15%Supports: NoneWalls: 2 AssemblyPrint all 3 parts in the default orientation. The tightening knob should be on the build plate with the threaded end pointing upwards.Let the build plate cool before removing to prevent warping the sealing surfaces.If the build plate is flexible, flex it in 2 directions by turning the build plate 90 degrees in between. Repeat until the main body and inlet place can be lifted off.Continue bending the plate until the diaphragm can slide freely off of the bed. If the build plate is not flexible, try to remove the diaphragm without bending it if possible.Place the diaphragm into the threaded end of the main body, so that it rests on top of the pins inside. The smooth side of the diaphragm (the side that was face down on the bed) should be facing upwards.Be sure the smooth side of the diaphragm is facing upwards for the best seal quality.Press fit the inlet plate into the hole to capture the diaphragm. Ensure that the inlet plate is oriented so the side that was touching the print bed is facing down, towards the diaphragm. The inlet plate should be flush with the body when fully seated.Use a piece of aluminum foil or duct tape to over the inlet plate, pressing to ensure a good seal.Trim the excess tape, ensuring that the tape extends completely to the edge and does not stop too close to the seam between the valve body and inlet plate. A little extra is fine, but too little will allow a leak. If tape is not available, glue may suffice at your own risk.Using a fingernail or sharp tool, score or cut the ridge around the center hole of the inlet plate and remove the resulting circle of tape to allow air to flow through the center hole. Avoid putting anything through the air hole to avoid damaging the diaphragm.Finally, you can test the valve by putting your mouth on either end. Air should be able to flow from the inlet plate through to the end with the knob. Airflow in the opposite direction should be blocked. Safety WarningsThis design relies on a properly calibrated first layer. If the 1 layer thick diaphragm has holes near the center, then the valve will not operate properly. Holes around the edge are acceptable. Ideally, the diaphragm should be strong enough that the layer lines cannot be pulled apart with bare hands unless it is folded or torn from the edge.Refer to the documentation for your face mask for the proper location to install the valve. This design is intended to be installed on the outside of the mask. Installing this on the inside will allow air to pass into the mask through the valve but not out.The NATO connector specifies a gasket to be used at the bottom of the female thread. If this gasket is not present, consider using an appropriate glue to form an airtight seal. Failure to do either can result in a leaky mask that will not protect you.If glue is used, ensure that the glue doesn't seep into the chamber containing the diaphragm, which could cause the diaphragm to be glued into place rendering the valve non-functional.Always test the final assembly with fit/leak testing procedures to ensure the valve performs acceptably before putting it into service.
With this file you will be able to print Fully Printed One-way Respirator Exhale Valve w/ NATO (40mm) Threading with your 3D printer. Click on the button and save the file on your computer to work, edit or customize your design. You can also find more 3D designs for printers on Fully Printed One-way Respirator Exhale Valve w/ NATO (40mm) Threading.
