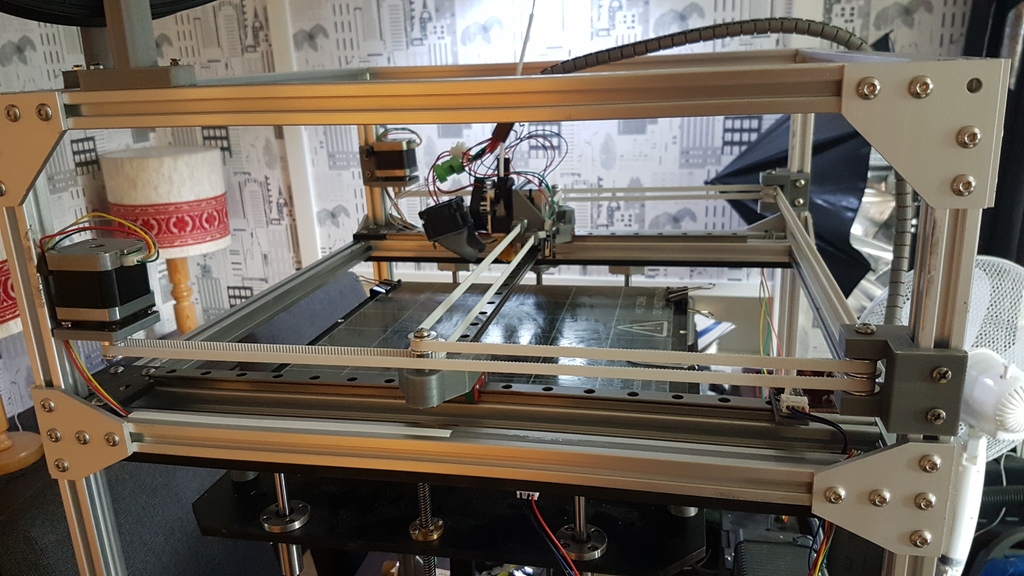
FT5 CoreXY Conversion
thingiverse
Important Update: Avoid Using Steel-Core Belts, They Cause Wrong Print Dimensions Over Time. -Replaced Files with New V2 Versions on July 27, 2017 -Made Minor Adjustments Today, August 1, 2017 -Lowered the High Idler of the Left Carriage by 1.5mm (Because the Toothless Idler Height is 10mm, Not 9mm Like the Toothed One), Changed Y Endstop Holes, and Corrected a Small Error in Extruder Mount Tensioner Holes on August 2, 2017 -Corrected Hole Positions in Parts "Right Idlers Mount 2" and "Left Idlers Mount 2" (They Were Off by Like 0.5mm) on August 3, 2017 -Uploaded Fan Mount V2 on August 6, 2017 -Changed Stepper Mounts on September 19, 2017 -Upgraded Belt Tensioner on November 30, 2017 -Added Letters (L&R) to Parts to Indicate Left and Right, Updated Left and Right Carriages to Use M5 Nuts Instead of Using the Carriage Itself as a Nut for Idlers Screws (Easier to Work With), and Slightly Adjusted Their Design on January 26, 2018 -Added Files in STEP Format on April 3, 2018 -Edited Extruder Mount So You Can Use Regular Nozzle/Heat Block or Volcano Setup (But If You Won't Use Volcano, You Have to Modify the Part Cooling Fan Design So It Becomes Shorter Otherwise It'll Hit the Bed) on June 23, 2018 Now You Can 3D View or Download Raw Design in Multiple Formats to Edit It Easily (If You Want To). http://a360.co/2Bv5o4T Video About All Changes Made to My FT-5: https://youtu.be/JWi-ZnHx8co FT5 Accurate Adjustable Z Endstop: https://www.youtube.com/watch?v=tF2z4EKhI4I Required Materials: * 13X M5*10mm Screws and T-Nuts (to Hold Mounts on 2020 Profiles) * 1X M3*8mm Screw (for X Endstop) * X16 Idlers F695zz Flanged Bearing 5x13x4mm * Carriages Screws: 8X M3*10mm for Y and 4X M3*8mm for X * 2X M3*20mm Screws and Nylon Lock Nuts (to Hold the X Rail) * 4X M3*30mm Screws and Nuts (for Belts Tensioners) * 6X M5*45mm and 8X M5 Nuts (for Idlers) Note: The Motors Side is the Front Side! Use Support for Part "Belt Tensioner/Mount" But Don't Use Support for Its Belt Teeth. When Inserting the Belts into Tensioners, Be Gentle with the Little Lever, Open It in Center, and That Leads to Print Quality Issues! No Need to Extend Any Wires for Motors or X Endstop, Stock Wires Are Long Enough. Make Sure to Orient Parts to Proper Orientation Before Printing (Depends on How Part Is Stressed). I'll Change Orientations Later for You. I Used 4 Walls, 4 Top, 4 Bottom, 50% Infill. Don't Forget to Remove "//" Before "#define COREXY" to Enable CoreXY Kinematics. Make Sure All Idlers/Belts Are in Their Correct Height, Belts Should Always Be Horizontal at Any Point! If You Are Going to Use High Bed Temps, Don't Use PLA for Part "Bed Spacer", You Can Also Ignore This Part and Use M3*60mm Screw as a Bed Spacer as Shown in the Picture (I Used 80mm Screws Temporarily). Use Stiff Material, Preferably Heat Resistance Like CF-PETG, CF-Nylon CF-ABS. Anything Could Work Tho Even PLA. Recommended Idlers: https://goo.gl/Wfv45t Recommended Pulleys: https://goo.gl/XntrST Let Me Know If I Forgot Something. Good Luck!
With this file you will be able to print FT5 CoreXY Conversion with your 3D printer. Click on the button and save the file on your computer to work, edit or customize your design. You can also find more 3D designs for printers on FT5 CoreXY Conversion.
