Frässchablone / Router Gauge
prusaprinters
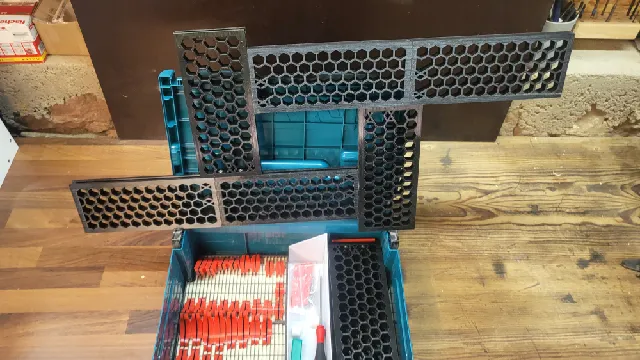
Bauteile / Parts: x Schablonmodul_StencilModule1x Nutenstein_T-SlotNut (je Schablone/per module)1x LehrenSatz_GaugeSet1x FräsAbstützung_MillingSupport2x S4x14 Schraube / Screw - DIN7991 (je Schablone/per module)2x M4 Mutter / Nut (je Schablone/per module)1x S4x14 Schraube / Screw - DIN7991 (FräsAbstützung_MillingSupport)L-Boxx:1x Makita_Inlay_11x Makita_Inlay_21x Makita_Inlay_31x Makita_Inlay_45x Makita_Inlay_Clip1x Makita_Box_Base1x Makita_Box_wall_large1x Makita_Box_wall_small2x Makita_Box_wall_lateral Modell einer erweiterbaren Frässchablone für die Oberfräse um Platten und Ausschnitte auszufräsen. Die Fräs-Abstützung könnt Ihr an Eure Oberfräse Schrauben um ein Kippen zu verhindern, es funktioniert jedoch auch ohne dieses Bauteil. Mit Dabei ein Satz Radius- und Fasen-lehren in verschiedenen Größen. Im Bild Unten findet Ihr eine Übersicht der enthaltenen Lehren und ein Beispiel zur Berechnung des Endergebnisses. Ebenfalls findet Ihr als Beispiel die Ergebnisse für Fräser Ø6mm und Fräshülse Ø17mm, was ich in der Regel benutze.Ich habe alle Lehren in einen Datensatz gepackt, diese könnt Ihr im Slicer einfach in einzelne Objekte trennen und die, die Ihr braucht vervielfältigen und drucken.Gedruckt wurde alles ohne Support in PETG im Profil 0,2mm Structural mit 4 Perimetern und 25% Infill auf einem Prusa MK4. Die Modelle sind alle in Z bereits richtig zum drucken ausgerichtet.Um die Lehren 2-Farbig zu drucken und so die Beschriftung hervorzuheben müsst Ihr ein Farbwechsel im Layer 3 (0,6mm) durchführen. Das Ergebnis könnt Ihr auf den Bildern sehen.Ist die Frässchablone zusammengebaut könnt ihr die Lehren einfach in die Ecken eindrücken. Diese sitzen gut und halten beim fräsen. Die Montage sieht Ihr unten im Clip.Außerdem findet Ihr noch einen Satz Einsätze für eine Makita L-Boxx in den Daten um alles sauber verstauen zu können. Ich denke es sollte auch für Boxen von anderen Herstellern passen. Wie das ganze aussieht könnt Ihr den Bildern entnehmen. Das Inlay-Gitter kann mit den 5 Clips fixiert werden. Ich habe es mit doppelseitigem Klebeband auf eine dünne Sperrholzplatte geklebt. Die Elemente der Kiste sind zusammengesteckt (erst die Wände zusammen stecken und dann das ganze in die Grundplatte stecken) und zum Schluss mit Sekundenkleber an den Verbindungspunkten fixiert. Die Kiste selbst habe ich ebenfalls mit doppelseitigem Klebeband auf dem Inlay-Gitter in der L-Boxx fixiert.Viel Spaß beim Drucken! Wenn Euch das Modell gefällt würde ich mich über ein like freuen. Model of an expandable milling gauge for the router to mill out panels and cutouts. You can screw the milling support onto your router to prevent it from tipping, but it also works without this component.Includes a set of radius and chamfer gauges in different sizes. In the image below you will find an overview of the included gauges and an example of how to calculate the final result. You will also find the results for a milling cutter Ø6mm and milling sleeve Ø17mm as an example, which is what I usually use.I have packed all the gauges into one data set, you can easily separate them into individual objects in the slicer and copy and print the ones you need (See picture in german text for slicer function).Everything was printed without support in PETG in a 0.2mm structural profile with 4 perimeters and 25% infill on a Prusa MK4. All models are already correctly aligned in Z for printing.In order to print the gauges in 2 colors and highlight the labeling, you have to change the color in layer 3 (0.6mm). You can see the result in the pictures.Once the milling template has been assembled, you can simply press the gauges into the corners. These fit well and hold when milling. You can see the assembly in the clip below.You will also find a set of inserts for a Makita L-Boxx in the data so that everything can be stored neatly. I think it should also fit to boxes from other manufacturers. You can see what the whole thing looks like in the pictures.The inlay grid can be fixed with the 5 clips. I stuck it to a thin sheet of plywood with double-sided tape. The elements of the box are put together (first put the walls together and then stick the whole thing into the base plate) and finally fixed at the connection points with superglue. I also attached the box itself to the inlay grid in the L-Boxx with double-sided adhesive tape.Have fun printing! If you like the model, I would be happy about a like. Montage der Lehren / Assembly of the gauges: Beispiel & Berechnung / Example and calculation:
With this file you will be able to print Frässchablone / Router Gauge with your 3D printer. Click on the button and save the file on your computer to work, edit or customize your design. You can also find more 3D designs for printers on Frässchablone / Router Gauge.
