Fridge Magnet Design Challenge
thingiverse
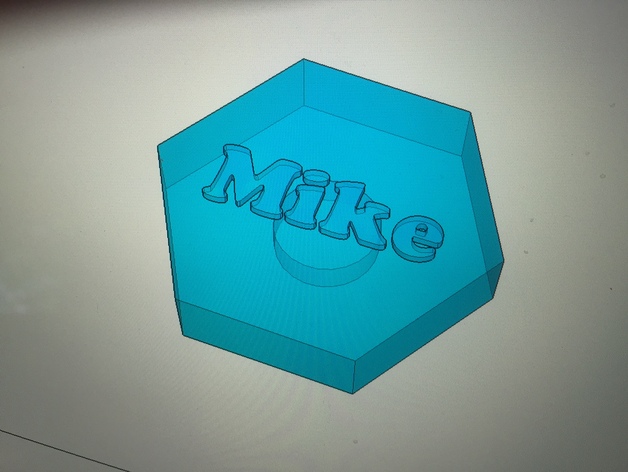
This project is perfect for 7th and 8th grade students, who will be challenged to design a unique magnet for their fridge at home using the Problem Solving Process. Google Sketchup 2015 is used to teach solid modeling skills and concepts. Students must use this process to come up with an original design that meets specific parameters. The parameters of the project are as follows: the magnet must fit within a 2"x 2"x 1/2" space, incorporate a geometric shape chosen from Sketchup's shape tools or custom drawn with the pencil tool, and include a hole for a magnet with a radius of .3" and depth of 3/16". The design also needs to feature custom text or a shape relevant to the student and meet school guidelines. This project teaches problem-solving skills, basic solid modeling concepts, standard measurement skills, critical thinking, and analysis. Print Settings: * Printer Brand: MakerBot * Printer: MakerBot Replicator (5th Generation) * Rafts: Yes * Supports: No * Resolution: .20mm * Infill: 10% * Notes: This print may be done with infill from 10% up to 20%. 10% is sufficient for the given dimensions, but if you wish to use larger dimensions, increase the infill by a few percent. Post-Printing: The final magnet design will resemble this hexagon shape. If turned over, there's a hole beneath the raft where a magnet can be placed. Student Designs Using Google Sketchup 2015 Here's how I designed my own hexagon-shaped magnet: 1. Polygon tool - Inscribed radius of 1 (If using a different shape, ignore this measurement and stay within the given space.) 2. Push/pull tool - .4 thickness 3. Use line tool to locate a center point 4. Circle tool - .3 radius 5. Eraser to delete all lines drawn inside the polygon 6. Push/Pull tool - Click inside the small circle, drag down (Do not click again yet), type in 3/16 and press enter (or click) 7. Select tool - Lasso entire object, right-click (Ctrl-click on laptop), Make Group from drop-down menu 8. Rotate tool - Click side face of polygon when it says "On Face In Group" 9. Orbit tool - Click until you can see the side surface 10. Move tool - Click on object, move off surface and click when it says "On Blue Axis" 11. Use orbit tool to view top of object 12. View menu - Choose Large tool set 13. 3D text tool - Enter desired text, choose font and place 14. Zoom out 15. Scale tool - Move mouse to corner of text box, click when it says "Uniform scale about opposite point" 16. Scale object down and click 17. Move tool - Move object to center of magnet 18. Repeat rotating, moving, and scaling process multiple times before proceeding 19. Select and lasso all components, right-click, Make Group 20. File menu - Export STL, check both boxes, choose a name and save
With this file you will be able to print Fridge Magnet Design Challenge with your 3D printer. Click on the button and save the file on your computer to work, edit or customize your design. You can also find more 3D designs for printers on Fridge Magnet Design Challenge.