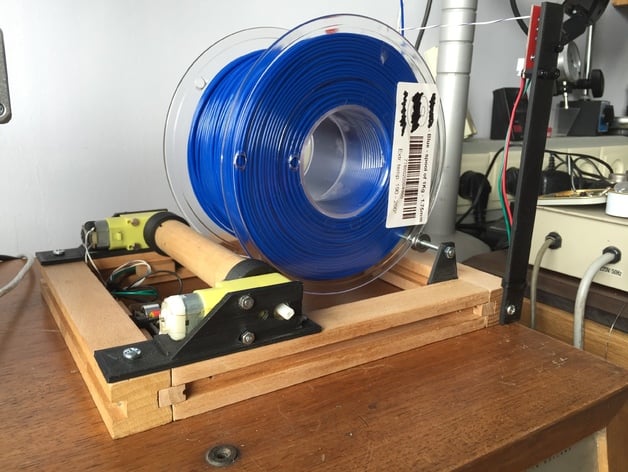
Frictionless Filament Feeder
thingiverse
See this thing in action on: http://youtu.be/01HIZuBam00http://youtu.be/MP64M0xKElQ I designed a filament feeder that automatically pulls the extruder's filament for me. I created a motorized version to make it easier to use, where two toy motors turn the wheel when there is enough pull on the filament. The pull is detected by two microswitches, and either one of them turns current to the motors on. This way, you never have to manually adjust anything. The filament feeder accepts different size reels without needing any adjustments. Everything was carefully designed in OpenSCAD, with parameters defined ahead of time. This allows for easy modification if you want to customize things yourself. I modified a drive wheel from: http://www.thingiverse.com/thing:883165 The two motors are powerful enough to handle the task alone, but they add some nice symmetry and cost nearly as little as the bearing I could have used instead. Building this feeder was a fun experience for me - it only took two days from start to finish, and my first version worked perfectly. The filament feeder is mounted on a wooden platform because it's easy to work with and provides stability. The platform consists of four wooden beams measuring 25.2x25.2x200mm, but the exact size doesn't matter too much for this build. There is one design available for the motor mount, which must be mirrored in your printer software before printing the second mount (I use repetier). A broomstick provides the rod connecting the two motors - its 24mm in diameter. If you have something different, adapt the OpenSCAD file and recreate the STL. Both ends of the rod need to have a cross-section sawn into them so that they fit with the motor wheels (it's obvious once printed). I used cheap toy motors from China, specifically: http://bit.ly/1QipvW3, along with two microswitches meant for endstops but mounted on PCBs from here: http://bit.ly/1JMtQhV. The rod itself is 4mm standard diameter and the V-groove bearings come from here: http://bit.ly/1hNhnkB. An electronics wire is stretched between the micro-switches, while the filament follows right behind it - this is Teflon-coated and its ends were stripped and turned around the levers of the micro-switches, then soldered. The lever's handles are bent into a good secure fix position now. The power source for this circuit is 4 AA batteries; both micro-switches are in parallel with each other as well as the two motors themselves - working together to make things easier on us users.
With this file you will be able to print Frictionless Filament Feeder with your 3D printer. Click on the button and save the file on your computer to work, edit or customize your design. You can also find more 3D designs for printers on Frictionless Filament Feeder.
