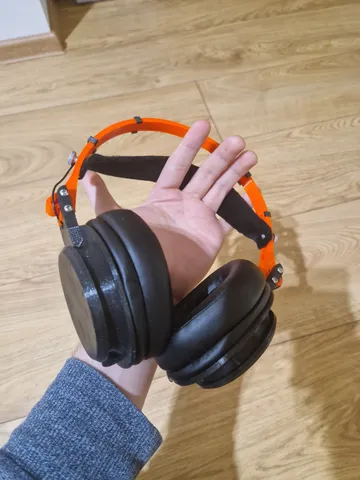
Franken-Technicas
prusaprinters
⚠ Warning ⚠I'm not a sound engineer. I'm not even an engineer. This mod greatly affects the sound characteristics of the headphones. Do it at your own risk! AboutThe history starts when the hinge on my M40Xs broke. I've used this hinge replacement, but it had some issues:It did not restrain the spinning of the cup like the original did, so it was possible to twist off the wire insideIt tended to rub a lot in its socket, thus destroying itselfAfter replacing both of my hinges and the wire inside after it broke, an idea came to my head: Make completely custom headphones out of those!The end result in my opinion is more comfortable, lighter and better covers the ears then the originals. Key featuresAdjustable headbandAdjustable cup tiltUnscrewable back for easy customization Additional hardwareSoldering ironThin, 2 strand wire ~ 80 cm8x M3 x 10 mm screw2x M3 x 12 mm screw4x M3 x 25 mm screw2x M3 washer2x M3 nut2x M3 thumb nutPiece of cloth/leather for the head support Printing tips Headphone bodiesSuggested material: PLA or any other stiff materialSupports: Yes, I used organic supportsClipsSuggested material: Something flexible like PETG, ABS or ASASupports: Not neededBandSuggested material: Something flexible like PETG, ABS or ASASupports: SnugPerimeters: I used 6 to make the band solid ant the infill going in its strongest direction, as the band will bend a lot. Head supportYou can use any material you like. I used minky fabric I stole from my GF 😘I recommend cutting a piece of paper to dimension, using it first in your headphones to see if it fits properly, resize it if needed and then use it as a template to cut the fabric.The dimensions I went with are: 230 mm x 30 mm About the soundBecause I know basically nothing about inner headphone design, the sound is changed when compared to the originals. I tuned them with an equalizer to make them sound good again, but someone more knowledgeable may remix this model or utilize the screw-on back feature to make them sound better. How to assemble Step 1: Unscrew the original driversTo do that, take off the earpads, unscrew the 4 screws under them on each side.Step 2: Unsolder the right driverUnsolder the marked wires. Remember their colors!Step 3: Unsolder the left driver with the jackUnsolder the wires marked RG and R+.Step 4: Unscrew the headphone jackUnscrew the jack and keep the screws, as we will reuse them later. You should be able to take off the entire driver.Step 5: Solder the new wire to the jack's PCBRemember the colors used! Step 6: Thread the wire through the left body Step 7: Screw the M3x10mm screws through the driver plateScrew the screw completely through the plate (not yet to the body). Keep screwing until you rip the threads the screw made. We don't want any resistance from the plastic here, so when we will be screwing it to the body, we will be able to feel when the screw is all the way down.Step 8: Screw the plate to the bodyBe careful not to rip the threads here! If you do that, you will need to print the part again! Use the screws from step 4 to screw in the PCB with the jack. Step 9: Thread the wire through the right body and solder the right driver Step 10: Screw in the right panel Step 11: Screw the cover platesTake note that the left one is reverse threaded! Step 12: Drop the nuts in the nut holes and screw the bodies to the bandDon't tighten it fully, though! You need some wiggle room for adjustments! Step 13: Attach the head support Step 14: Add the clipsAdd the guide clips first, then use the flat clips to hold the wire in place. Step 15: Tuck the wires inside the cups and put on the earpads Step 16: Adjust your strap height and cup angleTighten all the visible screws when the headphones sit nicely on your head :) Sizes for tinkerers
With this file you will be able to print Franken-Technicas with your 3D printer. Click on the button and save the file on your computer to work, edit or customize your design. You can also find more 3D designs for printers on Franken-Technicas.
