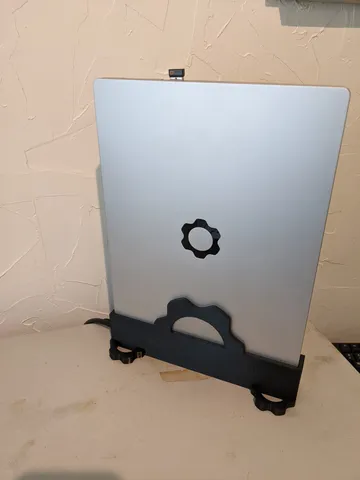
Framework Laptop Side stand
prusaprinters
I've been using ThinkPad laptops for a couple decades now at work, and have been very spoiled with the availability of docking stations. Most docking stations require the user to lay the laptop flat on the device, line up edges and then press the laptop down on a proprietary connector. For the Framework laptop, we don't have the proprietary plug, but we do have a thunderbolt connector that can connect to a port replicator (Docking Station). The other thing going for the Framework laptop is the community of users that like to tinker and give feedback.That's when I decided I wanted to create something that could act as a charging stand or docking station. The trick was to get the dimensions correct and get enough space to maneuver the USB plug into the slot for charging and/or docking. After several iterations, I found one that works with an aftermarket USB C right angle cable I purchased on Amazon.Version 1For this version, the stand is designed to have the left side of the laptop inserted and to use a pretty shallow right angled USB C/Thunderbolt plug to connect to the laptop. Also, the USB cable is meant to have the straight end threaded through the hole/tunnel from the inside in case it wasn't obvious. Again, the stand is a tight fit but a better print or a little sanding can resolve the issue. Using this stand and a docking station in the Docking Station Mega-Thread, I'm sure most everyone can find a good alternative to an proprietary solution that took a team of engineers to produce.For the feet and vertical stabilizers, I was inspired by the Framework laptop stand located here https://www.thingiverse.com/thing:5397001 but didn't use any elements from it, just raw inspiration for developing stabilizing feet and a more pleasing vertical stabilizing element.I found the post for the logo on the community website (https://community.frame.work/t/3-2-desktop-wallpapers/3533), imported it into Tinkercad, fixing a minor import error of it being a negative object, and used it to create the logo material in the design.Printed with generic PLA at .3mm (draft) layer height, no supports. Don't mind my bad but not horrible print in the pictures, It warped because I am still learning.Version 2:I reworked the first iteration and got my ToDo list done! This is now the default version moving forward. If you don't need access to the second expansion card and/or want a shorter stand, version 1 is what you want.Version 2 is has:Uniform wall thickness (with one purposeful exception)The exception is below the second expansion card, the hole is wider here to accommodate a thick right angle plug Access to the second (forward-most) expansion cardTaller stand to accommodate:Stock Framework USB C right angle plugRight angle DisplayPort or HDMI plug in the second expansion card slot (pictured)Larger feet to stabilize the higher center of gravity More realistic .gcode fileAdds supports everywhere0.2mm layer height for better quality15% infill for better filament economyVersion 2.1:Added .1mm to the length and depth of the laptop void to loosen the tolerances a bit.Added a void to not press module eject button. That way when you pull out the laptop, it won't release the module and stay plugged into the cable.Didn't include a .gcode because I don't know how useful it will be, seeing as how it's a minor variation of version 2.0.Future work:Design an expansion card that protrudes from the edge of the laptop to help with alignment (a docking key), but keeps the USB C plug functional.Design a modular insert that replaces the tunnels and acts as a keyway to align the laptop to the USB C plug and other expansion plug (or lack of)
With this file you will be able to print Framework Laptop Side stand with your 3D printer. Click on the button and save the file on your computer to work, edit or customize your design. You can also find more 3D designs for printers on Framework Laptop Side stand.
