FPV-Rover (Tank)
prusaprinters
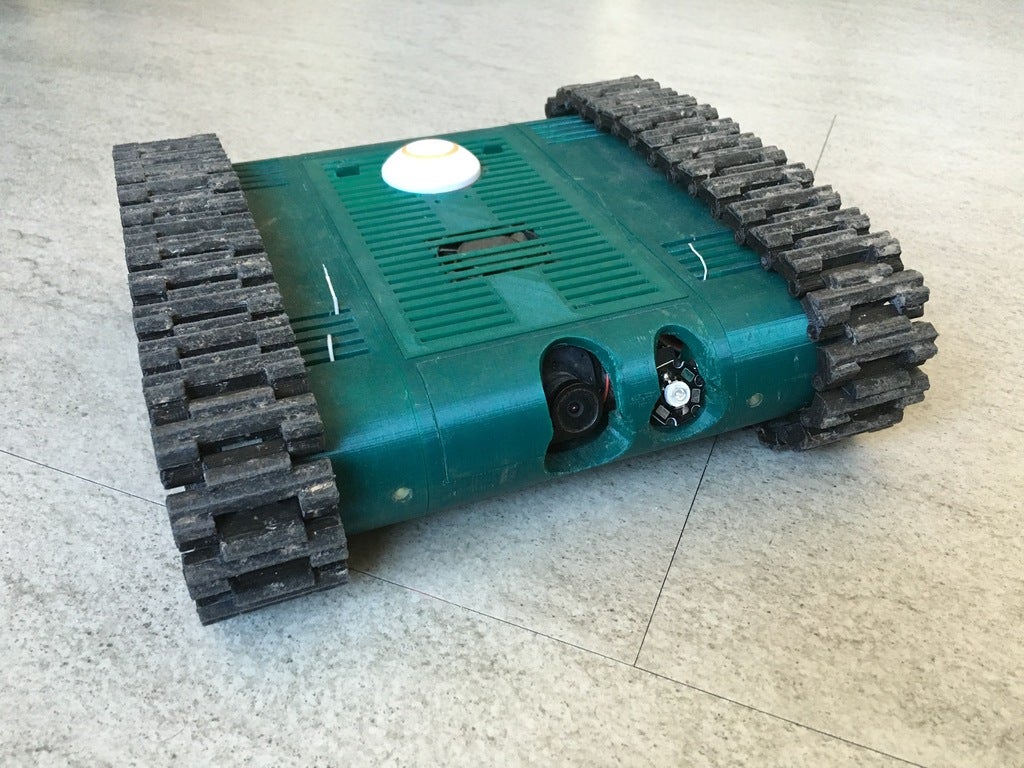
<p>It's finally here. The new FPV-Rover V2.0<br/> <a href="https://www.thingiverse.com/thing:2952852">https://www.thingiverse.com/thing:2952852</a></p> <p>This is a remix of the drogerdy designed by timmiclark.<br/> <a href="https://www.thingiverse.com/thing:700835/">http://www.thingiverse.com/thing:700835/#files</a></p> <p>Upgrade 01:<br/> <a href="https://www.thingiverse.com/thing:1269962">http://www.thingiverse.com/thing:1269962</a><br/> Upgrade 02:<br/> <a href="https://www.thingiverse.com/thing:1700138">http://www.thingiverse.com/thing:1700138</a><br/> Upgrade 03:<br/> <a href="https://www.thingiverse.com/thing:1936491">http://www.thingiverse.com/thing:1936491</a><br/> Upgrade 04 by Superfly851:<br/> <a href="https://www.thingiverse.com/thing:1979227">http://www.thingiverse.com/thing:1979227</a><br/> Upgrade 05(Nerf Dart Launcher):<br/> <a href="https://www.thingiverse.com/thing:3835285">https://www.thingiverse.com/thing:3835285</a><br/> Videos on Youtube<br/> <a href="https://www.youtube.com/watch?v=4Qc0D7U5R0s">https://www.youtube.com/watch?v=4Qc0D7U5R0s</a><br/> <a href="https://www.youtube.com/watch?v=6tj8FTdTix0">https://www.youtube.com/watch?v=6tj8FTdTix0</a><br/> <a href="https://www.youtube.com/watch?v=TQPVS7V3_Jw">https://www.youtube.com/watch?v=TQPVS7V3\_Jw</a><br/> <a href="https://www.youtube.com/watch?v=x7D1qESYsrA">https://www.youtube.com/watch?v=x7D1qESYsrA</a><br/> <a href="https://www.youtube.com/watch?v=jhvpuBi0zO4">https://www.youtube.com/watch?v=jhvpuBi0zO4</a><br/> <a href="https://www.youtube.com/watch?v=lbQW_ebiLKA">https://www.youtube.com/watch?v=lbQW\_ebiLKA</a><br/> <a href="https://www.youtube.com/watch?v=BlgNhrQPaEA">https://www.youtube.com/watch?v=BlgNhrQPaEA</a><br/> <figure class="media"> <oembed url="https://youtu.be/AgPFbaMxf3g"></oembed> </figure> </p> <p><strong>Instructions:</strong></p> <p>Body: The body has a support on the bottom to become a clean print. The support has to be removed after printing. Infill: 15%</p> <p>Track: You'll need 64 tracks. Infill: 15%</p> <p>Pin: There are two different pins. The normal one is 3.7mm. If the chain is to tight, you should print the small one with 3.0mm and add 3-4 of those pins. After printing the pins, you have to remove the small support on each side. Infill: 15%-20%</p> <p>Small cog: You need 8 small cogs. Infill: 15%</p> <p>Main cog: You need 4 main cogs. Infill: For the first 10mm you can print it with 15%. For the rest you should use at least 90%.</p> <p>Rubbertrack: Use Flexifil or Ninjaflex for the rubber track and glue it to the track. The rubber tracks are not necessary but you will love it. Infill: 30%-50%</p> <p>Track2: If you don't want to print the rubber track or don't have Ninjaflex, you can print track2 instead of track + rubber track. Infill: 15%</p> <p>Front + back: Print this with brim if it doesn't stick to the surface and use support structure. Infill: 15%</p> <p>FPV-Cam holder: Print it with support structure and glue the small part on the back side. This is for the servo to move the cam up and down. Infill: 15%</p> <p>Camera and LED mount: You need these two parts if you want do use a fpv-camera. Infill: 15%</p> <p>Tow-bar: Infill: 15%</p> <p>Tow-bar plug: If you don't want to use the tow-bar you need this twice. Infill: 15%</p> <p>LED-mount: Infill: 15%</p> <p>Top: The top is designed to use a 40mm fan for cooling the vtx and to plug in the fpv-antenna from banggood. Infill: 15%</p> <p>Track-body-connector: You can glue the track frame together and glue it to the body but if you do that, you can't replace parts if broken. Use this to mount the track frame to the body. They are marked for front and back. Infill: 15%</p> <p>Track outer cover: Print this part twice. Infill: 15%</p> <p>Outer track frame: Print this part twice. Infill: 15%</p> <p>Inner track frame right/left. Infill: 15%</p> <p><strong>Parts to print:</strong></p> <p>1x body (for 2S or 3S)<br/> 1x front<br/> 1x back<br/> 64x track<br/> 64x rubber track<br/> 64x pins (try which one fits best for you)<br/> 8x small cog<br/> 4x main cog<br/> 1x inner track frame right<br/> 1x inner track frame left<br/> 2x outer track frame<br/> 2x track outer cover<br/> 1x top<br/> 1x set track-body-connector<br/> 1x tow-bar<br/> 2x tow-bar plug<br/> 1x fpv-cam-holder<br/> 1x set camera-led-mount<br/> 1x led mount</p> <p><strong>Parts you need (BOM):</strong></p> <p>2x package of 10 bearings 688ZZ for the small cog (you need 2 bearings each cog)<br/> <a href="https://goo.gl/WGVqhm">https://goo.gl/WGVqhm</a></p> <p>1x package of 5 motor with gear (you need 4 motors, 2 for each chain)<br/> <a href="https://goo.gl/J9W8iZ">https://goo.gl/J9W8iZ</a></p> <p>2x brushed esc (one esc for each side. connect two motors to one)<br/> <a href="https://goo.gl/FmrdNn">https://goo.gl/FmrdNn</a></p> <p>8x bearings 61802 2RS / 6802zz for the main cog (each main cog needs 2 bearings)<br/> <a href="https://goo.gl/dFcmCe">https://goo.gl/dFcmCe</a></p> <p>1x Infrared-camera (or a normal one)<br/> Caution!: To use the infrared part of the camera, you need a two-way-switch (link coming soon)<br/> <a href="https://goo.gl/UkjZD7">https://goo.gl/UkjZD7</a></p> <p>1x Infrared-LED (if you do not use an infrared-camera, you don't need this LED)<br/> <a href="https://goo.gl/WtnRez">https://goo.gl/WtnRez</a></p> <p>1x Power-supply for the infrared-LED (if you do not use an infrared-camera, you don't need this)<br/> <a href="https://goo.gl/xeQitJ">https://goo.gl/xeQitJ</a></p> <p>1x Rear camera<br/> <a href="https://goo.gl/4mx7zw">https://goo.gl/4mx7zw</a></p> <p>1x FPV-switch<br/> <a href="https://goo.gl/R3qioB">https://goo.gl/R3qioB</a></p> <p>1x Package magnets (front and back are sticked to the frame by magnets)<br/> <a href="https://goo.gl/zPGRTc">https://goo.gl/zPGRTc</a></p> <p>1x fan 40mm for cooling the vtx<br/> <a href="https://goo.gl/GXY2nk">https://goo.gl/GXY2nk</a></p> <p>1x servo for the tilt-mechanism for the cam and LED<br/> <a href="https://goo.gl/cVt8wz">https://goo.gl/cVt8wz</a></p> <p>We use 4 tuning motors (Slotdevil 2035) instead of the motors which come with the gear reducer. You can run the tuning motors with 3S (the ESC does supply this, even if they are for 7,4v)</p> <p>Use 4 motor pinions for the tuning motors (sigma 4 9z m50 nylon)</p> <p>20x M3 Screw 25mm long<br/> 4x M4 Screw 20mm long<br/> 4x M4 Nut</p> <h3>Print instructions</h3><p>Unassociated tags: FPV Tank, Rubber band gun</p> <h3>Category: R/C Vehicles Summary</h3> <p>It's finally here. The new FPV-Rover V2.0<br/> <a href="https://www.thingiverse.com/thing:2952852">https://www.thingiverse.com/thing:2952852</a></p> <p>This is a remix of the drogerdy designed by timmiclark.<br/> <a href="https://www.thingiverse.com/thing:700835/">http://www.thingiverse.com/thing:700835/#files</a></p> <p>Upgrade 01:<br/> <a href="https://www.thingiverse.com/thing:1269962">http://www.thingiverse.com/thing:1269962</a><br/> Upgrade 02:<br/> <a href="https://www.thingiverse.com/thing:1700138">http://www.thingiverse.com/thing:1700138</a><br/> Upgrade 03:<br/> <a href="https://www.thingiverse.com/thing:1936491">http://www.thingiverse.com/thing:1936491</a><br/> Upgrade 04 by Superfly851:<br/> <a href="https://www.thingiverse.com/thing:1979227">http://www.thingiverse.com/thing:1979227</a><br/> Upgrade 05(Nerf Dart Launcher):<br/> <a href="https://www.thingiverse.com/thing:3835285">https://www.thingiverse.com/thing:3835285</a><br/> Videos on Youtube<br/> <a href="https://www.youtube.com/watch?v=4Qc0D7U5R0s">https://www.youtube.com/watch?v=4Qc0D7U5R0s</a><br/> <a href="https://www.youtube.com/watch?v=6tj8FTdTix0">https://www.youtube.com/watch?v=6tj8FTdTix0</a><br/> <a href="https://www.youtube.com/watch?v=TQPVS7V3_Jw">https://www.youtube.com/watch?v=TQPVS7V3\_Jw</a><br/> <a href="https://www.youtube.com/watch?v=x7D1qESYsrA">https://www.youtube.com/watch?v=x7D1qESYsrA</a><br/> <a href="https://www.youtube.com/watch?v=jhvpuBi0zO4">https://www.youtube.com/watch?v=jhvpuBi0zO4</a><br/> <a href="https://www.youtube.com/watch?v=lbQW_ebiLKA">https://www.youtube.com/watch?v=lbQW\_ebiLKA</a><br/> <a href="https://www.youtube.com/watch?v=BlgNhrQPaEA">https://www.youtube.com/watch?v=BlgNhrQPaEA</a><br/> <figure class="media"> <oembed url="https://youtu.be/AgPFbaMxf3g"></oembed> </figure> </p> <p><strong>Instructions:</strong></p> <p>Body: The body has a support on the bottom to become a clean print. The support has to be removed after printing. Infill: 15%</p> <p>Track: You'll need 64 tracks. Infill: 15%</p> <p>Pin: There are two different pins. The normal one is 3.7mm. If the chain is to tight, you should print the small one with 3.0mm and add 3-4 of those pins. After printing the pins, you have to remove the small support on each side. Infill: 15%-20%</p> <p>Small cog: You need 8 small cogs. Infill: 15%</p> <p>Main cog: You need 4 main cogs. Infill: For the first 10mm you can print it with 15%. For the rest you should use at least 90%.</p> <p>Rubbertrack: Use Flexifil or Ninjaflex for the rubber track and glue it to the track. The rubber tracks are not necessary but you will love it. Infill: 30%-50%</p> <p>Track2: If you don't want to print the rubber track or don't have Ninjaflex, you can print track2 instead of track + rubber track. Infill: 15%</p> <p>Front + back: Print this with brim if it doesn't stick to the surface and use support structure. Infill: 15%</p> <p>FPV-Cam holder: Print it with support structure and glue the small part on the back side. This is for the servo to move the cam up and down. Infill: 15%</p> <p>Camera and LED mount: You need these two parts if you want do use a fpv-camera. Infill: 15%</p> <p>Tow-bar: Infill: 15%</p> <p>Tow-bar plug: If you don't want to use the tow-bar you need this twice. Infill: 15%</p> <p>LED-mount: Infill: 15%</p> <p>Top: The top is designed to use a 40mm fan for cooling the vtx and to plug in the fpv-antenna from banggood. Infill: 15%</p> <p>Track-body-connector: You can glue the track frame together and glue it to the body but if you do that, you can't replace parts if broken. Use this to mount the track frame to the body. They are marked for front and back. Infill: 15%</p> <p>Track outer cover: Print this part twice. Infill: 15%</p> <p>Outer track frame: Print this part twice. Infill: 15%</p> <p>Inner track frame right/left. Infill: 15%</p> <p><strong>Parts to print:</strong></p> <p>1x body (for 2S or 3S)<br/> 1x front<br/> 1x back<br/> 64x track<br/> 64x rubber track<br/> 64x pins (try which one fits best for you)<br/> 8x small cog<br/> 4x main cog<br/> 1x inner track frame right<br/> 1x inner track frame left<br/> 2x outer track frame<br/> 2x track outer cover<br/> 1x top<br/> 1x set track-body-connector<br/> 1x tow-bar<br/> 2x tow-bar plug<br/> 1x fpv-cam-holder<br/> 1x set camera-led-mount<br/> 1x led mount</p> <p><strong>Parts you need (BOM):</strong></p> <p>2x package of 10 bearings 688ZZ for the small cog (you need 2 bearings each cog)<br/> <a href="https://goo.gl/WGVqhm">https://goo.gl/WGVqhm</a></p> <p>1x package of 5 motor with gear (you need 4 motors, 2 for each chain)<br/> <a href="https://goo.gl/J9W8iZ">https://goo.gl/J9W8iZ</a></p> <p>2x brushed esc (one esc for each side. connect two motors to one)<br/> <a href="https://goo.gl/FmrdNn">https://goo.gl/FmrdNn</a></p> <p>8x bearings 61802 2RS / 6802zz for the main cog (each main cog needs 2 bearings)<br/> <a href="https://goo.gl/dFcmCe">https://goo.gl/dFcmCe</a></p> <p>1x Infrared-camera (or a normal one)<br/> Caution!: To use the infrared part of the camera, you need a two-way-switch (link coming soon)<br/> <a href="https://goo.gl/UkjZD7">https://goo.gl/UkjZD7</a></p> <p>1x Infrared-LED (if you do not use an infrared-camera, you don't need this LED)<br/> <a href="https://goo.gl/WtnRez">https://goo.gl/WtnRez</a></p> <p>1x Power-supply for the infrared-LED (if you do not use an infrared-camera, you don't need this)<br/> <a href="https://goo.gl/xeQitJ">https://goo.gl/xeQitJ</a></p> <p>1x Rear camera<br/> <a href="https://goo.gl/4mx7zw">https://goo.gl/4mx7zw</a></p> <p>1x FPV-switch<br/> <a href="https://goo.gl/R3qioB">https://goo.gl/R3qioB</a></p> <p>1x Package magnets (front and back are sticked to the frame by magnets)<br/> <a href="https://goo.gl/zPGRTc">https://goo.gl/zPGRTc</a></p> <p>1x fan 40mm for cooling the vtx<br/> <a href="https://goo.gl/GXY2nk">https://goo.gl/GXY2nk</a></p> <p>1x servo for the tilt-mechanism for the cam and LED<br/> <a href="https://goo.gl/cVt8wz">https://goo.gl/cVt8wz</a></p> <p>We use 4 tuning motors (Slotdevil 2035) instead of the motors which come with the gear reducer. You can run the tuning motors with 3S (the ESC does supply this, even if they are for 7,4v)</p> <p>Use 4 motor pinions for the tuning motors (sigma 4 9z m50 nylon)</p> <p>20x M3 Screw 25mm long<br/> 4x M4 Screw 20mm long<br/> 4x M4 Nut</p> <h3> Updates</h3> <p><strong>11.08.2017</strong></p> <p>Added a mini version of the rover</p> <p><a href="https://www.thingiverse.com/thing:2478547">https://www.thingiverse.com/thing:2478547</a></p> <p><strong>02.05.2017</strong></p> <p>Added top without vents. Use with caution!! Might determine damage to your electronics.</p> <p><strong>02.02.2017</strong></p> <p>Added another upgrade by Superfly851. The Grabatron</p> <p><a href="https://www.thingiverse.com/thing:1979227">http://www.thingiverse.com/thing:1979227</a></p> <p><strong>03.12.2016</strong></p> <p>Added another upgrade to the rover, so that you can mount a GoPro to the top.<br/> You have to use the new top plate with the two holes on the front side.</p> <p><a href="https://www.thingiverse.com/thing:1936491">http://www.thingiverse.com/thing:1936491</a></p> <p><strong>17.08.2016</strong></p> <ul> <li><p>Redesigned the top so that you have less support structure<br/> <strong>11.08.2016</strong></p> </li> <li><p>Added some pins for the track with different diameter. Please try at first which one fits best for you<br/> <strong>02.08.2016</strong></p> </li> <li><p>Modified the tow-bar a little bit and added another part for connecting the trailer to the rover<br/> <a href="https://www.thingiverse.com/thing:1700138">http://www.thingiverse.com/thing:1700138</a></p> </li> </ul> <ul> <li>Added a new link to the 6802zz bearings</li> </ul> <ul> <li>Added a new link to the micro servo for the tilt-mechanism for the camera</li> </ul> <ul> <li><p>Added two new videos<br/> <strong>20.02.2016</strong></p> </li> <li><p>Added links to the part on tinkercad<br/> <strong>08.02.2016</strong></p> </li> <li><p>Modified the inner track frame with B and F (back and front) so that you don't screw it up<br/> <strong>25.01.2016</strong></p> </li> <li><p>Added some parts you need (Screws) to the list<br/> <strong>17.01.2016</strong></p> </li> <li><p>To use the infrared part of the camera, you need a two-way-switch. (link coming soon)</p> </li> </ul> <ul> <li><p>Pins for the track now in single files<br/> <strong>11.01.2016</strong></p> </li> <li><p>Due to some request, I've added the bodies without the manual support on the bottom. So you can decide which one you will print.</p> </li> </ul>
With this file you will be able to print FPV-Rover (Tank) with your 3D printer. Click on the button and save the file on your computer to work, edit or customize your design. You can also find more 3D designs for printers on FPV-Rover (Tank).