FPV NoTankS
prusaprinters
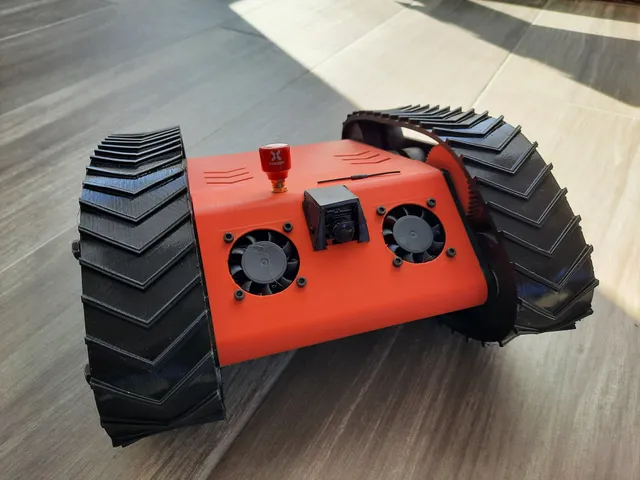
Introduction:After my FPV Drone journey I got an RC addiction and wanted a RC FPV Tank. I build the excellent NoTankS - 3D Printed RC Tank by swepet It was fun, but I ended having some problems:The motors would get too hot! it melted the PLA parts.The tracks were unreliable.It tumbles too easily, even with two big 3s 2200 Lipo batteries inside.I did not find a remix that could mount my fpv gear cleanly.After some initial awful tinkercad mashups, I bit the bullet and used this project to learn FreeCad. I used RealThunder FreeCad fork, but the model is compatible with FreeCAD 0.20TODOAdd the electronic tray or remove it and strap the ESCs to the “inside” partAdd a LED strip and buzzer controlled by the BluePill.Upload the STEP file.Learn how to use the FreeCAD Assembly workbench and have a proper model.Add a place to mount a GPS and a FC, to build an INAV version that can drive itself.About my design:My goals was to keep the simplicity of the original design, but address the shortcomings I found. My design It's heavily based the following work:NoTankS - 3D Printed RC Tank by swepet Motor position modification and ventilation by familyRootsNoTanks STL to defalt freecad solid by josheeg Main ChangesDesign a new TPU track that can be printed in one piece.Redesign the front cover to add 2 4010 12v fans, a 19mm FPV camera with a TPU Canopy and holes to mount the FPV VTX and RC control antennas.Use the Family Roots remix for mid motor position, but modified to be able to use 4 screws motor mountUse the Family Roots back cover for better airflowIncrease the gap for the Wheel Inserts/Spacers.Parts needed (Aliexpress Links)Power Plant2x 540/80T motor and 60 AMP esc combo, 80T2x Aluminium Heat Sinks for the motors2x M1 11T 5mm pinion Gear Do not waste time with 3d printed ones, they do not last2x 5mm to 3.17 mm Shaft adapter Do not waste time with 3d printed ones, they do not last2x Lipo 3s batteries 1550mah or more. max size Hardware 24x 608ZZ - 8x22x7mm Ball Bearings (standard skateboard bearings)12x M6 70mm Hex bolt12x M6 Nut8x M3 10mm screw (for the motors)2x velcro strap for holding batteriesElectronicsAny RC radio and receiver with 2 PWM outputs2x 4010 12v fan2x XT60 Female 2x XT60 Male 1x FPV VTX1x 19mm FPV CameraI used the following gear (not for beginners):RadioMaster Zorro ELRSBetaFPV ELRS RX - Classic T antennaDIY BluePill CRSF to PWM Converter running CRFServo TBS VTX Race 2 HVFoxeer Razer 19mm CameraFoxeer Lollipop 3 Stubby antennaA low ER Capacitor 470uFWas needed to clean the noise in the line that powered the VTX. How to print:I used SuperSlicer to print everything.TracksPrint in TPU ( I used a cheap Creality TPU) 5% infill, 3 perimeters and supports on the build plate.BodyEverything in regular PLA 20% infill, 4 perimeters. Perhaps it's a good idea to print the “Inside” parts with PETG/ABS a more heat resistant material.The covers and bottom are designed to be printed on its side, a little brim is a good idea.The bottom_wheel need support material everywhere.The front_cover stl needs touching buildplate supportThings you need to print multiple of:2x notanks_v1_drive_wheel_56t.stl if you use 11t pinion for motor.8x notanks_v1_bottom_wheel.stl2x notanks_v1_front_wheel.stl24x Spacers/Inserts2x notanks_v1_outside.stl2x notanks_v1_inside.stl (mirror one when printing) How to assemble:ToolPrint the included tool, it makes the job building easier then using a wrench. It is also great to have when out in the field driving.WheelsTwo ball bearings are press fitted into each wheels, a vise is a good tool for that.A wheel insert is then fitted into each ball bearing in the wheels, that is two per wheel.Be in mind that if you have chosen to use the 11 teeth motor pinion gear you will need the 56 teeth drive wheel, if you have chosen the 12 teeth motor gear then you will need the 55 teeth drive gear.Bottom, Cover and sidesThe nuts are press fitted into the holes using a screw from the other side to drag them in.MotorsAttache pinion gears (and adapters) to motors. Screw the motors to the inside parts. Add the Heat sinks. SidesPut the long bolts into the outside parts, put the wheels on the bolts. Front wheel in the front and drive wheel on top. Put the inside part with the motor on the bolts and screw in the drive wheel bolt.BottomScrew the now assembled sides onto the bottom part. Before tightening the screws, insert the rc holder part, between the slots in the insides.CoversScrew on the front and back cover.Battery holderUnscrew the two bottom middle bolts a little bit, mount the battery holder and fasten it by screwing in the bolts again. Attach a velcro strap to the slots in the battery holder for holding batteries.ElectronicsSolder the wires to the motors. Battery connectors to the ESC's. Mount the ESC's and receivers onto the rc holder using zipties. Connect wires and fasten the wires to the holder with zipties. Mount both fans and power them from the battery. If using and OpenTX/EdgeTX radio, use this mix FPVThis can be tricky, the ESC are very noisy and make the video feed awful. I use a low ERS capacitor to build a simple board that connects both fans and the VTX. The RX and the camera are powered with the 5v BEC of the VTX.Check the photo to get an idea of my setup. Warnings / Future upgradesHeatIf you drive hard enough it will get very hot.
With this file you will be able to print FPV NoTankS with your 3D printer. Click on the button and save the file on your computer to work, edit or customize your design. You can also find more 3D designs for printers on FPV NoTankS.