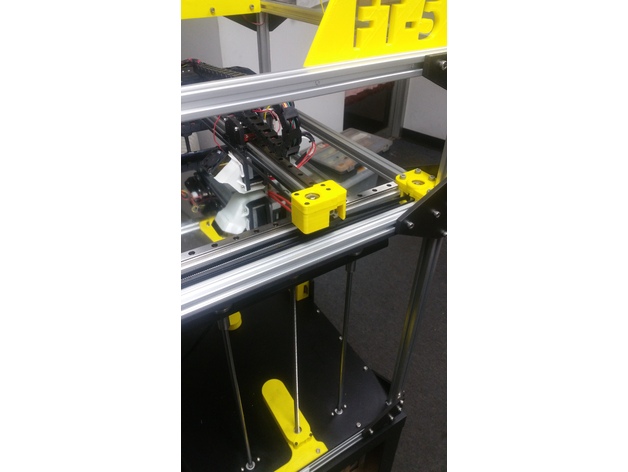
Folgertech FT-5 Y Idler upgrade
thingiverse
This is a more robust design of the Folgertech FT-5 Y idler assembly using commonly acquired 608 bearings, also widely used as skateboard bearings. They are designed to be a drop-in modular assembly for originally equipped components. Feedback positive or negative is always welcomed and encouraged "of course if tastefully spoken" because that's how we all learn. If this works for you, please show it off by posting a picture of it - that's what keeps me inspired to do more. If for some reason it doesn't work, please let me know and I'll make the necessary adjustments. Print Settings: Printer: Folgertech FT-5 Rafts: No Supports: Yes Resolution: I used .2 layer height Infill: I used 20% but recommend 50% and up. Notes: Parts are designed to have the mating flanges as flat as possible, so orient the lower half upside down so it's touching the bed. Recommend printing in ABS or higher temperature and strength materials, especially if using with a heated build chamber. Post-Printing: Assembly instructions and bill of materials will follow. Parts list: 4-608 bearings 8x22x7 commonly used for skateboards 2-m8 smooth rod x 34mm long. Chamfer both ends for idler axle shaft. Any type will work. 2-GT2 20 tooth X 8mm pulleys with set screws. You can find them on Amazon. 8-m5 x 16 hex head cap screws to replace existing Y idler plate screws too short for this use. 8-existing m5 drop in t-nuts. Perform post-printing clean-up of support as necessary. Press a bearing into each top cap and into lower base bearing seats. Loosen Y motor bolts to release belt and remove both existing Y idler top plates and idlers. Remove and reuse the 8 t-nuts. Store away remaining existing parts in a safe place in case this doesn't work. Prepare top plates by installing m5 x 16 socket head cap screws down through each one. Thread the loop of belt through the opening in each respective Y base while observing proper right/left side orientation. Insert m6 smooth rod axle down through belt loop and into lower bearing, being careful not to push the shaft too far or the bearing out of the lower base. Insert the pulley down through the belt loop onto the axle shaft, making sure to observe the top-to-bottom orientation of the pulley. The large pulley body end with the retainer screws should go up. While holding the lower shaft end and bearing in place, install upper cap down onto the axle shaft until base and cap flanges meet. Push all m5 cap screws through the cap and base and loosely install the drop-in t-nuts. To ease installation, hold body together and move axle shaft if necessary to be approximately 1 mm above bottom base. Let pulley seat against lower bearing and lightly tighten one of the pulley set screws. Now align all the t-nuts in orientation to the slots in the extrusion and set body down on place. Be sure body is seated flat against all the extrusions, then do the wiggle-jiggle-twist procedure we're all familiar with to get the t-nuts to seat. I found it's best and easier to lock the front rail screws first. Once solidly locked down, adjust your belt tension and lock your motor screws. Loosen the pulley set screw that you lightly tightened. Next slide the gantry back and forth a few times to center the pulley and belt on pulley. When happy with what it is doing, center a set screw in the set screw window and tighten firmly. Move the gantry to the next screw and also tighten firmly. Check your work and movement of the gantry. Done! Have a beer or drink of choice. On to X How I Designed This: Designed to be a drop-in replacement for the original Y idlers.
With this file you will be able to print Folgertech FT-5 Y Idler upgrade with your 3D printer. Click on the button and save the file on your computer to work, edit or customize your design. You can also find more 3D designs for printers on Folgertech FT-5 Y Idler upgrade.
