Folgertech FT-5 X Idler upgrade
thingiverse
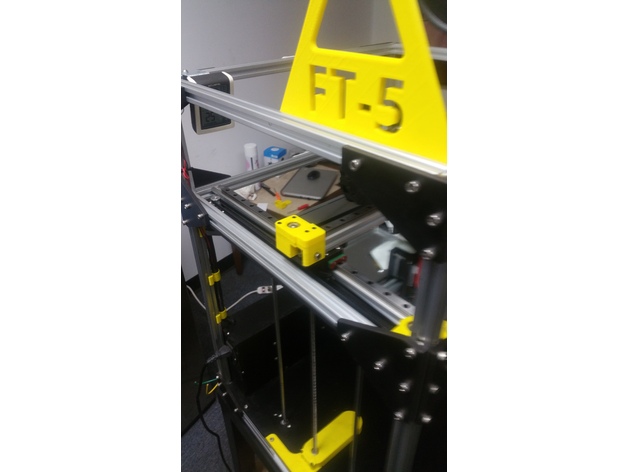
I have uploaded a revised X idler lower body to accommodate the difference in hole sizes of the factory X idler brackets on my FT-5 with the new style idlers. The revision is essentially the same as the original, but without the locator pin currently equipped. It's listed as XMAINBODYLATE. This is a more robust design of the Folgertech FT-5 X idler assembly using more commonly acquired 608 bearings, also widely used as skateboard bearings, designed to be a drop-in modular assembly for the originally equipped components. I welcome all feedback, whether positive or negative, and encourage you to share it with me. If this works for you, please show off your make by posting about it - that's what keeps me inspired to do more! If, on the other hand, it doesn't work as expected, please let me know so I can make adjustments accordingly. Thanks to John Folger for creating such an awesome machine at an affordable price - everyone should own one! Printer Settings: Printer: Folgertech FT-5 Rafts: No Supports: Yes Resolution: I used .2 layer height Infill: I used 20% but recommend 50% and up Parts List: 1. 608 bearing (preferably F608, but standard 608's can be used with a washer between the pulley and upper bearing) 2. M8 smooth rod, 33mm long, chamfered at both ends for idler axle 3. GT2 20-tooth X 8mm pulley with set screws (available on Amazon: https://www.amazon.com/gp/aw/d/B019GIJ296/ref=mp_s_a_1_1?ie=UTF8&qid=1496123258&sr=8-1&pi=AC_SX236_SY340_FMwebp_QL65&keywords=gt2%2B20t%2B8mm%2Bpulley&dpPl=1&dpID=51s-XR%2B4CcL&ref=plSrch&th=1&psc=1) 4. M5 x 10 hex head cap screw and companion t-nut (may be found in the kit as spares) 5. M3 x 16 hex head cap screws 6. Existing M3 drop-in t-nuts Post-Printing Instructions: 1. Perform post-print clean-up of support. 2. Press upper bearing into top cap. 3. Press lower bearing down through idler body and seat in base. 4. Loosen X motor mount bolts to release belt. 5. Remove existing X idler top melamine piece and existing idler pulley. 6. Slide belt through opening of new X tensioner body. 7. Install pin into bottom bearing through the belt opening. 8. Slide pulley down over pin through belt, orienting the pulley retainer end to the top. 9. Prepare top bearing plate by putting 2 M3 screws through the holes in the outside of the plate, threading them in just to the mating edge. 10. Install top bearing onto smooth rod and slide top plate down to mate with the main body. 11. Tighten the outer screws down finger-tight. 12. Put 2 remaining M3 screws down through both parts and start the drop-in t-nuts on the screws. 13. Install new X idler assembly down over the extrusion, centering the locator pin in the lower melamine plate and dropping the t-nuts into the extrusion. 14. Tighten down the mounting screws then final tighten the outer M3 screws, making sure everything is aligned and flat to each other. 15. Slide the M5 t-nut into the end of the extrusion on the front side, lining it up with the hole in the X idler body, and install and tighten the M5 bolt. 16. Seat belt in idler pulley and adjust belt tension and lock down motor bolts. 17. While holding X idler pin down in place, move the shuttle back and forth to align the pulley with belt travel then stop when a set screw is visible in screw portal. 18. Tighten set screw, then move shuttle enough to expose the second set screw in the portal and tighten down. Done! On to the Y idlers. How I Designed This: I designed this to be a drop-in replacement for the original X idler.
With this file you will be able to print Folgertech FT-5 X Idler upgrade with your 3D printer. Click on the button and save the file on your computer to work, edit or customize your design. You can also find more 3D designs for printers on Folgertech FT-5 X Idler upgrade.