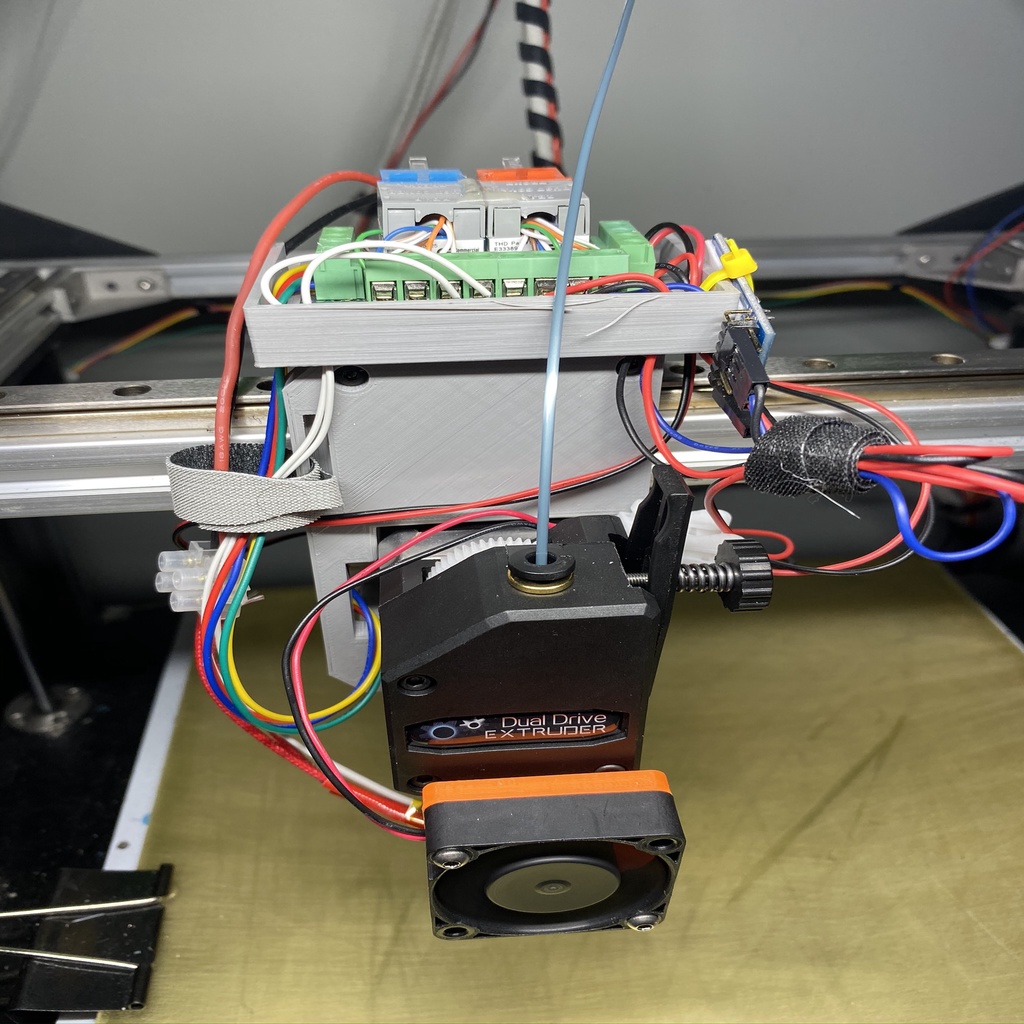
FolgerTech FT-5 Upgraded X-Carriage (piezo bed level option)
thingiverse
Update 11/15: Switched to a BMG vlone and added a compatible part cooler blower channel for BMG+V6+Volcano. Piezo leveling is still working great and I have switched back and forth between the Aero and BMG with almost no adjustment. Update 4/8: I received my Aero upgrade kit and converted over. The piezo leveling is still working just fine. The Aero and stock extruder require less Z correction than the full E3D v6 but other than that, nothing else needed to change. Since the Aero and stock extruder are so much shorter I added a new part cooler that accessories can be mounted to as well as an attachment for a 50mm blower targeted for a Volcano. I also have a beta for a regular V6 heater block if anyone wants to try it. This is the modified X-Carriage I have been using on my FT-5. This carriage fixes a number of inconveniences us FT-5 users endure. The differences between this upgraded carriage and the original (https://www.thingiverse.com/thing:1858771) are: - Solid pieces: The rail and motor attach to the same piece. The screws are fully backed - shouldn't bend or break like the default carriage. The attachment holes have divots to ensure everything stays in place and not the straight, tight square holes. All bolt heads and nuts are counter sunk. - Mount for a small 8-circuit terminal block (https://www.amazon.com/Blue-Sea-Systems-Circuit-Terminal/dp/B000S5Q2VS): I change my hot ends, coolers, thermistors, etc often. A terminal block is a lot easier to deal with than crimping every new wire. - Cut out for motor plug: You can remove the motor without having to disassemble the entire carriage. Remove the rear motor screws and it will pull out the front. I dropped the cable chain but the stock chain should mount to the top holes. I velcroed my cable rope to the rail 'hat' from my dual bowden gantry (https://www.thingiverse.com/thing:2814954). This is still WIP. Everything works great but I will be creating a part cooler that mounts to the carriage and a piezo sensor mount once the parts arrive. Update 3/11: Added a bottom piece that accessories can be mounted to as well as an attachment for a 50mm blower targeted for a Volcano. I also have a beta for a regular V6 heater block if anyone wants to try it. I've printed a dozen or so prints with the above z homing logic and even swapped out throats without having to change anything wrt z height. I have a pancake stepper on the way and I plan on making a compatible version. To set up your X-Carriage, follow these steps: - First, home the nozzle: G28 X0 Y0 - Then, move the nozzle to the middle of the plate: G1 X150 Y150 F5000 - Heat the nozzle to 180 to soften any material on the nozzle. Anything crusty will press on the plate and throw off the sensor (update: I have upped this to 210 as some PETG is still stiff at 180): M109 S210 - Home the Z. Make sure to clean up any goo that drops: G28 Z0 - Set a Z offset - this is a bit of trial and error based on the amount of preloaded pressure you have on the disk. If it's more than a couple 1/10s of a mm then recheck your sensitivity and setup: G92 Z-0.1 - Then, move everything back to home: G1 X0 Y0 Z0 F5000
With this file you will be able to print FolgerTech FT-5 Upgraded X-Carriage (piezo bed level option) with your 3D printer. Click on the button and save the file on your computer to work, edit or customize your design. You can also find more 3D designs for printers on FolgerTech FT-5 Upgraded X-Carriage (piezo bed level option).
