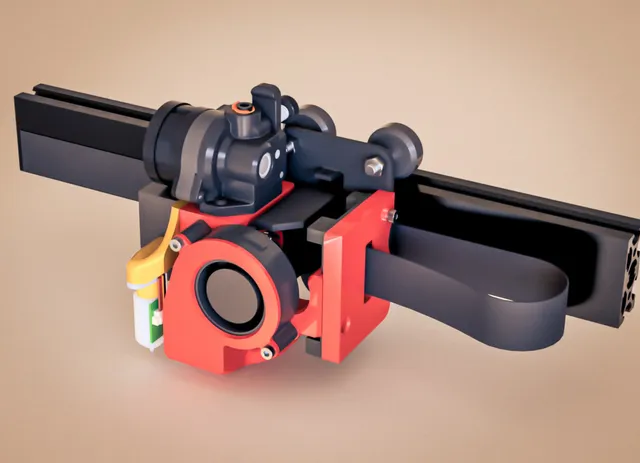
Fokoos Odin5-F3 - Custom Shroud - 5015 Fan - Dragon UHF - Orbiter 2.0 / NF Cannon Extruder
prusaprinters
No print support needed!This is an as-is project, will not improve it any further.It works great, cooling is better than stock, it's solidly attachedonly downside is limited visibility on the nozzle.This is a bit weird to setup due to the metal plate shape limitation so had to be creative, a flat plate would be easier to manage.Before you start, know that this isn't an super easy install (not hard either), heat inserts are needed (M3x4mm(L)x5mm(OD) or M3x4mm(L)x4.6mm(OD) ), selection of M3 screws M3x6, M3x8, M3x12, M3x16, M3x20, M3x25 , M3x30 are good to have on hand (might not use them all depends on your hotend cooling fan)And splicing and crimping connectors to your hotend, fans and extruder is a highly recommended to keep the amount of wires to a minimum as to avoid blocking the airflow, they use JST-XHHotend fan and part cooling fan connector don't use the same polarity so be careful with the plug in the same orientation, not sure why fokoos did it that way. plug-in your fan with reverse polarity could possibly damage it, thankfully my fan was resilient when I noticed it and still works.Remove everything except the metal backplate (there secondary metal plate that isn't attached to the back and should be removed) you will be left with a T shape plate (see render of the exploded view)if you try to put it as much together first away from the printer to get a good feel.Uses heat inserts M3x4mm(L)x5mm(OD) or M3x4mm(L)x4.6mm(OD) where needed.Any hole that is a through hole will not use a heat inserts.main block:- 5 on the fan side- 1 on the 5015 side- 2 on the opposite top side- 2 for extruder on top (place you extruder on top with filament path aligned to know which to populate)PCB_holder_1:- 3 (1 per side)PCB_holder_2:- 1 on the top left (bottom left is there in case there are PCB with additional holes, mine had only two in diagonal)bltouch_mount:- 2 where th blotch will screw intoThese instruction are off the top of my head so could have missed something, but should be obvious with things in hand .I did a couple screenshot of the screw placement that should help a bitMount the Dragon on the main block (remove the collar mount, and use the four M2.5x8 included in your dragonUHF box)Mount the main block with PCB_holder_1 first I think I had the dragon heat cartridge wire go through the metal hole, but the thermistor off the side opening where you will find a cable channel.A long M3x16 goes through the bottom right of the main block and will reach the PCB_holder_1M3x8 (or possibly M3x12 if M3x8 is too short) will go through the PCB_holder_1, the metal plate and into the main block on the top leftM3x8 will go on the top right side securing the main block to the metal plateprobably the best time to plug everything to the PCB. Best to splices and add connectors to everything to shorten the wires to a minimum.one screw to mount the PCB to PCB_holder_2 before mounting it to the setup (uses 3 more screws, two M3x6 on the right side into the metal plate and M3x8 or possibly M3x12 (not sure) on the bottom left connecting PCB_holder_2 through the PCB and into PCB_holder_1mount the front part cooling fan while “managing” the wires, I just stuffed them behind the 5015 fan (don'f forget the bltouch and front fan wires as they will go through that cable channel behind the 5015)install the BLtouch mount (goes between the hotend fan and the main block, held by a screw)then you can install the hotend fan, with 3 long enough screw (no screw on the bottom right)if using a 4010 fan M3x16 or m3x12 if it has recessed holes, longer one on the top right, might need M3x20if using a 4020 fan M3x25 if using a 4020 fans or M3x20 are long enough, and M3x25 or M3x30 on the top right.finish with the extruder (the NF cannon needs the Required_spacer_for_NF-Cannon piece under it )------Support me on Patreon so I can make more stuff!https://patreon.com/squirrelf3dor buy me a coffeehttps://ko-fi.com/squirrelf3dhttps://www.buymeacoffee.com/squirrelf
With this file you will be able to print Fokoos Odin5-F3 - Custom Shroud - 5015 Fan - Dragon UHF - Orbiter 2.0 / NF Cannon Extruder with your 3D printer. Click on the button and save the file on your computer to work, edit or customize your design. You can also find more 3D designs for printers on Fokoos Odin5-F3 - Custom Shroud - 5015 Fan - Dragon UHF - Orbiter 2.0 / NF Cannon Extruder.
