FLSUN V400 LED Triangle - Electronic Bay Cover
prusaprinters
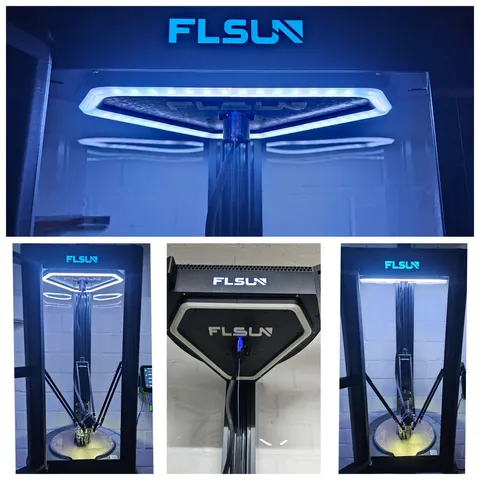
I design a Electronic Bay Cover with LED Light Just a little favour>>>Less then 10% of downloaded Models get a like.→ If you like the design, it will be nice if you click on the like button and maybe share your print. Its a heavy redesign of the still nice design of the FLSUN V400 Top Cover from JohnJackyThe electronic bay clover is necessary if you install a enclosure. It's to prevent the Electronic Bay from to much hot air from the print/printsurface. And it helps to get a better temperature in the enclosure to print ASA/ABS/Nylon. The V400 is a Delta Printer with a Triangle Shape so i design the LED Ring also as a Trianglering this looks for me better than a normal Neopixels ring, but the LED Strip needs to be cutted and soldering the LED at the corners Version: 2 Versions availableI upload 2 Versions a Normal one and a Splitted one→the normal one can only be printed with backside on the printsurface due to the LED Slot→the splitted one can be printed with front on the printsurface so that you can use a carbon_look_ plate PET, a triangle_look_plate PEO, or a PEI or what ever you like. The Parts at the splitted version needs to be glued together after printing, but it looks much nicer with a nice print pattern than the normal one. -The LED Cover and the Letters fits on both versions I printet the LED Cover and the Letters with Glow in The Dark Filament, it works great for me looks cool if the LED swiched off. But you can also print it with clear or white filament. Printing: Splitted Version →Splitted Closer part 1/2/3 Layerhight: 0.2 mmWalls: 3Supports: YesNormal Version→Closer part 1/2/3Layerhight: 0.2 mmWalls: 3Supports: noLED Cover→LED Cover Part 1/2/3Layerhight: 0.12 mmWalls: 3Supports: NoLETTERSLayerhight: 0.2 mmWalls: 2Supports: No-》If you wanna Print Glow in the Dark, I recommend 10 Top and Bottom Layer Mounting: Mounting of the Splitted Version :Glue the Splitted Closer part 1 frame and Splitted Closer part 1 plate together. Glue the Splitted Closer part 2 frame and Splitted Closer part 2 plate together.Glue the Splitted Closer part 3 frame and Splitted Closer part 3 plate together.Glue the Closer part 1,2 and 3 together..Glue the FLSUN Letters on the CloserInstall the NEOPIXELS, cut the Strip in 6 parts 3x 5 LEDs for the corners 3x 14 LEDs for the strait, solder the 6 Strips together with cables - Watch out of the Arrow on the strip this is the direction of the digital signal it must be from the connector strait in line to the end. Clip the LED Cover in install the Closer on the lower side of the upper electronic bay of the V400 with 10x M3x12 and M3 Nutsconnect the Neopixel connector to the Mainboard and install the Softwareor connect the LED to a Adaptor (5V/2A) Mounting of the Normal Version :Glue the Closer part 1,2 and 3 together..Glue the FLSUN Letters on the CloserInstall the NEOPIXELS, cut the Strip in 6 parts 3x 5 LEDs for the corners 3x 14 LEDs for the strait, solder the 6 Strips together with cables - Watch out of the Arrow on the strip this is the direction of the digital signal it must be from the connector strait in line to the end.Clip the LED Cover in install the Closer on the lower side of the upper electronicbay of the V400 with 10x M3x12 and M3 Nutsconnect the Neopixel connector to the Mainboard and install the Softwareor connect the LED to a Adaptor (5V/2A) LEDs - Neopixels:i used a 1m Neopixelstrip with 60 Neopixel LEDslike theseNeopixelsas already written in the Mountingcut the Strip in 6 parts 3x 5LED for the corners 3x 14 for the strait the solder the 6 Strips together with cables - Watch out of the Arrow on the strip this is the direction of the digital signal it must be from the connector strait in line to the end.and for the activation i used the Neopixels Makro from Cyril GuislanGuilouz/Klipper-Flsun-Speeder-Pad Wiki · GitHubNeopixels · Guilouz/Klipper-Flsun-Speeder-Pad Wiki · GitHubBut you can also use just a normal 5V adaptor(2A) with a simpel switch to switch on and of the Triangle LED RingI wrote a neopixels.cfg wich has a cool Startsequenz when the printer starts.Diplomator - Startsequenz Have Fun
With this file you will be able to print FLSUN V400 LED Triangle - Electronic Bay Cover with your 3D printer. Click on the button and save the file on your computer to work, edit or customize your design. You can also find more 3D designs for printers on FLSUN V400 LED Triangle - Electronic Bay Cover.