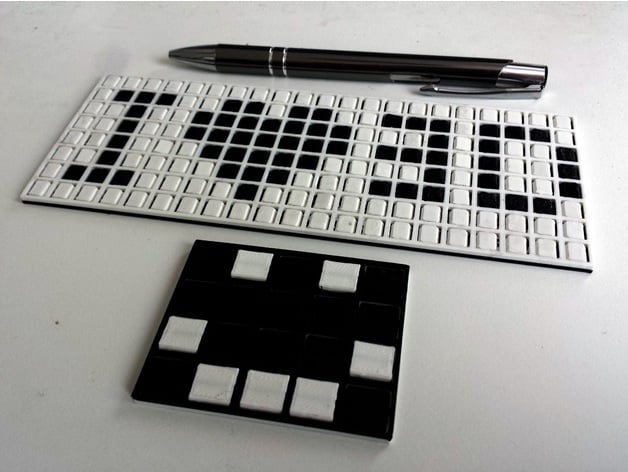
Fliptrix - customizable print-in-place dot matrix style flip board display
thingiverse
Fliptrix A customizable print in place dot matrix style flip board display Updates fixed 'cube' option thanks to @Neon22 v1.2 - improved plate_holders, adjusted default tolerances for better results on low end printers, renamed variables About This is my latest project in OpenSCAD. I've always been fascinated by post-it notes, dot matrix displays, pixel art editors, and other creative tools, so I decided to make my own real-life pixel-art board to play around with. I find it much more enjoyable to use than fidget widgets which are all the rage these days. Since I'm a bit laid-back, the main goal was to make it print fully assembled in one go and printable on single extruder 3D printers. I think this could be quite nice to use for stop motion animation projects. Parameters Just a few tricky things with parameters. Thickness (height of print; z-axis) cannot be larger than plate width. When it is equal to plate width and plates type is set to 'rounded', you'll end up with cylinders instead of plates, which might be fun as well (but you might need brim). Plate Holders I didn't have much trouble with plates flipping on their own (e.g. when the board gets shaken), but for high-resolution prints probably they will, so I've added the option to make a snap-in plate holder. Option tested, seems to work. Horizontal Gap It must be lower than half of row space and half of col space. In Practice As you can see on pictures, it works (disregard print quality). All prints have been made with 0.2 mm layer, 0.4 mm nozzle, extrusion width 0.5 mm. Small black & white print - plate size 10x10 mm (this works best in my opinion) Blue & yellow print - plate size 8x8 mm "I ❤️ 3D" print - plate size 6x6 mm Sample STL included in case you don't want to use customizer just to try it out. Future Considerations Probably improve plate holders after testing - seems done. Improve printing with long bridges (for larger values of plate height). Add connectors to combine multiple frames. For multi-extruder printers, print frame in a different color than plates (for better contrast). Add 3 and 4-sided plates... wow, much color. Print Settings Rafts: No Supports: No Infill: 100% Notes: If you're using single extruder printer remember to change filament around 50%. Note that plate height param that defines single plate height influences also the bridge that's printed inside plate so large values may not work out well. I have printed with 100% infill but it might work ok with lower values. I recommend printing small board (e.g. 2x2) first to test your setup. If the display plate and frame is glued together either play around with printer calibration or increase horizontal gap. If plate is not glued to frame but doesn't flip, increase hole gap parameter in customizer (not the actual layer height in slicer). If plate is neither glued to frame nor to the bridge inside and you've used plate holders they might be blocking it. Try using single plate holder or none. Post-Printing Anything other than manually flipping plates should not be required. When flipping a plate for the first time, it's probably better to do it gently, although I have not broken a single one even when significant force was applied. If you decide to print it out, would be fun to see a photo of your creation so please consider adding it with "I made one". Have fun!
With this file you will be able to print Fliptrix - customizable print-in-place dot matrix style flip board display with your 3D printer. Click on the button and save the file on your computer to work, edit or customize your design. You can also find more 3D designs for printers on Fliptrix - customizable print-in-place dot matrix style flip board display.
