Flexible helical z-wobble coupler for printrbot jr v2, 5mm to 3/8in
thingiverse
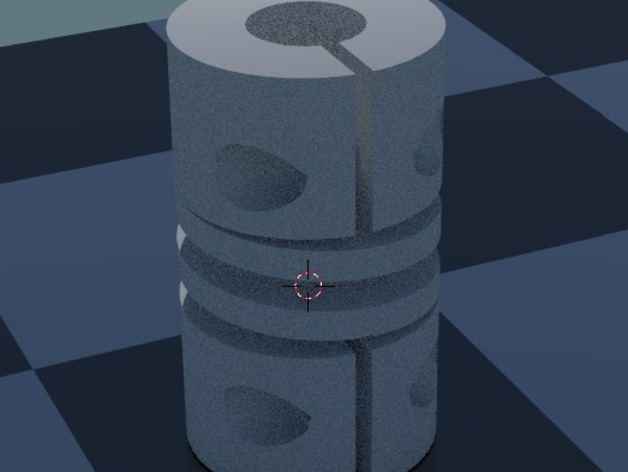
This is a customized version of Thingiverse, where I'm sharing my modifications to the base mesh for the PBJV2. I created this updated model using Customizer at http://www.thingiverse.com/apps/customizer/run?thing_id=143514. After importing it into Blender.app, I used the Boolean operation to create screw holes and compression gaps in the design. I fine-tuned the mesh size by trial and error to achieve the best possible fit. My modifications eliminate most of the z-wobble issues with my PBJV2 3D printer. Here are the instructions for printing: 1. To print, you must use support material. It's essential to choose the "lines" support option instead of "box" support. 2. Carefully remove the support material after the print is complete. To assemble this design, follow these steps: 1. Remove the old coupler from your Z-motor. 2. Attach the new coupler to the 5mm shaft of the Z-motor. Next, carefully lower the main carriage so that the Z-shaft enters the top of the coupler. Make sure to leave some space between the motor shaft and the Z-shaft inside the coupler. To secure the Z-screw in place, insert a 5mm wide rubber band into the spiral opening. This will prevent vibration and stop the screw from compressing over time. For added safety, use an M3 screw that's shorter than the one I originally used. This will prevent it from catching on your linear bearings or wires from your heated build plate.
With this file you will be able to print Flexible helical z-wobble coupler for printrbot jr v2, 5mm to 3/8in with your 3D printer. Click on the button and save the file on your computer to work, edit or customize your design. You can also find more 3D designs for printers on Flexible helical z-wobble coupler for printrbot jr v2, 5mm to 3/8in.