Flashlight Mount - Picatinny 19mm
thingiverse
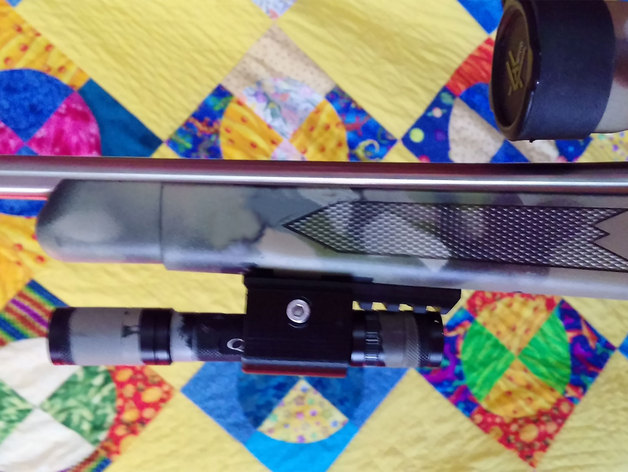
I needed a mount for my new Ruger 10/22 Takedown, which I recently picked up. I wanted to put a flashlight on it and had some 4Sevens AA2 flashlights lying around. It seemed like a decent pairing since a weapon without a light can be a horrible mistake waiting to happen in my opinion. This mount is designed for a flashlight with a diameter of roughly 19mm, which requires only one bolt to attach and the light. The package includes various height/profile versions and two slanted versions. The slanted versions were necessary to offset the slant on my Ruger TD so that the light and barrel are in somewhat close alignment. I included them here in case anyone else does the same thing with their Ruger and a AA2 or any light with a 19mm body. To mount it, I just drilled two holes in the forearm and then put a Magpul MOE picatinny rail on it. You could easily print a picatinny rail and use that, but I had several Magpul rails lying around unused. This is basically a remix of mechpilotz' mount, which I shrunk the hole a bit to fit my light and made longer for a bit more surface area and adjusted the height, wanting it as low profile as possible. I used PETG so that I can heat it up just enough to pop the light in. The 4Seven's AA light has larger diameter sections on both ends, making it impossible to slip it in. On the plus side, there's no way to lose your light unless you lose the mount as well. With PETG, I'm fairly positive that you'd have to destroy the forearm before the mount breaks off. Print Settings: Printer: MendelMax 3 Rafts: No Supports: No Resolution: 0.25 Infill: 20% Notes: I printed in PETG for more strength than PLA and less noxiousness than ABS. I find PETG pretty easy to work with on my MM3, and I'm not sure I could heat up either one and get my specific light inside the mount without warping it or breaking it. Using eSun's black PETG, I print at 60mm/s, 245C extruder temp, 60C bed temp, bed is covered in 3DEez. No issues to report. Post-Printing: To get your light into the mount, just heat it up with a heat gun or hair dryer along the top curve and it'll flex enough to get the light in. It doesn't take a lot of heat to make it doable. An M5x35 bolt and nylock nut fits perfectly in the mount for attaching.
With this file you will be able to print Flashlight Mount - Picatinny 19mm with your 3D printer. Click on the button and save the file on your computer to work, edit or customize your design. You can also find more 3D designs for printers on Flashlight Mount - Picatinny 19mm.