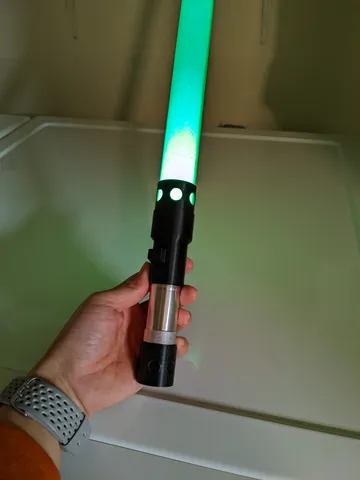
(Flash)Light saber
prusaprinters
Release your inner Jedi (or Sith) by building your own light saber - from a mini LED flashlight!PartsMini LED flashlight - https://smile.amazon.com/dp/B01CTX742M?psc=1&ref=ppx_yo2ov_dt_b_product_details3D printed hilt cap - 3 designs to choose from3D printed coupler - 5 designs to choose fromClear plastic cover/guard/protector for a T8 (1") bulb, cut to desired length3D printed clear capColored tissue paperWashi tape for friction fitting (optional)Aluminum tape for cap (optional) Print Instructions & Special ConsiderationsCoupler - 3 walls, infill doesn't matter. Inner diameter for tube side is 31.05mm.Inner diameter for flashlight side is 21.1mm. It's better to go looser than too tight as you can use tape to build it up to friction fit.Hilt CapThe hilt cap moves so that you can press the button on the bottom of the flashlight. Clearance between the pieces is 0.3mm.CapUse a transparent filament such as PETG0% infill8 top layers to ensure top is covered Assembly InstructionsPrint a coupler, hilt cap, and top cap.Prepare the flashlightOpen the flashlight battery compartment to remove the plastic battery long-term storage shield (if present).Remove the lanyard from the flashlight (if present).Fit the coupler on the top of the flashlight. Build up the flashlight rim with washi tape to make a friction fit.Fit the hilt cap to the bottom of the flashlight.Build up the flashlight rim with washi tape to make a friction fit.Cut the clear T8 bulb tube to the desired length.Cover the bottom of the transparent cap with either aluminum tape (for better reflectivity of light) or colored tissue paper for light diffusion.Fit the cap into the clear plastic tube and glue if necessary. Cut tissue paper about 4-5" wide of the desired color for the blade.Roll the tissue paper up around a helper rod then feed it into the clear plastic tube. Cut the paper to length. Fit the clear plastic tube into the coupler.Build up the tube with washi tape to make a friction fit.[Optional] Using a pin, melt a small hole in the hilt cap and re-attach the lanyard.You're done! Brandish your new laser sword like the badass Force wielder that you are.
With this file you will be able to print (Flash)Light saber with your 3D printer. Click on the button and save the file on your computer to work, edit or customize your design. You can also find more 3D designs for printers on (Flash)Light saber.
