fischertechnik N20 Mini Power Motor system
prusaprinters
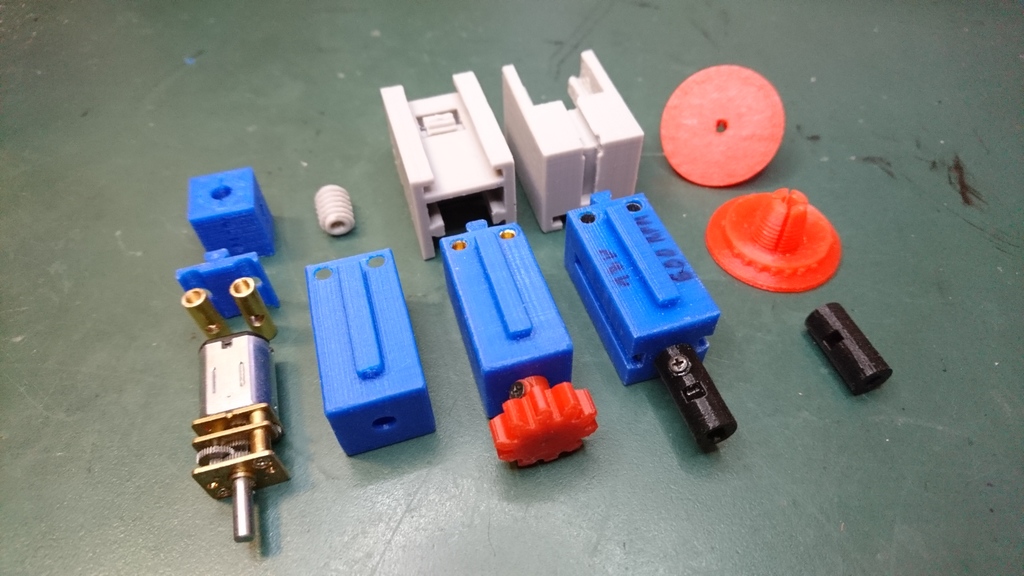
<p>Changelog:</p> <ul> <li>2018-09-25: (1) Corrected an error in Enclosure_grooved_v4.stl, the groove was 5mm short, now it is correctly 25mm. (2) I added a version of the enclosure parts and drilling aid for 4mm<em>square</em> brass rods, which are harder to get (where I live) but are much easier to cut and drill. Look for the files named ...v5_squareRods, images at the end of the gallery.</li> <li><p>2018-06-13: pinion & gear adapter now has filleted corners This is an enclosure for the cheap N20 gear motors, which are available e.g. from ebay with a number of different RPMs. The enclosure makes the motor compatible with the fischertechnik construction toy system, turning it into a 30x15x15mm size building block. The motors run with 12V, but 9V as used by other fischertechnik motors work fine, too.</p> <p>Two versions of the enclosure are provided, an ungrooved one and a grooved one. The latter offers more connection alternatives but leaves the gears open to dust and other foreign objects.</p> <p>Several fischertechnik-compatible adapters for the N20 D-shaped 3mm shaft are included:</p> <ol> <li>Clip-on axle adapter (similar to <a href="http://ft-datenbank.de/details.php?ArticleVariantId=767769a8-0dda-4038-9154-82e356e53c81">Rastachsenkupplung 15</a>) with and without locking screw</li> <li>10 tooth gear (similar to <a href="http://ft-datenbank.de/details.php?ArticleVariantId=fdb2325c-f18a-42f0-bda1-c6b25e5633c0">Zahnrad Z10</a>) with locking screw</li> <li>Adapter for bigger gears (similar to <a href="https://ft-datenbank.de/details.php?ArticleVariantId=cacb4054-5b30-4624-9a1f-7eb01fab49b1">Flachnabenzange</a>)</li> <li>Pinion and gear adapter (similar to <a href="https://ft-datenbank.de/categories.php?id=cce0cfe3-f220-48c2-8ae4-c162da10378b">ft Hubgetriebe</a>) for <a href="https://ft-datenbank.de/details.php?ArticleVariantId=cf524eb5-4bbf-497e-880e-eb064b857df6">fischertechnik 0.5 module linear gears</a> with printed-in-place gear and matching worm gear m0.5. Needs a grooved enclosure. Warning: the worm gear will wear out under stress (at least if printed with PLA), so this is mainly meant for demonstration purposes. Please report if you get better results with other materials. Additional non-printed parts and tools you'll need: </li> </ol> </li> <li><p>4mm solid brass rod for the connectors</p> </li> <li>high quality 2.4mm metal drill</li> <li>drill rig</li> <li>soldering iron</li> <li>super glue</li> <li><p>fixing screws 2x2mm, as needed This video shows 600 RPM motors in action:<br/> <figure class="media"> <oembed url="https://www.youtube.com/watch?v=zOH47J43NnE"></oembed> </figure> </p> <p>Related thread in the fischertechnik community: <a href="https://forum.ftcommunity.de/viewtopic.php?f=15&t=4784">https://forum.ftcommunity.de/viewtopic.php?f=15&t=4784</a></p> <p>Please consider leaving a "like" or posting your make as a token of appreciation for my work.</p> <p>Find my other fischertechnik designs <a href="/juh/designs">here</a>.</p> <h3>Print Settings</h3> </li> </ul> <p><strong>Printer:</strong></p> <p>Anet A8</p> <p><strong>Rafts:</strong></p> <p>No</p> <p><strong>Supports:</strong></p> <p>Yes</p> <p><strong>Resolution:</strong></p> <p>.1 mm</p> <p><strong>Infill:</strong></p> <p>100%</p> <p><strong>Notes:</strong></p> <ul> <li>Print the<em>cases</em> upright with open side up.</li> <li>Print the<em>cap</em> upright with the peg aligned with the z-axis, use brim if needed.</li> <li>Print the<em>pinion and gear adapter</em> sideways with supports, so that the teeth of the print-in-place gear is aligned upright with the z-axis. Be very patient and careful when removing the supports, so not to damage the gear. The gear is printed in place, it will probable need a bit of loosening, but should turn freely afterwards. I found that a drop of machine oil on both ends of the axle also helps.</li> <li>Print the<em>worm gear</em> upright. You may need to prevent your slicer from lifting the print head too often to get this printed properly. Cura settings which might be relevant are Cooling/Lift Head (disable) and Material/Retraction minimum travel (increase), you will also want to avoid overextrusion.</li> <li>Print the<em>drilling aid</em> with 100% infill.</li> <li>Print all others as provided.<h3>Post-Printing</h3> </li> </ul> <p><strong>Motor assembly</strong></p> <p>Print either the grooved or ungrooved version of the case, the cap, and the drilling aid.</p> <ol> <li>Use the drilling aid and a metal saw to cut two 13,5mm pieces of 4mm brass rod.</li> <li>Use only high quality 2.4mm metal drills to drill three sockets into each brass piece. Cheaper drills will wear out too fast and produce too much heat too quickly, resulting in a meltdown of your drilling aid.Use a drill rig and fix the drillling aid properly for each drill. Don't hold it manually, or you might injure your fingers when the drill catches.Start with the middle socket, Pause often to check that brass and drill don't get too hot. Continue with top and bottom sockets.</li> <li>Fit motor into case, fit and align brass connectors. Warning: do not solder inside case, the heat will shrink or twist the plastic (you can see that in one of my images if you watch closely). Instead, use a drop of glue to fix the connectors to the motor.</li> <li>When dry, remove motor with connectors. Solder connectors to motor with two short pieces of wire.</li> <li>Reinsert motor with soldered connectors. Use super glue to fix cap permanently. Congratulations, you are now one of the few owners of a fischertechnik mini power motor.</li> </ol> Category: Construction Toys
With this file you will be able to print fischertechnik N20 Mini Power Motor system with your 3D printer. Click on the button and save the file on your computer to work, edit or customize your design. You can also find more 3D designs for printers on fischertechnik N20 Mini Power Motor system.
