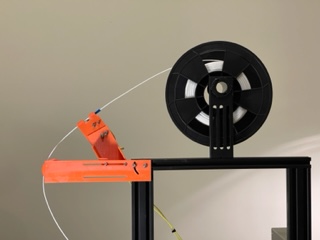
Filament Sensor (no software modifications needed)
prusaprinters
<p>I am not comfortable with changing the software needed with a low-voltage filament sensor input to the printer. I modified a short extension chord that is connected in series with the printer input power cable and wall outlet. The modification adds a micro switch to the filament feed and turns off power to the printer when there is no more filament. The Ender 3 knows where to restart when the filament is added to the printer after the loss of power (for any reason). See the schematic.</p><p>The power turns on as soon as the switch senses there is a filament, so I switch off the printer power when installing the filament.</p><p>Connections need to be soldered and insulated with heat shrink tubing.</p><p>If you are capable of modifying code, you could use the mechanism to interface with the low-voltage side of the printer. There are several U-Tube explanations for that approach.</p><p> CAUTION:</p><p>IF YOU ARE NOT FAMILIAR WITH 120 volt WIRING AND SOLDERING, DO NOT USE THIS 120-VOLT POWER CONTROL SYSTEM. If you are capable in this area, the micro switch and wiring are rated well above the 350 watts (3 amps max) consumed by the Ender.</p><p>BE SURE TO PUT THE MICRO SWITCH IN THE HOT LEG OF THE POWER. PLACING IT ON THE WRONG LEG IS A HIGH RISK TO YOU.</p><p>You could use this mechanical design and limit switch to interface with the low-voltage system, but you will have to provide the required software modifications.</p><p>There are several adjustments (position and angle of microswitch and feed pulley) that support installation on a variety of printers.</p><p>Store-bought parts: </p><p>Extension chord, ~1.5', 3 wire, rated 5+ amps, 120 volt AC </p><p>16 Ga copper electrical wire ~20'</p><p> Microswitch, 1 each (Amazon, 250V, 5 amp, SPDT, 1 NO, 1 NC, Roller Lever, URBEST STORE (or others) cost $6.99 for qty 10</p><p> For attaching Microswitch:</p><p> 2 each: Bolt - 2 mm x 10 mm; Nut - 2 mm; Flat Washer - 2 mm; Lock Washer - 2 mm</p><p>To insulate soldered items: 560PCS Heat Shrink Tubing 2:1, $6.00</p><p>For assembly of printed parts:</p><p> 6 each: Bolt - 3 mm x ~10 mm; Nut - 3 mm; Flat Washer - 3 mm; Lock Washer - 3 mm</p><p> 2 each: Bolt - 3 mm x 6 mm to fasten “T” between Aluminum Extrusion and Horizontal to Beam</p><p> 1 each: Bolt - 3 mm x ~4 mm for the cap to secure the pulley to the axle.</p><p>Capricorn Feed Tube: </p><p> 2 each: ~ 10 mm long</p><p> </p>
With this file you will be able to print Filament Sensor (no software modifications needed) with your 3D printer. Click on the button and save the file on your computer to work, edit or customize your design. You can also find more 3D designs for printers on Filament Sensor (no software modifications needed).
