Filament Quickchange for Robo 3D, Wade extruders
thingiverse
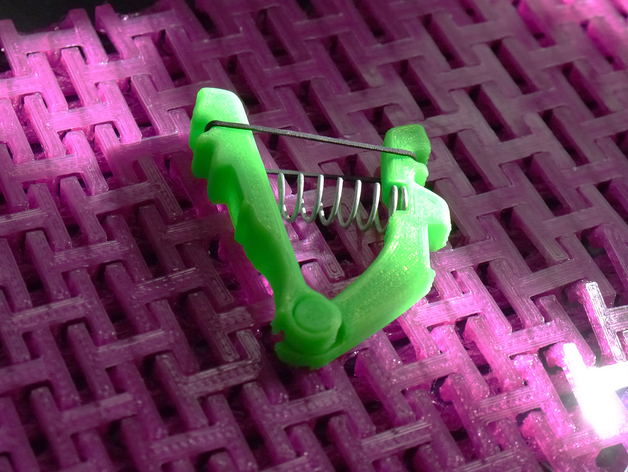
I finally realized I had grabbed the wrong retainer file for the redux pinchers. The one labeled Retainer-redux fits much better, no excuses. 8-14-18 Update After having some extra time to revisit this model, I decided it was a great opportunity to make some upgrades. Specifically, I redesigned the swivel to be more sturdy. These updates are labeled as Redux. 10-26-16 Update I have been brainstorming and prototyping a lot using captured and print-in mechanics (take a look at http://www.thingiverse.com/thing:1809355 for an example) and now my sights are set on this vintage device. I have been developing this for two years and it still is one of the things I enjoy doing most. It's even more efficient to print and install, with the pincher being in a single piece. You can try using a small rubber band on top if you tend to accidentally send your spring flying across the room. At long last, I finally have an incredibly fast and easy filament interface for my Robo 3D printer! These components took just one hour to print and they've already saved me more time than that by alleviating my frustration. Update: A video was added to show its function here: https://youtu.be/6kazC2Riodg Update: I made adjustments to the pressure pincher so it won't overextend and is simpler to insert and remove. Additionally, a smaller footprint version (6mm) was included for those using smaller springs. The pinch tensioner can be adjusted by turning one of the M4 screws on hand. Simply find the right spring; I found an 8mm diameter one, roughly 30mm in length, that works really well. Keep checking this page for any updates or modifications that might become available soon. Any comments or feedback would be more than welcome! Instructions Replace your old Wade extruder bracket with the new part provided. The replacement requires a Phillips screwdriver and possibly one additional small tool, though a wrench may suffice. For easier access to certain areas later on down the line, remove that large gear connected to your printer head. Flipping it upside-down so its nuts align in a specific direction helps make the next steps less difficult for future adjustments. First, pop out that old pressure bearing with an object small enough to fit in the designated space. The new piece you print will take its place immediately. Replace any removed parts carefully to avoid potential damage. Take off the long M4 screws and thread them back through the new part's retainer where they originally belonged. With a Phillips head screwdriver, make some fine-tuned adjustments as necessary. The hinged area of the pin lever should be aligned correctly using either 3mm filament or a small set of nuts and bolts. It may prove to be slightly helpful if you choose different colors for your two print sides so orientation isn't hard to visualize - like shown in some attached photos. It might become a little tricky at first removing that pressure pincher without proper support, though having another object assist underneath makes the whole process more manageable - still much easier than its previous method or current standard setup. For now, I'm very satisfied with this system as long as the centering of your filament has been ensured and everything is fitted snugly together before starting to print any pla (not tested yet with other filaments).
With this file you will be able to print Filament Quickchange for Robo 3D, Wade extruders with your 3D printer. Click on the button and save the file on your computer to work, edit or customize your design. You can also find more 3D designs for printers on Filament Quickchange for Robo 3D, Wade extruders.