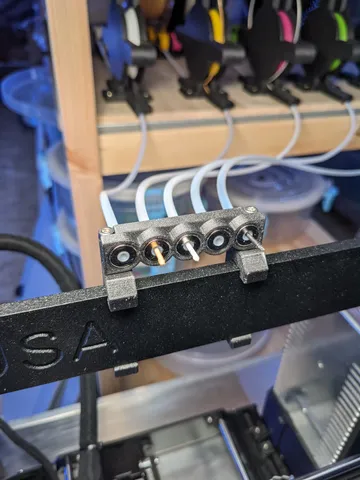
Filament guide with magnets
prusaprinters
These parts allow to add a PTFE filament guide (also known as reverse bowden) from the extruder to the printer's frame, and optionally to for example a filament storage solution. It makes for a better and smoother filament path.After it turned out I only used my MMU2s as a remote (octoprint) filament selector (multi material turned out to be a real challenge, and I never have the need for multi colour), that has it's own set of quirks, I started to think about replacing it for a much simpler system.My requirements were simple; have a fixed filament path, and have up to 5 filaments readily available. I also wanted to have easy access to all parts just in case something gets stuck (got tired of unscrewing these PTFE tube connectors)After getting intrigued by https://www.prusaprinters.org/prints/52352-magnet-filament-coupler and it's simplicity, I asked for a .step file which allowed me to extend its usage to more than just a coupler. The design works just great and I only adapted the design to use magnets with a 5mm height as that was what I had available.I then added a multi-magnet holder to mount on the frame (derived from the MMU2s frame mount), and a modified extruder cover to hold a magnet as well (derived from the MK3s+ part - the magnets do not interfere with the sensor or magnets inside the extruder body)The f3d/step files are included and parameterised to adapt the design to your own needs or to hold different magnets. The f3d file for the original magnet cap can be downloaded following the link above.Extra needed hardware2x M3 bolt, 18-25mmPTFE tube; 2mm ID, 4mm ODBetween the FS cover and frame holderIn the FS coverFrom the frame holder to your filament storage solutionRing magnets; 4mm ID, 10mm OD, 5mm height1x for the FS cover2x for the length of PTFE between FS cover and frame holder1x, 3x, 5x or 6x for the frame holder, depending on the desired versionPrint instructionsPrint everything as in the gcode/3mf file. I used .20mm layer height with supports on the build plate.Note that you need two frame clamps, one original, and one mirrored.Remove the build-in brim where applicableConnect the 5-magnet holder with the frame mounts with M3 bolts (you can use some spare ones that came with the printer - it should hold 25mm, but I used 18mm since I had a lot of these)Insert the magnets (pay attention to the orientation so they actually attract and not repel each other)Depending on the tolerances of your printer, you might want to add a few drops of CA glue (after a test-fit).Insert some PTFE tube between the magnetic couplers (I used the PTFE tube from the MMU2s)Insert a short piece of PTFE tube in the cover (from the top of the magnet to the bottom of the cover)Use a sharp knife to bevel the inside of the PTFE tubes on the magnet-sides to ensure a smooth filament path.
With this file you will be able to print Filament guide with magnets with your 3D printer. Click on the button and save the file on your computer to work, edit or customize your design. You can also find more 3D designs for printers on Filament guide with magnets.
