Filament Dryer - Up to 80°C (176°F)
prusaprinters
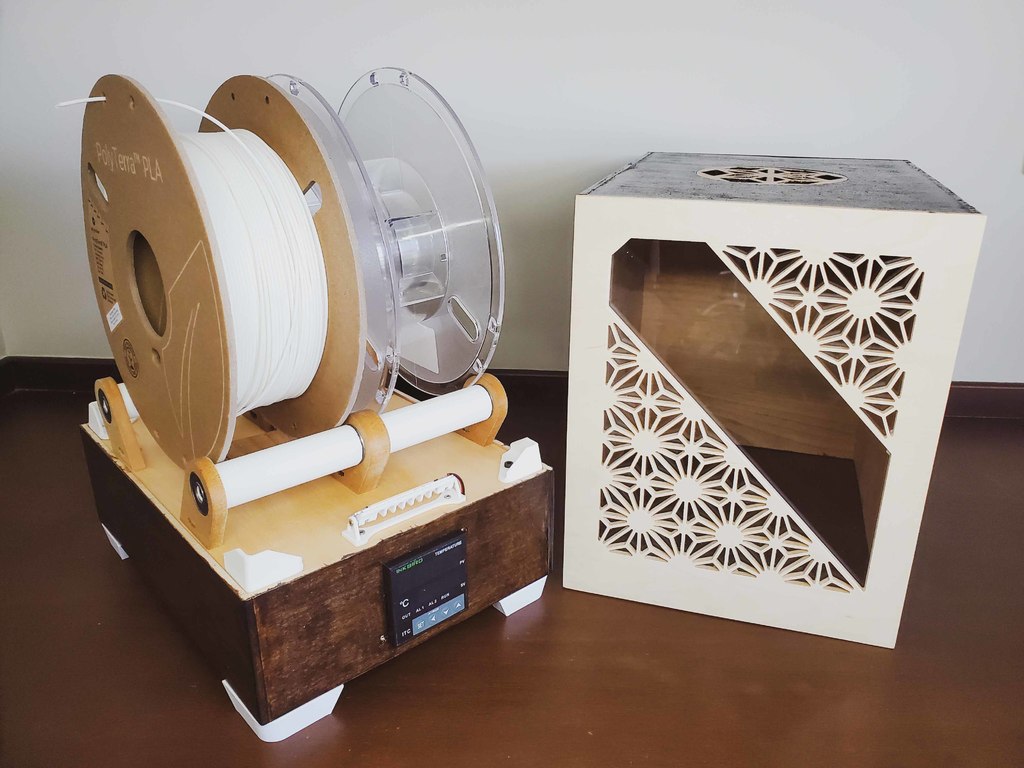
<p>This filament dryer is designed as an efficient, reliable, easy-to-build, low-cost, and environmentally friendly solution for drying common 3D printing filaments such as TPU, PLA, PETG, ABS, Nylon ASA, PC, etc.</p><p>Provides differentiated designs of parts so that they can be fabricated with either CNC milling, laser cutting, or wire saw+drilling (minimum requirement).</p><p>The prototype has been tested for maximum achievable temperature, temperature stability, temperature gradient within the enclosure, and reliability for 72 hours of continuous operation (results see below).</p><h3>Features</h3><p>· Inkbird itc-100vh, Auto PID calibration, multiple adjustable parameters needed for precise tuning.</p><p>· Compact size, large capacity, LWH= 250<i>190</i>310mm, loads two rolls of 1kg filament or one roll of 3kg filament.</p><p>· Capable of reaching a true maximum 80 C, achieving safe and fast drying.</p><p>· Environmentally friendly wooden enclosure.</p><p>· Easy to build and highly customizable</p><h3>Safety</h3><p><strong>Is wood safe to use for a heated dryer?</strong></p><p>“At oven temperatures of 450°-500°F., the wood gradually chars and usually ignites after several hours.”- fireengineering.com</p><p>Wood will first char in an environment above 230 C without an open flame before it starts to burn. Also, the 300W PTC heater has an overheat limit switch of 150 degrees Celsius</p><figure class="image"><img src="https://media.printables.com/media/prints/222356/rich_content/f643edee-e095-4d13-a9bc-98ff060a7e42/vent.jpg#%7B%22uuid%22%3A%22c9e3f0a2-8780-4a96-9c5b-da3e3e32e4bf%22%2C%22w%22%3A4032%2C%22h%22%3A3024%7D"></figure><p>The wood piece in direct contact with hot fins showed no visible charring after test running for continuous 72 hours at the temperature set to 80 C.</p><figure class="image"><img src="https://media.printables.com/media/prints/222356/rich_content/c49a56d2-c1d6-4d3c-9aec-3c0da82cd74e/c14.png#%7B%22uuid%22%3A%2242d9703c-eefd-4176-af61-a3a44a618c65%22%2C%22w%22%3A448%2C%22h%22%3A549%7D"></figure><p><strong>Only the C14 socket that has a fuse should be used.</strong></p><h3>Parts need to be purchased (prices may fluctuate)</h3><p><strong>Amazon: about $120 CAD</strong></p><p>C14 Switch Inlet 5A Fuse $13.31 <a href="https://www.amazon.ca/dp/B07ZKK183L?ref_=cm_sw_r_cp_ud_dp_5TDVRJFR31PANNS33XY6&tag=thingiverse09-20">link</a>.</p><p>Inkbird Itc100vh PID Controller with SSR $53.70 <a href="https://www.amazon.ca/gp/product/B00T2IODGS/ref=ppx_yo_dt_b_search_asin_title?ie=UTF8&psc=1&tag=thingiverse09-20">link</a>.</p><p>300W PTC Heater $26.25 <a href="https://www.amazon.ca/gp/product/B07W9B7RH6/ref=ppx_yo_dt_b_search_asin_title?ie=UTF8&psc=1&tag=thingiverse09-20">link</a>.</p><p>5015 $2.79</p><p>12V Power Supply $13 <a href="https://www.amazon.ca/gp/product/B093BRV85Y/ref=ppx_yo_dt_b_search_asin_title?ie=UTF8&th=1&tag=thingiverse09-20">link</a>.</p><p>608 $10</p><p><strong>AliExpress: about $80 CAD</strong></p><p>C14 Switch Inlet 5A Fuse $3.28 <a href="https://www.aliexpress.com/item/33015569049.html?spm=a2g0o.productlist.0.0.6ad7184852sWxT&algo_pvid=0c0f3f69-7586-43e9-8873-61f0fd0793cc&aem_p4p_detail=20220605061040915395002724400023629091&algo_exp_id=0c0f3f69-7586-43e9-8873-61f0fd0793cc-4&pdp_ext_f=%7B%22sku_id%22%3A%2267170938776%22%7D&pdp_npi=2%40dis%21CAD%21%212.52%212.52%21%21%21%21%40210318bb16544346401793770ed97e%2167170938776%21sea">link</a>.</p><p>Inkbird Itc100vh PID Controller with SSR $48 <a href="https://www.aliexpress.com/item/32798114423.html?spm=a2g0o.productlist.0.0.28dc167dJyKaVg&algo_pvid=7bf39be0-3975-40ff-8486-c3c43e1cfdd3&algo_exp_id=7bf39be0-3975-40ff-8486-c3c43e1cfdd3-30&pdp_ext_f=%7B%22sku_id%22%3A%2264143884637%22%7D&pdp_npi=2%40dis%21CAD%21%2147.51%2147.51%21%21%21%21%400b0a556416544347819641891e78f4%2164143884637%21sea">link</a></p><p>300W PTC Heater $16.14 <a href="https://www.aliexpress.com/item/32968062277.html?spm=a2g0o.productlist.0.0.20d47e30n2WTkn&algo_pvid=b4ac79b6-0a82-4e7a-a2df-ba86c3d677c9&algo_exp_id=b4ac79b6-0a82-4e7a-a2df-ba86c3d677c9-0&pdp_ext_f=%7B%22sku_id%22%3A%2212000016632768953%22%7D&pdp_npi=2%40dis%21CAD%21%2116.14%2116.14%21%21%21%21%402101e9d116544348564511144e1e43%2112000016632768953%21sea">link</a></p><p>5015 $2.79</p><p>12V Power Supply $3 <a href="https://www.aliexpress.com/item/4001145911468.html?spm=a2g0o.productlist.0.0.3dec6fa6LbqEKW&algo_pvid=ce32e7d9-7b41-4250-bbde-fc288f7b3fed&algo_exp_id=ce32e7d9-7b41-4250-bbde-fc288f7b3fed-22&pdp_ext_f=%7B%22sku_id%22%3A%2212000018324703053%22%7D&pdp_npi=2%40dis%21CAD%21%212.34%212.34%21%21%21%21%402101fd4b16544350161268531eb5f8%2112000018324703053%21sea">link</a></p><p>608 $2</p><p> </p><h3>Fabrication</h3><p>Thanks to printables for allowing me to create folders for categorizing files.</p><p> </p><p><strong>Lid, Base, Chamber Separator Panel and Acrylic Panel</strong></p><p>These three parts are made of panels cut from 5 mm plywood.</p><p>I provide three format files for each panel, .stl for preview, .svg for laser cutting, and .step for milling.</p><p>If laser cutting or CNC milling is not available, all panels can be fabricated with a wire saw and drill following .pdf drawings. The Kumiko themed front panel is difficult to make with hand tools, however, a see-through front panel is not functionally necessary and can be replaced with the non see-through back panel.</p><p><a href="https://www.printables.com/model/222358-2mm-panel-mounting-bracket"><strong>2mm Panel Mounting Bracket</strong></a></p><p>Fix the acrylic panel with these brackets.</p><p>At 80°C the acrylic will start trying to warp (not melt), however, the warping is reversible when the temperature is lowered, use at least 8 brackets to stop the warping.</p><p><strong>Lid Exhaust</strong></p><p><a href="https://www.printables.com/model/222357-90mm-adjustable-air-outlet"><strong>90mm Adjustable Air Outlet</strong></a></p><p>ABS printed exhaust can be used when drying temperature is not higher than 60 degrees Celsius. (Commonly used for TPU and PLA)</p><p>"Air Outlet_Kumiko themed" for milling if available.</p><p>"Lid_exhaust.svg" is used for laser cutting.</p><p><strong>Heater Vent</strong></p><p>Since this part needs to be in direct contact with the heater, this part is designed to be removable for easy inspection.</p><p>"Air Vent Cover_ABS" can be printed if the drying temperature is no higher than 60 C.</p><p>A wooden vent must be used, for any drying above 60 degrees Celsius. Make all the parts and glue them together as shown in the pictures.</p><p>"Heater vent_milling" is used for milling.</p><p>"Heater vent_laser cutting" is used for laser cutting and hand tool making.</p><p><strong>Bearing Housing</strong></p><p>Print the "Filament holder side bearing housing.stl" and "Filament holder mid bearing housing" by ABS if the drying temperature does not over 60 C.</p><p>The "Filament holder side bearing housing.step" & "Filament holder mid bearing housing.step" file is for the milling cutting, I milled mine with some 1/4" MDF.</p><p>The "Filament holder side bearing housing.svg" are used for laser cutting multiple thin profiles and gluing them together to achieve the desired thickness.</p><p>Holes for the M3 screw are in the center of the bottom surface, complete this with a drill, or glue the bearing housing onto the panel.</p><p><strong>Illumination</strong></p><p><a href="https://www.printables.com/model/222360-angle-bracket-for-cob-led-strip-6015"><strong>Angle Bracket for COB LED Strip 6015</strong></a></p><p>This is the adjustable bracket designed for 6015 COB LEDs.</p><p><strong>Parts by 3D printing</strong></p><p>"Lid guide"</p><p>"Foot"</p><p>"Base Spacer"</p><p>"SSR VHB mount"</p><p>"Filament holder roller"</p><p>"Filament holder roller shaft"</p><p><strong>Fastener</strong></p><p>M3*10: 12, Six for bearing housing and four for Lid guide</p><p>M3 T Nuts: 6, or use M3 hex nuts</p><p>M3*12: 4, for fixing the heater.</p><p>M2*10: 2, or fix the LED bracket with VHB.</p><p>M5*15: for feet.</p><h3>Assembling</h3><figure class="image"><img src="https://media.printables.com/media/prints/222356/rich_content/0a0f69e2-86cf-415b-bc12-306814ceac4e/8.jpg#%7B%22uuid%22%3A%22c01fa09d-4881-416f-b1d6-e2ac5512fd5c%22%2C%22w%22%3A3024%2C%22h%22%3A4032%7D"></figure><figure class="image"><img src="https://media.printables.com/media/prints/222356/rich_content/d98daf38-5d72-4cda-8a0d-1c03ec95dd80/9.jpg#%7B%22uuid%22%3A%22fce7146e-0681-4575-a21c-6d2027da72e6%22%2C%22w%22%3A4032%2C%22h%22%3A3024%7D"></figure><p>I don't feel this is a complicated assembly, so I haven't made a video about it.</p><h3>Testing and Results</h3><p><strong>Testing Conclusions and Coping with Overshooting</strong></p><figure class="image"><img src="https://media.printables.com/media/prints/222356/rich_content/3d8d9a30-9c7a-4c81-9db1-e75b1a9b5ee0/3.jpg#%7B%22uuid%22%3A%229e771731-b489-47a8-8b91-b6dae63fb264%22%2C%22w%22%3A3024%2C%22h%22%3A4032%7D"></figure><figure class="image"><img src="https://media.printables.com/media/prints/222356/rich_content/723c01f5-ca5c-4650-a283-06e0e95cd1fa/50-testing.jpg#%7B%22uuid%22%3A%227d27c979-9d07-47b3-ae0d-e16d2eeb939e%22%2C%22w%22%3A3024%2C%22h%22%3A4032%7D"></figure><figure class="image"><img src="https://media.printables.com/media/prints/222356/rich_content/ea456e2b-c6e0-4061-bb4c-99d8070f62a2/65-testing.jpg#%7B%22uuid%22%3A%22b2fbdbba-288b-40a2-92b1-9cbad5969786%22%2C%22w%22%3A3024%2C%22h%22%3A4032%7D"></figure><figure class="image"><img src="https://media.printables.com/media/prints/222356/rich_content/4ad45835-55c4-4636-82f1-3d9dec12d425/75-testing.jpg#%7B%22uuid%22%3A%22bfa138cf-fd18-4cd8-90cd-b27775d10278%22%2C%22w%22%3A3024%2C%22h%22%3A4032%7D"></figure><figure class="image"><img src="https://media.printables.com/media/prints/222356/rich_content/14eb7f13-482a-438e-9fb9-fa895957d689/80-testing.jpg#%7B%22uuid%22%3A%22965261b2-8cd5-4ff2-8336-dc8b5d977521%22%2C%22w%22%3A3024%2C%22h%22%3A4032%7D"></figure><p>In order to let the drying temperature reach the expected temperature, the air outlet temperature is always higher than the set temperature. The designed air outlet and spool holder keep the filament away from the hot zone.</p><p>When starting at room temperature, the temp in the drying chamber usually reaches 95% of the set temperature in about 22 minutes and reaches a steady-state in about 1 hour.</p><p>For the prototype, I didn't specifically tune the PID. The dryer shows an acceptable overshoot after letting the PID controller complete auto-calibration.</p><p>In case of a small amount of temperature overshooting, the lower drying temperature of the filament can be used to overcome it. For example, the recommended drying temperature for PLA is around 45~50C, use 45C instead of 50C.</p><p>***If you use different materials or parts please perform a similar test before drying to confirm the temperature overshoot is within a safe range.</p><figure class="image"><img src="https://media.printables.com/media/prints/222356/rich_content/b96ee3d9-3974-49d2-9659-2016474d83fd/testing.jpg#%7B%22uuid%22%3A%229e97b44a-3a31-4a0c-8ced-a7e4bdaea737%22%2C%22w%22%3A4032%2C%22h%22%3A3024%7D"></figure><p>Data were collected with an Arduino Nano and DS18B20. Each temperature reading was given at least 20 minutes to reach the steady-state before recording.</p><p>The selected 300W PTC heater will not heat the internal temperature above 85 degrees Celsius even if the temperature is set to 90 degrees Celsius.</p><p>When the heater temperature reaches about 150 degrees Celsius (while the drying temperature is 80 C), the overheating limit switch will trigger and cut the power of the heater.</p><h3>Conclusion</h3><p>Having a reliable and effective filament dryer makes it easier for me to buy some TPU or nylon that are not always used in large quantities, and this is also one of the ways to maintain the performance of multi-roll colored PLA.</p><p>Let me know if anything is missing and I'll keep watching and updating this design.</p><p>If you decide to make one too, please post a photo and I'd love to see your masterpiece!</p><h3>Timer and Thermohygrometer</h3><p><strong>Timer</strong></p><p>Inkbird itc100vh does not have a timer shutdown function.</p><p>I made one with an Arduino Nano and a NO relay, but that would add up the cost and more hardware.</p><p>At some point, I realized that any smart plug will work for this.</p><p>I ended up using a Kasa Smart Plug by TP-Link, In any case, most smart plugs work the same way.</p><p><strong>Thermohygrometer</strong></p><p><a href="https://www.amazon.ca/Veanic-Hygrometer-Thermometer-Temperature-Humidifiers/dp/B07FCPJRFH/ref=sr_1_22_sspa?crid=236187IK35UT1&keywords=thermo+hygrometer&qid=1654522646&sprefix=thermohygrometer%2Caps%2C75&sr=8-22-spons&psc=1&smid=AKX2DI4Z071IG&spLa=ZW5jcnlwdGVkUXVhbGlmaWVyPUFUT0xROU5ERTkzQTkmZW5jcnlwdGVkSWQ9QTAwMTM5NzBVVU85N0pMVllNOFUmZW5jcnlwdGVkQWRJZD1BMDUyMDY3NEswSUdLM09CNUhHWCZ3aWRnZXROYW1lPXNwX210ZiZhY3Rpb249Y2xpY2tSZWRpcmVjdCZkb05vdExvZ0NsaWNrPXRydWU%3D&tag=thingiverse09-20">Veanic 4-Pack Mini Hygrometer Thermometer</a></p><p>I thought about adding a thermohygrometer at first, but I don't think it would actually affect the drying.</p><p>If you need one, there are some inexpensive options, and pretty easy to install.</p><p>Category: 3D Printer Accessories</p>
With this file you will be able to print Filament Dryer - Up to 80°C (176°F) with your 3D printer. Click on the button and save the file on your computer to work, edit or customize your design. You can also find more 3D designs for printers on Filament Dryer - Up to 80°C (176°F).