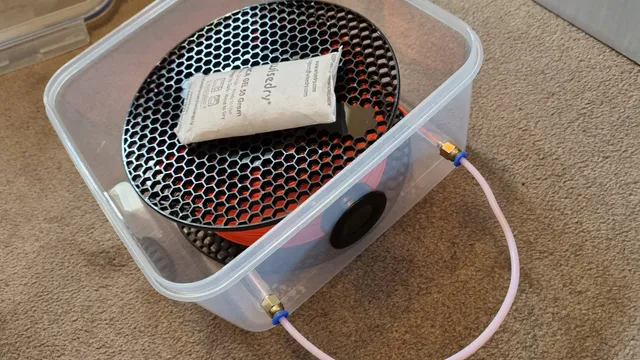
Filament dry print box kit | Horizontal 'no-open' spool holder
prusaprinters
For PETG I'd been looking for a suitable filament dry box and wasn't happy with what was available. A lot seem to use vertical cereal boxes, but in my experience these are too narrow to take 1kg spools, at least of my favourite; Prusament.This simple project allows the spool to be stored inside then the box never opened again until it's empty as you can print directly from it while it remains sealed. I use it sitting on a shelf above my printer, then store the others anywhere, but you could have it feeding upwards.This design uses an airtight 5 litre ‘MyKitchen’ box that's easily available in-store or online from ‘The Range’ in the UK for £5.99 (search for ‘MY Clip and Close 5L Square Container’). You will almost certainly be able to use alternative, similar boxes available elsewhere.This dry-box box has two PC4-M6 PTFE tube connectors in, linked by PTFE tube (bought as a bundle on Amazon), and a round mini hygrometer, again from Amazon.Assembly instructionsPrint the horizontal spool holder top and bottom in PLA (0.2mm layer height is fine). Don't use a matte-finish; I used Prusament Galaxy Silver but any gloss filament should be okay. You can fit two complete holders on a Mk3 base if you stagger them.Print the filament receiver (I recommend 0.15mm later height) . I used clear PETG for this, so you can see the filament going into it. It's this that keeps the box sealed when it's in use.Assemble the horizontal spool holder by clicking the two parts together (push the top straight down – do not twist – and it should go together fine), then use some hot glue (or any suitable adhesive) to stick it into the centre of the box.Drill a 41mm hole in the box for your hygrometer – don't rush as putting too much pressure on the drill-bit can crack the box. The hygrometer is then sealed in with a bead of silicone (I used a black silicone). I'd recommend setting it a little lower than I have in this pic – too high and it could foul on the filament spool.Drill two 5mm holes then carefully screw in the PC4-M6 PTFE tube connectors. Screw these down until they touch the box, but be careful not to strip the plastic out by over-tightening.Screw your filament receiver (it's pre-threaded) onto the end of one of the tube connectors to seal it off, which leaves space inside for about an inch of filament.Cut a length of PTFE tube with a sharp knife and pop it into the two tube connectors (this can work as a carry handle too!).Use instructionsThe spool holder is designed to fit any spool and is just intended to roughly centralise it – it doesn't matter if it's not a tight fit. It's also got enough friction that the spool doesn't spin around and unravel itself inside.Drop in your spool and feed the filament all the way through the tube until it ends up in the receiver.Place a desiccant pouch on top of the spool then seal the lid. That's the last time you should need to open it.When you want to print, unclip the PTFE tube from the connector that has the receiver on the end, then pull the filament out and feed it into the printer. You can now print without worrying about moisture getting to the spool. If you want, you can make the PTFE tube long enough to reach the extruder.When you've finished printing, cut the filament off ready for its next use, with about an inch sticking out of the end of the PTFE tube, then just pop it back into the connector to seal the box again.I'd love to hear how you get on with this – it's solved a problem for me and I hope it's useful to you. If you have any questions I'll do my best to help.
With this file you will be able to print Filament dry print box kit | Horizontal 'no-open' spool holder with your 3D printer. Click on the button and save the file on your computer to work, edit or customize your design. You can also find more 3D designs for printers on Filament dry print box kit | Horizontal 'no-open' spool holder.
