Fiberoptic LED Hybrid Wall Clock (40cm) v6.1
prusaprinters
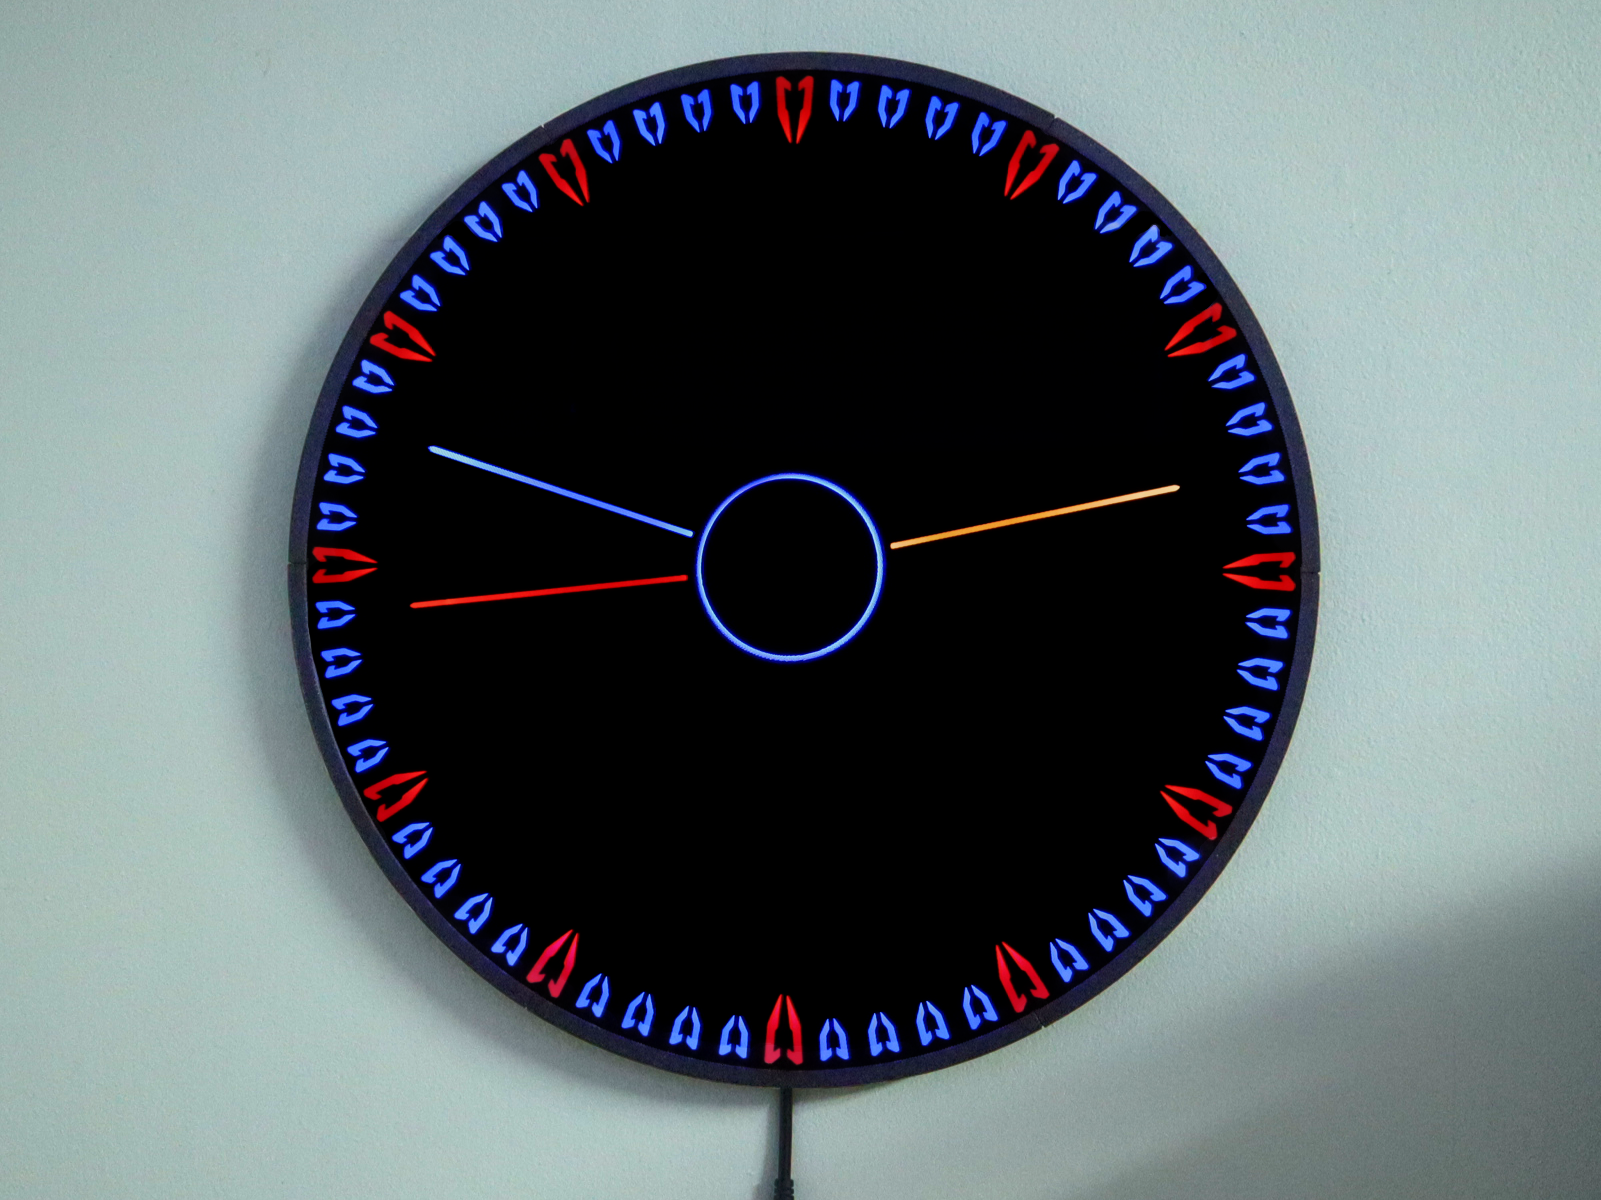
<figure class="media"><oembed url="https://www.youtube.com/watch?v=cVx-ll3D218"></oembed></figure><p><strong>Clock will be running WLED from now on.</strong><br>(Old videos and intro are at the bottom of the page).</p><figure class="image image_resized" style="width:50%;"><img src="https://media.prusaprinters.org/media/prints/69188/rich_content/bbd1e68c-41c3-4fbc-a815-1bd2198ac767/animgif.gif#%7B%22uuid%22%3A%228582c998-86e8-483e-9f93-f0f6b1c962f9%22%2C%22w%22%3A300%2C%22h%22%3A294%7D"></figure><p><strong>No, you don't need a large printer to make this. It's split into 6 segments. In fact - it should be printable on the Prusa Mini!</strong></p><p>A ~40cm 170+ parts wall clock with a glass front and tint film, 132 addressable 3535 LED's (any light can be any color), 60 or 120 fiberoptic lines (almost 10 meters), WiFi, light and temperature sensor, 14 manual color changes (black, white, transparent), and possibly a bunch of other stuff? (more coding help needed).</p><ul><li>Takes around 60 hours to print in total.</li></ul><p>This is a work in progress. Some stuff needs editing, like the intro here.</p><ul><li>This project requires more than just printing. Electronics and programming obviously, but it also needs white paint and you need a round 395mm glass plate that's used on top of the front face. This can be made with a glass circle cutter but it's not super easy to do - tutorial below. (can also be cut professionally). You also need to put dark tint film on the glass. The film makes the clock super black so the indicators disappear where the lights are off. Other reasons for the glass is because it makes it look like a screen, and it can be cleaned without scratching anything. It also aids in removing light bleed and removes the joint between the 6 segments.</li></ul><p><strong>Power:</strong></p><p>To power it you will need a 5v power supply (everything runs on 5v). Current rating will depend on brightness and colors you choose (FastLED has 142 static colors to choose). Animations might come later if someone codes it in) With a stress test with all lights set to white at full brightness, the clock uses around 4 amps (20 watts), but this is highly unlikely to be reached with normal use.</p><p><strong>---------------------------------------------------------------------------------------------------------</strong></p><figure class="table"><table><tbody><tr><td style="background-color:#40C8E8;text-align:center;"><h3><strong>WLED Code</strong></h3><p>(setup will be shown soon)</p></td></tr><tr><td style="background-color:#40C8E818;"><p><strong>The code the clock runs on has now been completely replaced with WLED!</strong> (old code will still be available). WLED is a program for microcontrollers that is designed for controlling addressable LED's, like the ones used in the clock. WLED has a built-in clock function with time syncing. In the web interface you can easily control colors, animations, and a bunch of other stuff. WLED connects to your router and has webserver running on the controller. It has a nice looking interface where you just push buttons to change things. It also has support for home automation, but I'm not familiar with that. Can also be controlled with the phone app. Also supports wireless OTA updates, so it should not be necessary to upload more than once.</p><p>The clock function in WLED does have some limitations in the current version. You can not control the colors or brightness of the hands themselves. Hopefully this will be added in a later version. The benefits of WLED far outweighs this limitation. You also loose the light and temperature sensing. It's not impossible to add this, but it seems to require compiling the code yourself, if you want to add more complex things. It does have support for buttons and potentiometers, but I have not tested any of that so far.</p><p><strong>Installing WLED is very easy.</strong> It's all handled by a website. You don't need the Arduino IDE, no board manager and no libraries to keep track of. All you need is a USB cable and a supported microcontroller - which would be an esp32 or esp8266 (note the esp32 S2 does not seem to be supported at the time of writing).</p><p><a href="https://kno.wled.ge">Here is the WLED website.</a></p></td></tr></tbody></table></figure><p><strong>---------------------------------------------------------------------------------------------------------</strong></p><h5>Changelog:</h5><figure class="table"><table style="background-color:#E0E0E0;"><tbody><tr><td><p><strong>29.Jun.21</strong></p><ul><li>Muffin code v0.2 updated: Hour pointer now moves throughout the hour instead of being fixed on a hour indicator.</li></ul></td></tr></tbody></table></figure><figure class="table"><table style="background-color:#E0E0E0;"><tbody><tr><td><p><strong>03.Jul.21</strong></p><ul><li>Added light sensor to the bezel. Only need to make a hole for it.</li><li>I wrote some v0.3 code for the TEMT6000 light sensor in the code Muffin modified. Working, but it's not very advanced (glitches out startup a bit). You can set minimum and maximum light limits.</li><li>Changed all wire channels to have wires less likely to get caught on edges. It's more tapered inside now. Not much need to reprint.</li><li>Added unique wire channel for the power cable that has recesses for the wire so it doesn't get pulled out of the clock so easy.</li><li>Added unique wire channel for the light sensor wires at the top - the one the data wires for the strips goes through. It's just a small edge that was removed. Can cut a notch manually instead.</li><li>Changed color of the seconds pointer to DimGray, to make it easier to differentiate all hands.</li><li>Added more pictures to parts needed. I'm still looking for a reliable source of the correct fiberoptic. (It's easy to order the wrong one).</li><li>Made the bezel a little slimmer.</li></ul></td></tr><tr><td><figure class="image image-style-align-center image_resized" style="width:50%;"><img src="https://media.prusaprinters.org/media/prints/69188/rich_content/041e280c-87b0-4fd4-8c39-5c03c0998f3a/update_02.png#%7B%22uuid%22%3A%2265fa9e59-6b53-49bd-a0b5-2e46bcf875e3%22%2C%22w%22%3A1280%2C%22h%22%3A960%7D"></figure></td></tr></tbody></table></figure><figure class="table"><table style="background-color:#E0E0E0;"><tbody><tr><td><p><strong>04.Jul.21</strong></p><ul><li>Added test segments for the main parts. Allows you to test fit parts without printing any large ones.</li><li>Added a simple code file for testing the light sensor and an led strip without any extra code.</li><li>Added a tutorial I found on YouTube, for cutting glass circles (see below).</li></ul></td></tr></tbody></table></figure><figure class="table"><table style="background-color:#E0E0E0;"><tbody><tr><td><p><strong>25.Jul.21</strong></p><ul><li>Found a source for fiberoptic in the UK on eBay (see fiber). Added some info there.</li></ul></td></tr></tbody></table></figure><figure class="table"><table style="background-color:#E0E0E0;"><tbody><tr><td><p><strong>06.Aug.21</strong></p><p>Code updated to 0.4:</p><ul><li>I added code to be able to set colors on the arms separately (used to be linked to the outer strip).</li><li>Added list of colors to bottom of the code file so you don't need to dig in FastLed's keywords file.</li><li>Removed some unused code. Added some code descriptions.</li></ul></td></tr></tbody></table></figure><figure class="table"><table style="background-color:#E0E0E0;"><tbody><tr><td><p><strong>16.Okt.21</strong></p><ul><li>Changed license to allow remixes. step files might be released at some point.</li></ul></td></tr></tbody></table></figure><p>Just some thoughts: I've had my clock running for quite awhile now. I probably should have added a resistor to the data channels for the led's. I lost the green color in 1 led, and the blue in another. Not sure why that happened. Maybe a spike on the data line or manufacturing defect. Places like Adafruit and Sparkfun recommends using resistors. Maybe this is why. Or maybe it was a lack of a level shifter.</p><p>The clock have been downloaded a decent amount now, but I see no actual attempts to make one. Makes me wonder if the instructions are to confusing. It's a fairly complex project so I can't really make a step-by-step guide on this, as the process has not been linear when I make them. It's all over the place. </p><figure class="table"><table><tbody><tr><td style="background-color:#E0E0E0;"><p><strong>7.Feb.22</strong></p><ul><li>No model change yet. Experimental 6.1 is close.</li><li>Added more pictures.</li><li>Made instructions more organized. Missing some stuff.</li></ul></td></tr></tbody></table></figure><figure class="table"><table><tbody><tr><td style="background-color:#40C8E8;text-align:center;" colspan="2"><h4>Version 6.1</h4></td></tr><tr><td style="background-color:#E0E0E0;" colspan="2"><p><strong>15.Feb.22</strong></p><p>Version 6.1 has been released as experimental files. They should work fine but I have not made a full clock with them, and they may get adjusted.</p><p><br>This version has quite a few differences to the previous version:</p><ul><li>The face of the clock has been split into an outside ring (which holds the indicator design), and the pointers (which holds the pointer design).</li><li>There are now 6 types of clock faces you can choose, and 2 pointer types - straight and curved. These new faces are compatible with the older version, so you can swap if you want. New parts can also be mixed.</li><li>The outer compartment now has inserts that are printed in white so you don't need to paint there. One of them have holes for wires that are used in 6 compartments. Not compatible with old base.</li><li>The fiber channels are now straight, a little wider, and a little deeper. To avoid painting here you can press paper or something else white into the channels, under the fibers. It should wrap around the fibers like a U shape, to act as a reflector.</li><li>Fiberoptics are no longer used in the outer compartments. Doesn't seem necessary (can actually make it look worse).</li><li>The LED assembly now uses 1mm thick, 5mm wide neoprene foam tape instead of the plastic track. This should be more forgiving when putting these parts together, as the foam will wrap around the metal strip even if it's a little dented\wobbly. If you cant find 5mm tape, you can just cut 10mm in half.</li><li>3mm neoprene is now used instead of the foam tape described in parts needed, to seal the space between the walls and LED strips. Neoprene is good for heat resistance.</li><li>Core has a small change. Just some geometry to prevent it from spinning in the base.</li></ul></td></tr><tr><td style="background-color:#40C8E818;">Here are the 6 faces I've made so far, all in one clock.</td><td style="background-color:#40C8E818;">Here you can see the curved pointer type. Looks more sharp and even in color.</td></tr><tr><td><figure class="image image-style-align-center"><img src="https://media.prusaprinters.org/media/prints/69188/rich_content/45b66ee5-60f9-4c02-8a7a-9ce66e2a09f2/multiface_01n.png#%7B%22uuid%22%3A%22510e061d-eaf0-418d-9fb4-2cbd1eb9aa77%22%2C%22w%22%3A1600%2C%22h%22%3A1200%7D"></figure></td><td><figure class="image image-style-align-center"><img src="https://media.prusaprinters.org/media/prints/69188/rich_content/43629b65-2afc-4da2-b5fe-665f3bbbbec0/multiface_02.png#%7B%22uuid%22%3A%222ecded49-63bd-466b-b4d2-5a00e3a54730%22%2C%22w%22%3A1600%2C%22h%22%3A1201%7D"></figure></td></tr><tr><td style="background-color:#40C8E818;">Here you can see how the clock face has been split:</td><td style="background-color:#40C8E818;">The back now has some cuts to divide up the long perimeters:</td></tr><tr><td><figure class="image image-style-align-center"><img src="https://media.prusaprinters.org/media/prints/69188/rich_content/6d4c3e3b-bc1b-4382-a448-e680c11e7136/split.png#%7B%22uuid%22%3A%2221f1280d-deae-4c4c-b1ed-86a2ec4981f0%22%2C%22w%22%3A800%2C%22h%22%3A800%7D"></figure></td><td><figure class="image image-style-align-center"><img src="https://media.prusaprinters.org/media/prints/69188/rich_content/2ff9ace7-dbcc-4689-ad4c-eadc157a8ac2/back.png#%7B%22uuid%22%3A%22409b958d-a14b-4701-8682-716006c2825f%22%2C%22w%22%3A800%2C%22h%22%3A800%7D"></figure></td></tr><tr><td style="background-color:#40C8E818;">LED assembly now looks like this:</td><td style="background-color:#40C8E818;">The black is where the neoprene goes:</td></tr><tr><td><figure class="image"><img src="https://media.prusaprinters.org/media/prints/69188/rich_content/c24c2a95-3f10-4bb6-aba4-fa322ef9d9b3/ledas.png#%7B%22uuid%22%3A%22328f00de-9fbf-4979-97e4-d9be0f188513%22%2C%22w%22%3A800%2C%22h%22%3A800%7D"></figure></td><td><figure class="image"><img src="https://media.prusaprinters.org/media/prints/69188/rich_content/3b51f38d-a59b-4009-be4a-a818f9413832/ledas2.png#%7B%22uuid%22%3A%22f4e62777-184f-46a9-b9f1-e133a71c65ca%22%2C%22w%22%3A800%2C%22h%22%3A800%7D"></figure></td></tr><tr><td style="background-color:#40C8E818;">Inserts for the outer compartments:</td><td style="background-color:#40C8E818;">Core geometry to prevent rotating:</td></tr><tr><td><figure class="image"><img src="https://media.prusaprinters.org/media/prints/69188/rich_content/ab44e48d-4153-4a63-833c-b6561b7eb136/inserts.png#%7B%22uuid%22%3A%227ba45642-a60e-4b92-89ec-fc86525f832a%22%2C%22w%22%3A800%2C%22h%22%3A800%7D"></figure></td><td><figure class="image"><img src="https://media.prusaprinters.org/media/prints/69188/rich_content/ef79ae95-4f05-4d4a-8d71-5c36a17cbf54/antir.png#%7B%22uuid%22%3A%22dcbffec3-6dda-43f2-886f-063b1d2de6e4%22%2C%22w%22%3A800%2C%22h%22%3A800%7D"></figure></td></tr></tbody></table></figure><p><strong>20.Feb.22:</strong></p><p>Code is replaced completely by WLED, which is far more advanced then the old code.</p><p><strong>---------------------------------------------------------------------------------------------------------</strong></p><figure class="table"><table><tbody><tr><td style="background-color:#f9cd42;"><h3>Critical Info:</h3><ul><li>All parts must be printed with 0.2 layer height to be printed correctly!!</li><li>You should check your black filament and see if it's truly opaque! Some blacks are a little transparent when lit from behind. Print 3 layers and see if a flashlight goes through it. It does not need to be 100% sealed though.</li><li>Requires a good printer with a very flat bed!</li><li>Needs to be printed in PETG or better as the clock can get very hot in certain light configs.</li><li>Base parts are a little prone to lifting, so it might be necessary to print with a brim.</li><li>Led strips are factory soldered every 50cm. The inner strip might need to be opened and realigned.</li><li>Led assembly, top channel does not attach to the top, but the base walls.</li><li>The led data channels should probably have a resistor in series to protect the led's. Places like Adafruit and Sparkfun recommends this.</li><li>No solder on the wires going into screw terminals. Solder will deform over time and come loose. Use bare wires or ferrules.</li><li>v6.1 needs very precise fiber length to get the right circumference on inner LED strip. Not quite sure what it is yet. Model says 119mm, which would be close.</li><li>???</li></ul></td></tr></tbody></table></figure><p><strong>---------------------------------------------------------------------------------------------------------</strong></p><h3>Printed Parts:</h3><h4> </h4><h4>Base:</h4><figure class="table"><table><tbody><tr><td style="text-align:center;width:550px;">___________________Placeholder____________________</td></tr><tr><td style="background-color:#40C8E818;"><p>This is the base of the clock. You will need 6 of these. This model is pretty straight forward to print. Needs to be printed in black or a dark color that blocks light. Needs to be painted white after to reflect and diffuse the light. A lot of light is going to be absorbed by the black color if you don't. I painted mine with model paint and a brush, which took forever using 3 layers. Airbrush or spraypaint would be faster, although getting paint into the 3mm fiber channels is a little tricky, and you don't want much added thickness in there. It will put more pressure on the walls when the fiber is inserted.</p><p>Paint should be removed from the top of the walls as the light might go through it. Just scrape or sand it off. The top face is attached to the top walls with the 1mm wide double-sided tape, or glued (not recommended, as it's permanent).</p><p>There are a lot of holes in these. Some are vents for heat, and some are for routing wires to the internal and external chambers. Top most chambers (12) will need wires for the 2 data channels for the led strips, as they can only be connected from the start. Power can be connected anywhere in the 6 wire channels, although the bottom one will be the input power cable.</p><p>The bottom of the fiber channels needs to have a perfect even white color. The fibers acts as a magnifying glass so if there's any spots or dirt in there, it will show as a dark spot in the light. The easy way to get this even is to just cut small strips of paper and put that under the fiber. It will be held in place by the fiber. </p><p>These parts are a little <strong>prone to lifting</strong> of the bed, so it might be necessary to use a brim (had a couple fail). I did add some internal cuts to chop up the long perimeters which should in theory balance out some of the internal stress from contractions as it cools down, or that's what I assume.</p><p><strong>There are small tabs in the fiber channel that holds the fiber down near the led's so the fiber doesn't try to lift the led assembly. The fiber is inserted from the side here, not pushed down into it.</strong></p><p><strong>Do not take these off the buildplate before they have cooled down!!</strong> Doing so can put a bow in the part and that will make it harder to isolate the light compartments if the top of the walls are not flat.</p><p>Each part takes around 6 hours to print, so 36 hours just for these.</p><ul><li>Outer compartments do not need fibers. I don't use it on mine. Version 6.1 will have it removed.</li></ul></td></tr></tbody></table></figure><p> </p><h4>Front Face:</h4><figure class="table"><table><tbody><tr><td style="width:355px;"><figure class="image image-style-align-center"><img src="https://media.prusaprinters.org/media/prints/69188/rich_content/d408fff4-11eb-4c3a-9dd6-bcdb434c9413/facelayers.png#%7B%22uuid%22%3A%22c11ec77c-939e-4076-8fb1-2bfdfdab7502%22%2C%22w%22%3A1000%2C%22h%22%3A1000%7D"></figure></td><td style="text-align:center;width:355px;"><figure class="image image-style-align-center"><img src="https://media.prusaprinters.org/media/prints/69188/rich_content/a881b7e4-27d0-4aaa-9891-05332a7c867f/facelayers2.png#%7B%22uuid%22%3A%229fc78870-0425-4b68-b6f8-619ba79b335c%22%2C%22w%22%3A1000%2C%22h%22%3A1000%7D"></figure></td></tr><tr><td style="background-color:#f9cd42;" colspan="2">Above you can see how the layers are supposed to look. This has 2 transparent layers followed by 2 black and 3 white. The photo on the right is backlit. As you can see the black layers are blocking most of the light from coming through. You can also try 3 black and 2 white, or just one transparent layer at the start. White needs to be at least 2 layers though.</td></tr><tr><td style="background-color:#40C8E818;" colspan="2"><p>This is the face of the clock which holds the design of the indicators and the arms. You will need 6 of these as well. <strong>This requires special settings to print.</strong> Each segment has three colors in it (transparent, black and white), so it will need 2 color changes at very specific layer heights. You start with 2 layers of transparent, followed by 3 layers of black, and then the rest is white (to avoid painting it). You also need to turn on solid infill every layer to avoid something called infill anchoring, which divides up the infill into ugly pointless zones (in PrusaSlicer). That will not look good in the transparent layers and needs to be bypassed. This can be done by having 0 top layers and use like 10 bottom layers instead.</p><p>Should be printed with only 1 perimeter. Less chance of light leaking in my experience.</p><p>Prints upside down.</p><p>I don't recommend using the rough textured sheet for this. The texture will diffuse the light a little more then the flat sheet, so you will get somewhat fuzzier edges. Not a huge difference though. The smooth powder coated sheet will work fine.</p><p>Top surface needs to be very flat, as light will leak over the walls if not. Top pieces could be scraped with a razorblade to get them flat. Could also be sanded, but you would need to be careful to not break through the layers.</p><p>Ironing top layer could also work.</p><p>Be careful when taking these off the buildplate. They can snap pretty easy.</p><p>These are attached to the top walls of the base with the 1mm wide double-sided tape, or glued (not recommended, as it's permanent).</p><p>The joint between all the top pieces should be covered with black electrical tape that is cut with a taper towards the core. It removes light coming through the joints. This will be invisible when the tint film is placed on top anyway.</p></td></tr></tbody></table></figure><p> </p><h4>Core:</h4><figure class="table"><table><tbody><tr><td><figure class="image image-style-align-center"><img src="https://media.prusaprinters.org/media/prints/69188/rich_content/456de277-ef0b-41cf-bf99-9c8ee6599f5a/core_1.jpg#%7B%22uuid%22%3A%227f62fd1d-ebd6-47c2-ae00-dd7e2086084c%22%2C%22w%22%3A1000%2C%22h%22%3A1000%7D"></figure></td><td><figure class="image image-style-align-center"><img src="https://media.prusaprinters.org/media/prints/69188/rich_content/f2785dd0-c45e-4420-b900-6b791c73c876/core_2.jpg#%7B%22uuid%22%3A%22d40c1f82-8a8a-4823-b318-b0415b19c5b4%22%2C%22w%22%3A1000%2C%22h%22%3A951%7D"></figure></td></tr><tr><td style="background-color:#40C8E818;" colspan="2"><p>This is the core in the center which holds the electronics and 12 led's for the illuminated ring. <strong>This also needs special settings</strong> like the front, except it's 2 transparent, 4 black, and the rest white. Should be printed with 0.45 extrusion width, as there is a very thin wall that holds the led strip. Prints upside down.</p><p>The white part of the outside wall of the core can be colored black with a marker or painted. This will decrease the chance of light leaking through the joints between the top of the core and the front faces. Or use the same black electrical tape. </p><p>The core sits flush with the front face. It has a wedge that will press all parts together when the back lid is screwed on.</p></td></tr></tbody></table></figure><p> </p><h4>Core - Back Lid:</h4><figure class="table"><table><tbody><tr><td style="width:350px;"><figure class="image image-style-align-center"><img src="https://media.prusaprinters.org/media/prints/69188/rich_content/82bfd925-8ce9-4d54-ab0e-876e0afcf0bb/core_3.jpg#%7B%22uuid%22%3A%229fec5077-ffb7-4383-962d-dec4c65beb54%22%2C%22w%22%3A1000%2C%22h%22%3A951%7D"></figure></td><td style="background-color:#40C8E818;"><p>Back lid for the core in the center. Nothing special with this. Prints solid. Should be dark to block the light from the center led's. Prints upside down.</p><p>You will need 6x 5mm m3 screws for this, ideally pan heads, as they build out the least.</p></td></tr></tbody></table></figure><p> </p><h5>Core - Light bouncer:</h5><figure class="table" style="float:left;"><table><tbody><tr><td style="width:350px;">___________________Placeholder____________________</td><td style="background-color:#40C8E818;">This small ring goes inside the core and covers the led strip. It bounces the light up and over the edge that holds the led strip and diffuses it in the center so you don't get that ugly hotspot looking light. Prints solid. <strong>White only.</strong> Prints upside down.</td></tr></tbody></table></figure><p> </p><h4>Led Assembly Top\Bottom:</h4><figure class="table"><table><tbody><tr><td><figure class="image image-style-align-center image_resized" style="width:50%;"><img src="https://media.prusaprinters.org/media/prints/69188/rich_content/35e1c3bd-ece0-4c84-9268-e92aeacdcb91/track.jpg#%7B%22uuid%22%3A%226a3c47f2-3cd3-45cd-94b5-61a35ffaacdb%22%2C%22w%22%3A800%2C%22h%22%3A572%7D"></figure></td></tr><tr><td style="background-color:#40C8E818;"><p>These are the tracks that holds the steel and led strips. The top and bottom channels sandwich all the parts together and blocks light from entering neighboring chambers. No special settings for them. Prints solid, <strong>black only,</strong> 1 perimeter. Top is printed upside down.</p><p><strong>These will be the parts that gets the most heat,</strong> so it would be beneficial to print in a higher temp plastic like ABS, or PETG at least. PLA here would likely be a disaster (could deform and wedge stuck in the base).</p><p><strong>Make sure there are no blobs of plastic in the tracks!</strong></p><p><strong>The top channel is not attached to the clock face plate</strong> but should be lightly glued to the base walls when you are sure it's seated right. When the top is correctly seated, it will feel the same as it does when there's no metal strip there. If you feel any wobbling, it's not seated properly in the tracks.</p><ul><li>The reason these are not integrated into the base is because it allows me to adjust tolerances around the led strips without reprinting the entire clock.</li></ul></td></tr></tbody></table></figure><p> </p><h4>Bezel:</h4><figure class="table"><table><tbody><tr><td style="width:350px;">___________________Placeholder____________________</td><td style="background-color:#40C8E818;"><p>These are the parts that holds the glass pressed on top of the front face. Nothing special for these either. Print with at least 2 perimeters. You will need 6 of these that are then glued together. Prints upside down.</p><p><strong>The glue used should be strong. If the joint fails, the glass will drop to the floor.</strong></p><p>Last joint should not be glued before pressfitting the bezel to the clock. I wrapped a ratcheting strap around the clock when gluing the last joint to get a tight fit. There will be a small gap here that can be filled with a gap filler. Bezel can still be removed later.</p></td></tr></tbody></table></figure><p> </p><h4>Wire Channels:</h4><figure class="table"><table><tbody><tr><td style="width:350px;">___________________Placeholder____________________</td><td style="background-color:#40C8E818;"><p>These are channels the wires go through on the back of the clock. Nothing special here. Prints solid. Prints upside down.</p><p>These can be mounted with the same double sided tape that the top uses, or lightly glued in case you need access.</p></td></tr></tbody></table></figure><p> </p><h4>Side Plugs:</h4><figure class="table"><table><tbody><tr><td style="width:350px;">___________________Placeholder____________________</td><td style="background-color:#40C8E818;">These are optional pieces that holds the base parts together. Will take some of the stress of the glue joint between the base parts. Prints solid and can be glued in.</td></tr></tbody></table></figure><p> </p><h4>Led Caps:</h4><figure class="table"><table><tbody><tr><td style="width:350px;">___________________Placeholder____________________</td><td style="background-color:#40C8E818;"><p>These are very small models that goes over the led's on the strips and centers the fiber optics over them. These are very sensitive to some print settings, like extrusion width and flow. You will most likely need to test a little here, as it's likely to have a different fit then I have. They are correctly sized when they grip on the fiber enough so they don't fall of by themselves. I used 0.45 extrusion width on these. <strong>Should not be scaled up</strong> as it can interfere with the led assembly tracks. Prints with the square side down.</p><p>I printed these in white. Black would isolate more, but I don't know how much light that would reduce in the fiber, if any.</p><p>You will need 60 or 120 of these, depending on if you want fibers in the outer chambers.</p></td></tr></tbody></table></figure><p> </p><h4>Circumference Guide:</h4><figure class="table"><table><tbody><tr><td style="width:350px;"><figure class="image image-style-align-center"><img src="https://media.prusaprinters.org/media/prints/69188/rich_content/26cf5567-728e-463f-a49c-166e99ed0430/cg.jpg#%7B%22uuid%22%3A%2227cb5a8c-947e-4743-8543-d132bd800b1a%22%2C%22w%22%3A800%2C%22h%22%3A671%7D"></figure></td><td style="background-color:#40C8E818;"><p>These are 4 parts that attach together to make a guide for putting the inner led strip on the metal strip. The guide will make it easier to put the led strip on at the correct height, which is critical. The led strip also needs to be put on while the metal one is held in a circle. <strong>You cannot place it on a flat strip and then bend it.</strong> It will create bulges on the led strip that will interfere with the walls in the base, or it can even break the strip. </p><p>It also has indicators that should line up with the led's on the strip. If you see them start to misalign after led 30, you will most likely need to open up the factory solder joint and reattach it at the correct length, which can be hard to do. You should have 13mm between the led's, but this joint will most likely be closer to 11-12mm and has to be corrected. The fibers will not line up if you don't.</p><p>LED strips should be alligned with LED's 30 (in the middle), not from the start, as the outer strip LED's will shift more to the side at the end.</p><p>Technically only the data channel needs to be bridged here, if you connect power wires before and after the cut.</p></td></tr></tbody></table></figure><h4> </h4><h4>Fiberoptic Cutting Guide:</h4><figure class="table"><table><tbody><tr><td style="width:350px;"><figure class="image image-style-align-center"><img src="https://media.prusaprinters.org/media/prints/69188/rich_content/16db69de-bf70-4228-b797-6e6851370df9/fibercutter.png#%7B%22uuid%22%3A%22ca00a675-8201-4b67-9d4c-f8d39b756eb3%22%2C%22w%22%3A1280%2C%22h%22%3A960%7D"></figure></td><td style="background-color:#40C8E818;"><p>A simple adjustable jig to make it easy to cut the fiberoptic at the correct length. Has a m3 screw at the end to adjust the length.</p><p>It's important that the fibers are cut as flat as possible so the light does not get distorted. Make sure the fiber isn't so long that it pushes on the led strip. The strip will get wobbly and hard to insert in top led assembly channel.</p></td></tr></tbody></table></figure><p> </p><h4>Stand:</h4><figure class="table"><table><tbody><tr><td style="width:350px;"><figure class="image image-style-align-center"><img src="https://media.prusaprinters.org/media/prints/69188/rich_content/d03b24c6-d7ff-4713-9e69-fd96be1a3ede/g_04.png#%7B%22uuid%22%3A%2274f0fd77-3147-43b2-9640-bb6ad3f2fc4a%22%2C%22w%22%3A1280%2C%22h%22%3A960%7D"></figure></td><td style="background-color:#40C8E818;">A simple clock stand for programming so it doesn't roll around on the desk anymore. Fits on the mini. Prints in 3.5 hours at 0.3. Can be PLA.</td></tr></tbody></table></figure><p><strong>---------------------------------------------------------------------------------------------------------</strong></p><h3> </h3><h3>Parts you need:</h3><p> </p><h4>Microcontroller:</h4><p>My clock is currently using the Wemos D1 Mini. With it's built-in WiFi, small size and cheap price, it's a decent choice, but many different microcontrollers can be used, including regular Arduinos with an RTC module added (for offline use), Teensy boards or Adafruit stuff.</p><ul><li><strong>Future versions will most likely use something else, like the M5, since it's much smaller.</strong></li></ul><p> </p><figure class="table"><table><tbody><tr><td style="background-color:#E0E0E0;"><h4>MicroPython?</h4><p>I've been dabbling with MicroPython recently using the Thonny IDE. I like how interactive it is compared to Arduino. You can change things live (including through WiFi) by typing it in the REPL (a terminal of sorts), like the colors of the LED's. I know MP is slower than C++, but I'm not sure it matters for this project.</p><p>I've tested some basic MP code running on an esp32. I have wireless upload setup (which was easier then on Arduino), so I can change colors on the led strips live. I also tested the dallas temp sensor, which works fine, but that's it so far. It has no clock function or animations. FastLED is not available on MP so you would have to use the Neopixel library, which is included by default in MP.</p></td></tr></tbody></table></figure><h4> </h4><p>The smallest WiFi microcontrollers I have found that would be suitable for MicroPython (or Arduino) are:</p><figure class="table"><table><tbody><tr><td style="background-color:#40C8E818;"><p><strong>M5 Stamp PICO</strong> (esp32 PICO D4):</p><p>The smallest I'm aware of. 240MHz Dual-core. No USB so it needs an external upload board (until WiFi upload is setup). Can be bought in a kit with the uploader from M5Stack on AliExpress. The PICO itself can be bought in a kit of 5, so not that expensive. Easy to power directly with 5v. This would most likely be my choice.</p></td><td style="width:350px;"><figure class="image image-style-align-center image_resized" style="width:75%;"><img src="https://media.prusaprinters.org/media/prints/69188/rich_content/59ca14da-1471-40ec-8f74-1a4704338107/m5stamp.png#%7B%22uuid%22%3A%22ee340eed-f2a1-49bf-821b-280e22eb27b2%22%2C%22w%22%3A500%2C%22h%22%3A500%7D"></figure></td></tr><tr><td style="background-color:#40C8E818;"><p><strong>TinyPICO V2</strong> (esp32 PICO D4) :</p><p>A little larger than the M5. Has the same 240MHz dual-core.<br>UK made or designed I think, so good doumentation.</p><p>Button cover fell off..</p></td><td style="width:350px;"><figure class="image image-style-align-center image_resized" style="width:75%;"><img src="https://media.prusaprinters.org/media/prints/69188/rich_content/212d3e98-8d88-4216-9b66-60c6c996e40c/tinypicov2.png#%7B%22uuid%22%3A%22dfbc4611-0370-4296-82fb-12ede13ed30e%22%2C%22w%22%3A500%2C%22h%22%3A500%7D"></figure></td></tr><tr><td style="background-color:#40C8E818;"><p><strong>TinyS2</strong> (esp32 S2):</p><p>Very similar to TinyPico, but has a single 240MHz core. Slightly longer.<br>UK made or designed I think, so good doumentation.</p></td><td style="width:350px;"><figure class="image image-style-align-center image_resized" style="width:75%;"><img src="https://media.prusaprinters.org/media/prints/69188/rich_content/418357ff-fa89-443a-a205-7e78c769ffef/tinys2.png#%7B%22uuid%22%3A%228ab9c7cf-c4e9-4028-af4d-178cbc92ba62%22%2C%22w%22%3A500%2C%22h%22%3A500%7D"></figure></td></tr><tr><td style="background-color:#40C8E818;"><p><strong>Wemos S2 Mini</strong> (esp32 S2):</p><p>Same formfactor as the D1 mini, except it's not an esp8266. Not to keen on this. Way more pins then needed. Acted a little strange with uploads.</p></td><td style="width:350px;"><figure class="image image-style-align-center image_resized" style="width:75%;"><img src="https://media.prusaprinters.org/media/prints/69188/rich_content/66a97945-3d44-416f-8025-f65424ba24cb/d1s2.png#%7B%22uuid%22%3A%226f909e26-aef0-4d7e-9f18-04f562335baf%22%2C%22w%22%3A500%2C%22h%22%3A500%7D"></figure></td></tr></tbody></table></figure><p> </p><figure class="table"><table><tbody><tr><td><figure class="image image-style-align-center image_resized" style="width:89.01%;"><img src="https://media.prusaprinters.org/media/prints/69188/rich_content/0002736a-0b34-48b1-8549-ec37fe294216/m5pico.png#%7B%22uuid%22%3A%228ac8b0ed-f773-4849-9aa7-a160226d1437%22%2C%22w%22%3A550%2C%22h%22%3A493%7D"></figure></td><td><figure class="image image-style-align-center"><img src="https://media.prusaprinters.org/media/prints/69188/rich_content/c66edeac-3f35-4f1a-b340-fcdd594d3f9e/m5picof.png#%7B%22uuid%22%3A%22d21606da-2545-4f54-82f0-0a57f163369c%22%2C%22w%22%3A550%2C%22h%22%3A484%7D"></figure></td></tr><tr><td>Here you can see how small the M5 Stamp is (the 6 pins on the right are for the upload board)</td><td>It might look something like this in the clock (missing the capacitor and temp sensor)</td></tr></tbody></table></figure><p> </p><h4>10M 3mm side glow fiberoptic cables:</h4><p>These are soft bendable wannabe fiberoptic cables that shoots light out from the side instead of forward. Acts as a lightpipe for the LED's, which creates the clock arms.</p><p>I cut my fiber to a length around <strong>118-118.5mm</strong> with the fiber cutter.</p><p><strong>The correct type of these can be somewhat hard to find.</strong> You are looking for the super flexible type that is so flexible you can tie knots with it. Ask the seller if you are buying on eBay. Pictures can not be trusted.</p><p>You want this stuff:</p><figure class="image image-style-align-left image_resized" style="width:52.04%;"><img src="https://media.prusaprinters.org/media/prints/69188/rich_content/2608f94e-b0df-41b3-aff1-9792e743890a/fiber.jpg#%7B%22uuid%22%3A%2235828dcc-65a2-4edc-9c31-07401d2f958c%22%2C%22w%22%3A1200%2C%22h%22%3A547%7D"></figure><p> </p><p> </p><p> </p><p> </p><p> </p><p> </p><p>Found the correct type of fiber on a UK based eBay store <a href="https://www.ebay.com/itm/323519575525?ssPageName=STRK%3AMEBIDX%3AIT&var=512559969453&_trksid=p2060353.m2749.l2649"><strong>here</strong></a>. You want the one titled “Super Light Infilled Side Glow Flexible Light 3mm” </p><figure class="table"><table><tbody><tr><td style="background-color:#f9cd42;">In the clock there will be some degree of tapering of the brightness (darker in the middle). This can be improved by making sure there is something white or reflective at the end of the fibers - paint, paper, alu foil, ect. It makes a visible difference to do so.</td></tr></tbody></table></figure><p>Made some comparisons between all the types of fiber I have seen so far (numbers for comparison only, not actual light output):</p><figure class="table"><table style="background-color:#40C8E818;"><tbody><tr><td style="text-align:center;width:178px;"><strong>Hard Acrylic:</strong><br><strong>700 lux</strong></td><td style="text-align:center;width:178px;"><strong>Soft Thin Sleeve: 450 lux</strong></td><td style="text-align:center;width:178px;"><strong>Soft Thick Sleeve: 300 lux</strong></td><td style="text-align:center;width:178px;"><strong>Soft Frosted Sleeve: 140 lux</strong></td></tr><tr><td>Brightest, but would be very difficult to use since it needs heat to be shaped. Can't be pressed in so it will either fall out, or not fit at all. Not recommended.</td><td>Best so far. This is what is linked. 0.2mm sleeve. Clear.</td><td>Similar type in the same store. 2mm core and 0.5mm sleeve. Worse than thin sleeve. Sticky sleeve, so it's very difficult to press in.</td><td>Same soft type. Has a milky look. 0.2mm sleeve. Worse output. Difficult to find. No reason to buy this.</td></tr></tbody></table></figure><h4><br>3+ meters of low profile 4mm wide 3535 led strips:</h4><ul><li>eBay search: sk6812 3535</li></ul><figure class="table"><table><tbody><tr><td><figure class="image image-style-align-center"><img src="https://media.prusaprinters.org/media/prints/69188/rich_content/735a6726-a86c-4550-9e7c-b7ab8eb87b30/img_20210702_010219.jpg#%7B%22uuid%22%3A%22d1fcee39-cb76-423f-a346-dd41a9814870%22%2C%22w%22%3A800%2C%22h%22%3A483%7D"></figure></td><td><figure class="image image-style-align-center image_resized" style="width:75%;"><img src="https://media.prusaprinters.org/media/prints/69188/rich_content/61152db1-c5c9-4142-87af-d2be76234dc3/strip.jpg#%7B%22uuid%22%3A%22805d4cbb-6bd1-418d-9238-38b6610f9086%22%2C%22w%22%3A800%2C%22h%22%3A674%7D"></figure></td></tr><tr><td style="background-color:#40C8E818;" colspan="2"><p>You will need a LED strip called SK6812 that uses 3535 LED's. Some sort of clone of the ws2812b strips.</p><p>These are fragile so I would buy more then you need. Soldering pads on them is barely 1mm wide. A small tip would help when working with them.</p><p>These strips are soldered every 50cm from factory. <strong>There will be an overlap between led 30 and 31 which might need to be corrected</strong>, at least with the inner strip, as the led's will not line up with the fibers if you don't. There should be 13mm between all led's.</p></td></tr></tbody></table></figure><p> </p><h4>26AWG silicone wires:</h4><figure class="table"><table><tbody><tr><td style="width:350px;">___________________Placeholder____________________</td><td style="background-color:#40C8E818;"><p>26 or 24AWG is fine. Bigger then that and you can run into problems soldering them to the tiny LED strip.</p><ul><li>No solder on the wires going into screw terminals. Solder will deform over time and come loose. Use bare wires or ferrules.</li></ul></td></tr></tbody></table></figure><p> </p><h4>~395mm glass\plastic glass circle:</h4><figure class="table"><table><tbody><tr><td style="width:350px;">___________________Placeholder____________________</td><td style="background-color:#40C8E818;"><p>Glass should not be larger then the base, as the bezel will only grab the glass and not provide any press fit.</p><p>Could use plastic like acrylic or polycarbonate if you want, and have access to a CNC, like a laser. I prefer real glass. Less messy to cut.</p><p>To find thin glass you can just buy a picture frame that has glass. The glass used in them is usually around 1.5-2mm thick. Mine is 1.7mm. When cutting glass this thin you can sometimes pull the circle straight out from the glass, like you see in movies when breaking in somewhere :)</p><p>You should get glass that's 45x45cm at least. A 40x40 will not cut right. You need some edge to break it correctly.</p></td></tr><tr><td colspan="2"><p><strong>Found a good cutting tutorial on Youtube here:</strong></p><figure class="media"><oembed url="https://www.youtube.com/watch?v=T7dqybxIn7Q"></oembed></figure></td></tr></tbody></table></figure><p> </p><h4><strong>Tint film of some sort:</strong></h4><figure class="table"><table><tbody><tr><td style="width:350px;">___________________Placeholder____________________</td><td style="background-color:#40C8E818;"><p>eBay search: "vlt tint (film,foil)"</p><p>This attaches to the glass. I use a very dark one intended for use on cars which has a 15% VLT (visible light transmission).</p><p>This film is important in my opinion. It makes the clock look like a super black OLED screen. It cleans up a lot and improves the look of everything.</p></td></tr></tbody></table></figure><p> </p><h4>Dallas 18B20 Temperature sensor (optional):</h4><figure class="table"><table><tbody><tr><td style="width:350px;"><figure class="image image-style-align-center"><img src="https://media.prusaprinters.org/media/prints/69188/rich_content/6a464536-6483-4bf9-bfa7-9a1d7c8d7cf5/img_20210702_010501.jpg#%7B%22uuid%22%3A%2210a3c5ef-dd62-4de6-a782-2b20ea502804%22%2C%22w%22%3A500%2C%22h%22%3A385%7D"></figure></td><td style="background-color:#40C8E818;"><p>The idea I had with this is to provide some sort of overheat protection in cases where the clock uses a certain light configuration. If all lights are set to white with full power the clock uses 4 amps of current (20 watts), which is enough to create heat that is capable of warping PETG. Also if the clock is placed somewhere where the sun hits it, it will most likely get very hot, since it's black and almost fully sealed.</p><p>The temp sensor could be used to turn off or flash the lights if a certain temperature limit is passed. This is not coded in. It just reports the temperature once every minute. The sensor is in the core, but it should be possible to mount one right on the strip as well. I have not tested that.</p></td></tr></tbody></table></figure><p> </p><h4>5mm wide, 1mm thick foam tape:</h4><ul><li>eBay search: “5mm 1mm thick foam tape” - (or 10mm cut in half)</li></ul><figure class="table"><table><tbody><tr><td><figure class="image image-style-align-center"><img src="https://media.prusaprinters.org/media/prints/69188/rich_content/10c2780b-293f-45b4-b103-5666cb154a0d/foamtape.jpg#%7B%22uuid%22%3A%22c0619acf-8f53-48b9-99a3-9b331a351fd6%22%2C%22w%22%3A800%2C%22h%22%3A589%7D"></figure></td><td><figure class="image image-style-align-center image_resized" style="width:75%;"><img src="https://media.prusaprinters.org/media/prints/69188/rich_content/2007604c-99f9-4ee3-862e-044ec6c3e281/ledasfoam.png#%7B%22uuid%22%3A%22dfa0478e-3225-410a-a065-f344d846ceb6%22%2C%22w%22%3A1033%2C%22h%22%3A818%7D"></figure></td></tr><tr><td><figure class="image image-style-align-center"><img src="https://media.prusaprinters.org/media/prints/69188/rich_content/9bd4949a-3c73-4d77-a5de-7aa55899269b/tape1.jpg#%7B%22uuid%22%3A%22c0363158-b39e-4965-a01e-4bb83481d348%22%2C%22w%22%3A800%2C%22h%22%3A526%7D"></figure></td><td style="background-color:#40C8E818;"><p>This is used to seal the space between the led strip's and base walls. Because it's foam it will form around the strip and seal pretty well. It's cut into small pieces that are mounted to the strip.</p><p>Tape goes where the blue rectangles are. It's purpose is to seal against things like resistors and solder bumps on the strip, so light doesn't escape into another compartment. This would not work well with just plastic walls</p></td></tr></tbody></table></figure><p> </p><h4>1mm wide double-sided tape (somewhat optional):</h4><ul><li>eBay search: "1mm double sided tape"</li><li>Should be black</li></ul><figure class="table"><table><tbody><tr><td><figure class="image image-style-align-center"><img src="https://media.prusaprinters.org/media/prints/69188/rich_content/9ce69838-2271-4a90-bd7a-e36de9bc8e82/tape2.jpg#%7B%22uuid%22%3A%221c32e480-525f-4f1a-ac60-2b4658b4447b%22%2C%22w%22%3A800%2C%22h%22%3A321%7D"></figure></td><td style="background-color:#40C8E818;">A 1mm thick and wide tape that could be used to seal the space between the top and the base. It goes on top of the base walls, that are also around 1mm thick. The need for this will depend on how much light isolation you need.</td></tr></tbody></table></figure><p> </p><h4>TEMT6000 ambient light sensor (optional) :</h4><figure class="table"><table><tbody><tr><td><figure class="image image-style-align-center"><img src="https://media.prusaprinters.org/media/prints/69188/rich_content/4e6b06ba-ac00-4dbf-9c9c-e2ecc776d13a/lightsensor.jpg#%7B%22uuid%22%3A%226d7ef3c5-56d2-4cc4-b15c-4634cdbbf091%22%2C%22w%22%3A1000%2C%22h%22%3A1000%7D"></figure></td><td><figure class="image image-style-align-center"><img src="https://media.prusaprinters.org/media/prints/69188/rich_content/72412415-4ab2-4bd7-8cd6-0d0296be5457/img_20210702_010328.jpg#%7B%22uuid%22%3A%22ec39d5c0-482a-4171-8ec6-143b4e618edf%22%2C%22w%22%3A800%2C%22h%22%3A630%7D"></figure></td><td style="background-color:#40C8E818;"><p>A light sensor that's apparently made to respond to light like the human eye, whatever that means. This will most likely be placed inside the bezel at the top. Should only be necessary to drill a 2-3mm hole in the bezel.</p><p>The purpose of this is to make the clock adjust itself to the brightness in the room so it doesn't look so strong in the dark, or is hard to see in a bright one.</p><p>Might want to put something like a dupont connector or this, so it can detach from the clock when changing clock faces.</p></td></tr></tbody></table></figure><p> </p><h4>18AWG 5.5x2x1mm “pigtail” power cable:</h4><ul><li>eBay search: “5.5 18awg pigtail”</li></ul><figure class="table"><table><tbody><tr><td><figure class="image image-style-align-center"><img src="https://media.prusaprinters.org/media/prints/69188/rich_content/6fb8518a-3eff-4cd1-b796-84e96335995d/dccable.jpg#%7B%22uuid%22%3A%22c61d277d-6672-4be2-975b-ee6cbd095bc7%22%2C%22w%22%3A1000%2C%22h%22%3A1000%7D"></figure></td><td><figure class="image image-style-align-center"><img src="https://media.prusaprinters.org/media/prints/69188/rich_content/431117e1-e981-47cc-bbd8-a97dd17b9e79/dc-cable.jpg#%7B%22uuid%22%3A%22234b51e5-73fa-4f2d-a8ab-4e9d657a95c4%22%2C%22w%22%3A800%2C%22h%22%3A523%7D"></figure></td><td style="background-color:#40C8E818;width:250px;"><p>Don't know of any better option. Make sure it's long enough.</p><p>Picture shows how it comes out of the bottom wire channel.</p></td></tr></tbody></table></figure><p> </p><h4>7mm wide 0.05mm thick dental “striproll”:</h4><ul><li>eBay search: “dental metal striproll”</li></ul><figure class="table"><table><tbody><tr><td style="width:350px;"><figure class="image image-style-align-center"><img src="https://media.prusaprinters.org/media/prints/69188/rich_content/6a6abd58-55e3-476f-9a52-de4b08485ab4/img_20210702_005947.jpg#%7B%22uuid%22%3A%22b828ab1b-745a-4b0e-b912-b605a74c807c%22%2C%22w%22%3A800%2C%22h%22%3A604%7D"></figure></td><td style="background-color:#40C8E818;"><p>Possibly the weirdest order of the year. This is what dentist use around teeth when a filling is placed.. Why this? Because it's a super thin steel band that is strong, precise, and oddly easy to find. You can use the nickel type strips that's also easy to find, but it's a lot weaker then steel so it's easy to dent, which will make it harder to fit the parts together. </p><p>The purpose of this strip is to separate the inner and outer chambers without causing a big difference in circumference between the inner and outer led strips. This is one reason why the wall between the strips cannot be printed. The led's on the outer strip would gradually misalign from being a larger circle. Other reasons are that steel doesn't care about heat, and it's lightproof</p></td></tr></tbody></table></figure><p> </p><h4>Stripboard or custom PCB:</h4><figure class="table"><table><tbody><tr><td><figure class="image image-style-align-center"><img src="https://media.prusaprinters.org/media/prints/69188/rich_content/e2f6b206-ebff-4526-9705-3d168bc8b0a6/pcb.jpg#%7B%22uuid%22%3A%221455c041-f012-4fa8-940c-b3156b1951fa%22%2C%22w%22%3A800%2C%22h%22%3A585%7D"></figure></td><td style="background-color:#40C8E818;"><p>I use a good quality white stripboard that was cut with metal cutting shears into a 53mm circle.</p><p>Can't really tell you how exactly to make this, as it will depend how much stuff you shove into the core</p></td></tr></tbody></table></figure><p> </p><h4>Low Profile Header Pins:</h4><figure class="table"><table><tbody><tr><td style="text-align:center;width:350px;"><figure class="image image-style-align-center"><img src="https://media.prusaprinters.org/media/prints/69188/rich_content/5ac8dada-ee0e-43d1-af00-acadf4393ae7/headers.png#%7B%22uuid%22%3A%22d43eeda0-af7c-46c4-b7c0-2f49e98e33dc%22%2C%22w%22%3A500%2C%22h%22%3A500%7D"></figure></td><td style="background-color:#40C8E818;">Low profile header pins might be necessary to not hit the core lid. The M5 Stamp comes with 5mm headers, which will work. 3mm headers is also available. You can also remove the plastic strip from the regular male headers if using the D1. This is what I did (see other picture)</td></tr></tbody></table></figure><p> </p><h4>Logic Level Converter (maybe optional?):</h4><figure class="table"><table><tbody><tr><td style="width:350px;"><figure class="image"><img src="https://media.prusaprinters.org/media/prints/69188/rich_content/8a3dca77-76d9-493b-9298-30ae6876a0b9/logicl.png#%7B%22uuid%22%3A%22d64af36c-fd1b-4465-9ae5-9f6ab549abc3%22%2C%22w%22%3A500%2C%22h%22%3A500%7D"></figure></td><td style="background-color:#40C8E818;">It may be necessary to use a converter to change the 3.3v data signal for the led strips to 5v. For me it's not required. My data channels are connected directly to the D1 mini</td></tr></tbody></table></figure><p> </p><h4>Screw Terminals:</h4><figure class="table"><table><tbody><tr><td style="width:350px;"><figure class="image"><img src="https://media.prusaprinters.org/media/prints/69188/rich_content/8f8722c0-3b6b-480c-ac47-ac05c83f0009/terminal.png#%7B%22uuid%22%3A%2203865049-e75b-43e6-a741-29b0ac14089e%22%2C%22w%22%3A500%2C%22h%22%3A500%7D"></figure></td><td style="background-color:#40C8E818;"><p>I use smaller green terminals that use what I think is called riser blocks. Instead of wedging the wires with a screw like the typical blue terminals you see, these clamp the wire in a cage, kind of like a vice. Doesn't damage the wire like blue ones usually do. The blue type also take up too much room.</p><ul><li>No solder on the wires going into screw terminals. Solder will deform over time and come loose. Use bare wires or ferrules.</li></ul></td></tr></tbody></table></figure><p> </p><h4>10v+ 1000µF Capacitor:</h4><p>These are always recommended when using addressable led strips. Not sure if it's necessary.</p><p> </p><h4><strong>White paint that sticks to the plastic you are using.</strong></h4><p> </p><p><strong>---------------------------------------------------------------------------------------------------------</strong></p><h5>Notes:</h5><ul><li>Arduino IDE setup - glitchy led's = board manager ESP issue - downgrade library.</li><li>Clock will run on usb cable alone - possible high current - not safe.</li></ul><p><strong>---------------------------------------------------------------------------------------------------------</strong></p><h5>Old Stuff:</h5><p>Old code simulation video (has working time synced code now thanks to muffin from discord)</p><figure class="media"><oembed url="https://www.youtube.com/watch?v=fyjkVjuSSLk"></oembed></figure><figure class="media"><oembed url="https://www.youtube.com/watch?v=_OXkwiOg7bA"></oembed></figure><p>^ ^ ^ FastLED demoreel video demonstrating capabilities of addressable LED's ^ ^ ^</p><p><strong>---------------------------------------------------------------------------------------------------------</strong></p><p><strong>Status:</strong> Any coder(s) that wants to, can help make code for this. They would need to know ESP's, addressable LED's, the FastLED library, light and temperature sensors, OTA (over the air updates for wireless uploads), WiFi (for time syncing, light and animation control)</p><p><strong>Code Update:</strong></p><p>There are two code files now. One is the simulation used in the video which does not have a clock function, but still gives you an idea of how the lights are set up. </p><p>The second one is modified by “Muffin” from unofficial Prusa discord, which is a working basic clock with time syncing. You will need to replace the WiFi id, password, time zone and some IP stuff to your network in there.</p><ul><li>Currently the clock uses a D1 Mini, which has WiFi, so it could be controlled wirelessly and sync to a time server. The core also has a temperature sensor (Dallas 18B20) that could be used for overheat protection (not in my v6 yet) (clock can get quite hot with certain light configurations, or if it's placed in sunlight). Also has a TEMT6000 light sensor, which is working.</li></ul><p><strong>---------------------------------------------------------------------------------------------------------</strong></p>
With this file you will be able to print Fiberoptic LED Hybrid Wall Clock (40cm) v6.1 with your 3D printer. Click on the button and save the file on your computer to work, edit or customize your design. You can also find more 3D designs for printers on Fiberoptic LED Hybrid Wall Clock (40cm) v6.1.