Ferris Wheel Puller for PET pulltruder machines
prusaprinters
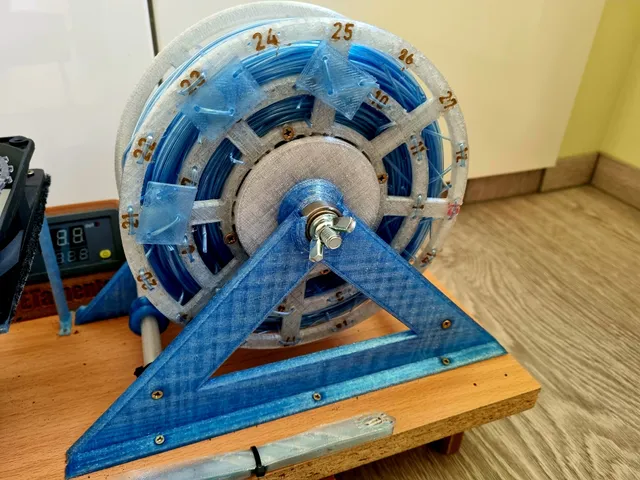
I have been using a pulltruder (PETamentor2 by Ondřej Šraitr) for almost a year now, and my biggest pain point was that after every PET bottle that I converted into 3D printer filament, I had to unwind it from the puller spool, and store it somewhere else.The Ferris Wheel Puller allowes you to pull & store up to 27 PET bottles on a single spool. Your workflow will be much faster and simpler, plus you can use the filament right off the spool.I also designed a little connector that you can use to connect the filament to the spool when you start to pull. Why 27? Initially I wanted to make a spool that can hold 1kg of filament. I even made it, and I filled it with PET filament. However, I realized something: PET filament needs to be dried before you want to use it. If I want to be able to use the filament, I would have to constantly dry it every 2-3 days.Instead, I designed this spool that can store only the amount of filament that can be used within 2-3 days, so after you filled it with filament, you can dry it, and store it in a vacuum bag until you use it.Plus filling a spool with 1kg of filament can take even a week. Pulling 27 bottles takes maximum 1-2 days. Materials needed for the assembly:Any type of 608 bearing → 2pcsM8 threaded rod → 140mmM8 wing nut → 2pcs3 x 30 woodscrew → 12pcs (+8pcs for every additional Spool)2,5 x ~15 woodscrew → 6pcsM3 nut → 2pcsM3 x 10mm screw → 2pcs (+6pcs for the motor)Motor: JGB37-520 12V 7RPM Printing:Make sure that you print it with 0.2mm layer height!Every part has been optimized for printing without support, but they are not oriented. Make sure to orient them on their sides! After you printed the frames, you will have to remove a layer from the bearing hole. It is only there so that you can print it without support.Based on my experience the Spool front & back should be printed with at least 50% Grid infill.You can get away with printing them with 1perimeter if you want to save some time.You have to print 1pcs from every part, exept for these:Frame connector rod → 2pcsFilament connector → 3pcs(later you will want to print multiple spools as well) Assembly:You will see that on one side of the Spool Front the screw holes are filleted for the screw heads. Use 8pcs 3x30 wood screw to screw the front on the back.Make sure that you can fit the Filament Guide on one of the Frame connector rods. If not, a little sandig will help. Put the Filament Guide on the Frame connector that will be on the front, then use 4pcs 3x30 wood screw to screw the Frame connectors into the two side of the frame connecting them together. Screw the motor into the frame.Put 2pcs M3 nut into the Motor connector, and screw it onto the motor using 2pcs M3 screws.Put every part on the M8 threaded rod in the following order: 1pcs M8 wing nut1pcs 608 bearingBearing - Non-geared connector spacerNon-geared Spool connectorSpool, with the Front facing the Non-geared Spool connector. Make sure that the Non-geared Spool connector has found it's way into the holes on the Spool.Geared Spool connector. Again, the connector should find it's holes on the Spool.Bearing - Geared connector spacer.1pcs 608 bearing1pcs M8 wing nutPlace the whole assemly into the bearing holes on the frame. Make sure that the Geared Spool connector is connected to the Motor connector.Fasten the M8 wing nuts.Place the whole assembly to it's final location, and use 6pcs 2,5 x ~15 woodscrew to screw it down via the holes on the bottom of the frame.Using a Sharpie number the holes on the front of the Spool. Start from the inner circle, and go clockwise.Optional: use some Zip-ties on the front Frame connector rod to make sure that the Filament guide only moves between the sides of the Spool. Usage:Pull the filament under the Filament guide and the Spool, and pull it up between the rear Frame connector rod and the spool.Pull it through the front side of the spool.Take a Filament connector, and pull the filament through it's holes.Start the motor. Make sure that the Filament connector stuck on the side of the spool, and the filament is running through the Filament guide.When the PET bottle has run out find the next numbered holes. First pull the filment's end from the inner side of the spool to out, then on the other hole back to the inner side of the spool. You should leave enough filament so that it reaches all the way to the back side of the spool frame. The next filament will go on top of the end of the previous filament.I'm using 3 Filament connector, and I always cut the filament from the 3rd one after I finished pulling the filament that I connected with the 1st one. I hope that the elaborate description helped you to build this project successfully. I have designed and tested it for months, but if you have any feedbacks, feel free to leave a comment.If you made it, please post your make, I would love to see your finished projects! :)
With this file you will be able to print Ferris Wheel Puller for PET pulltruder machines with your 3D printer. Click on the button and save the file on your computer to work, edit or customize your design. You can also find more 3D designs for printers on Ferris Wheel Puller for PET pulltruder machines.