Ferris Wheel Plant Stand
prusaprinters
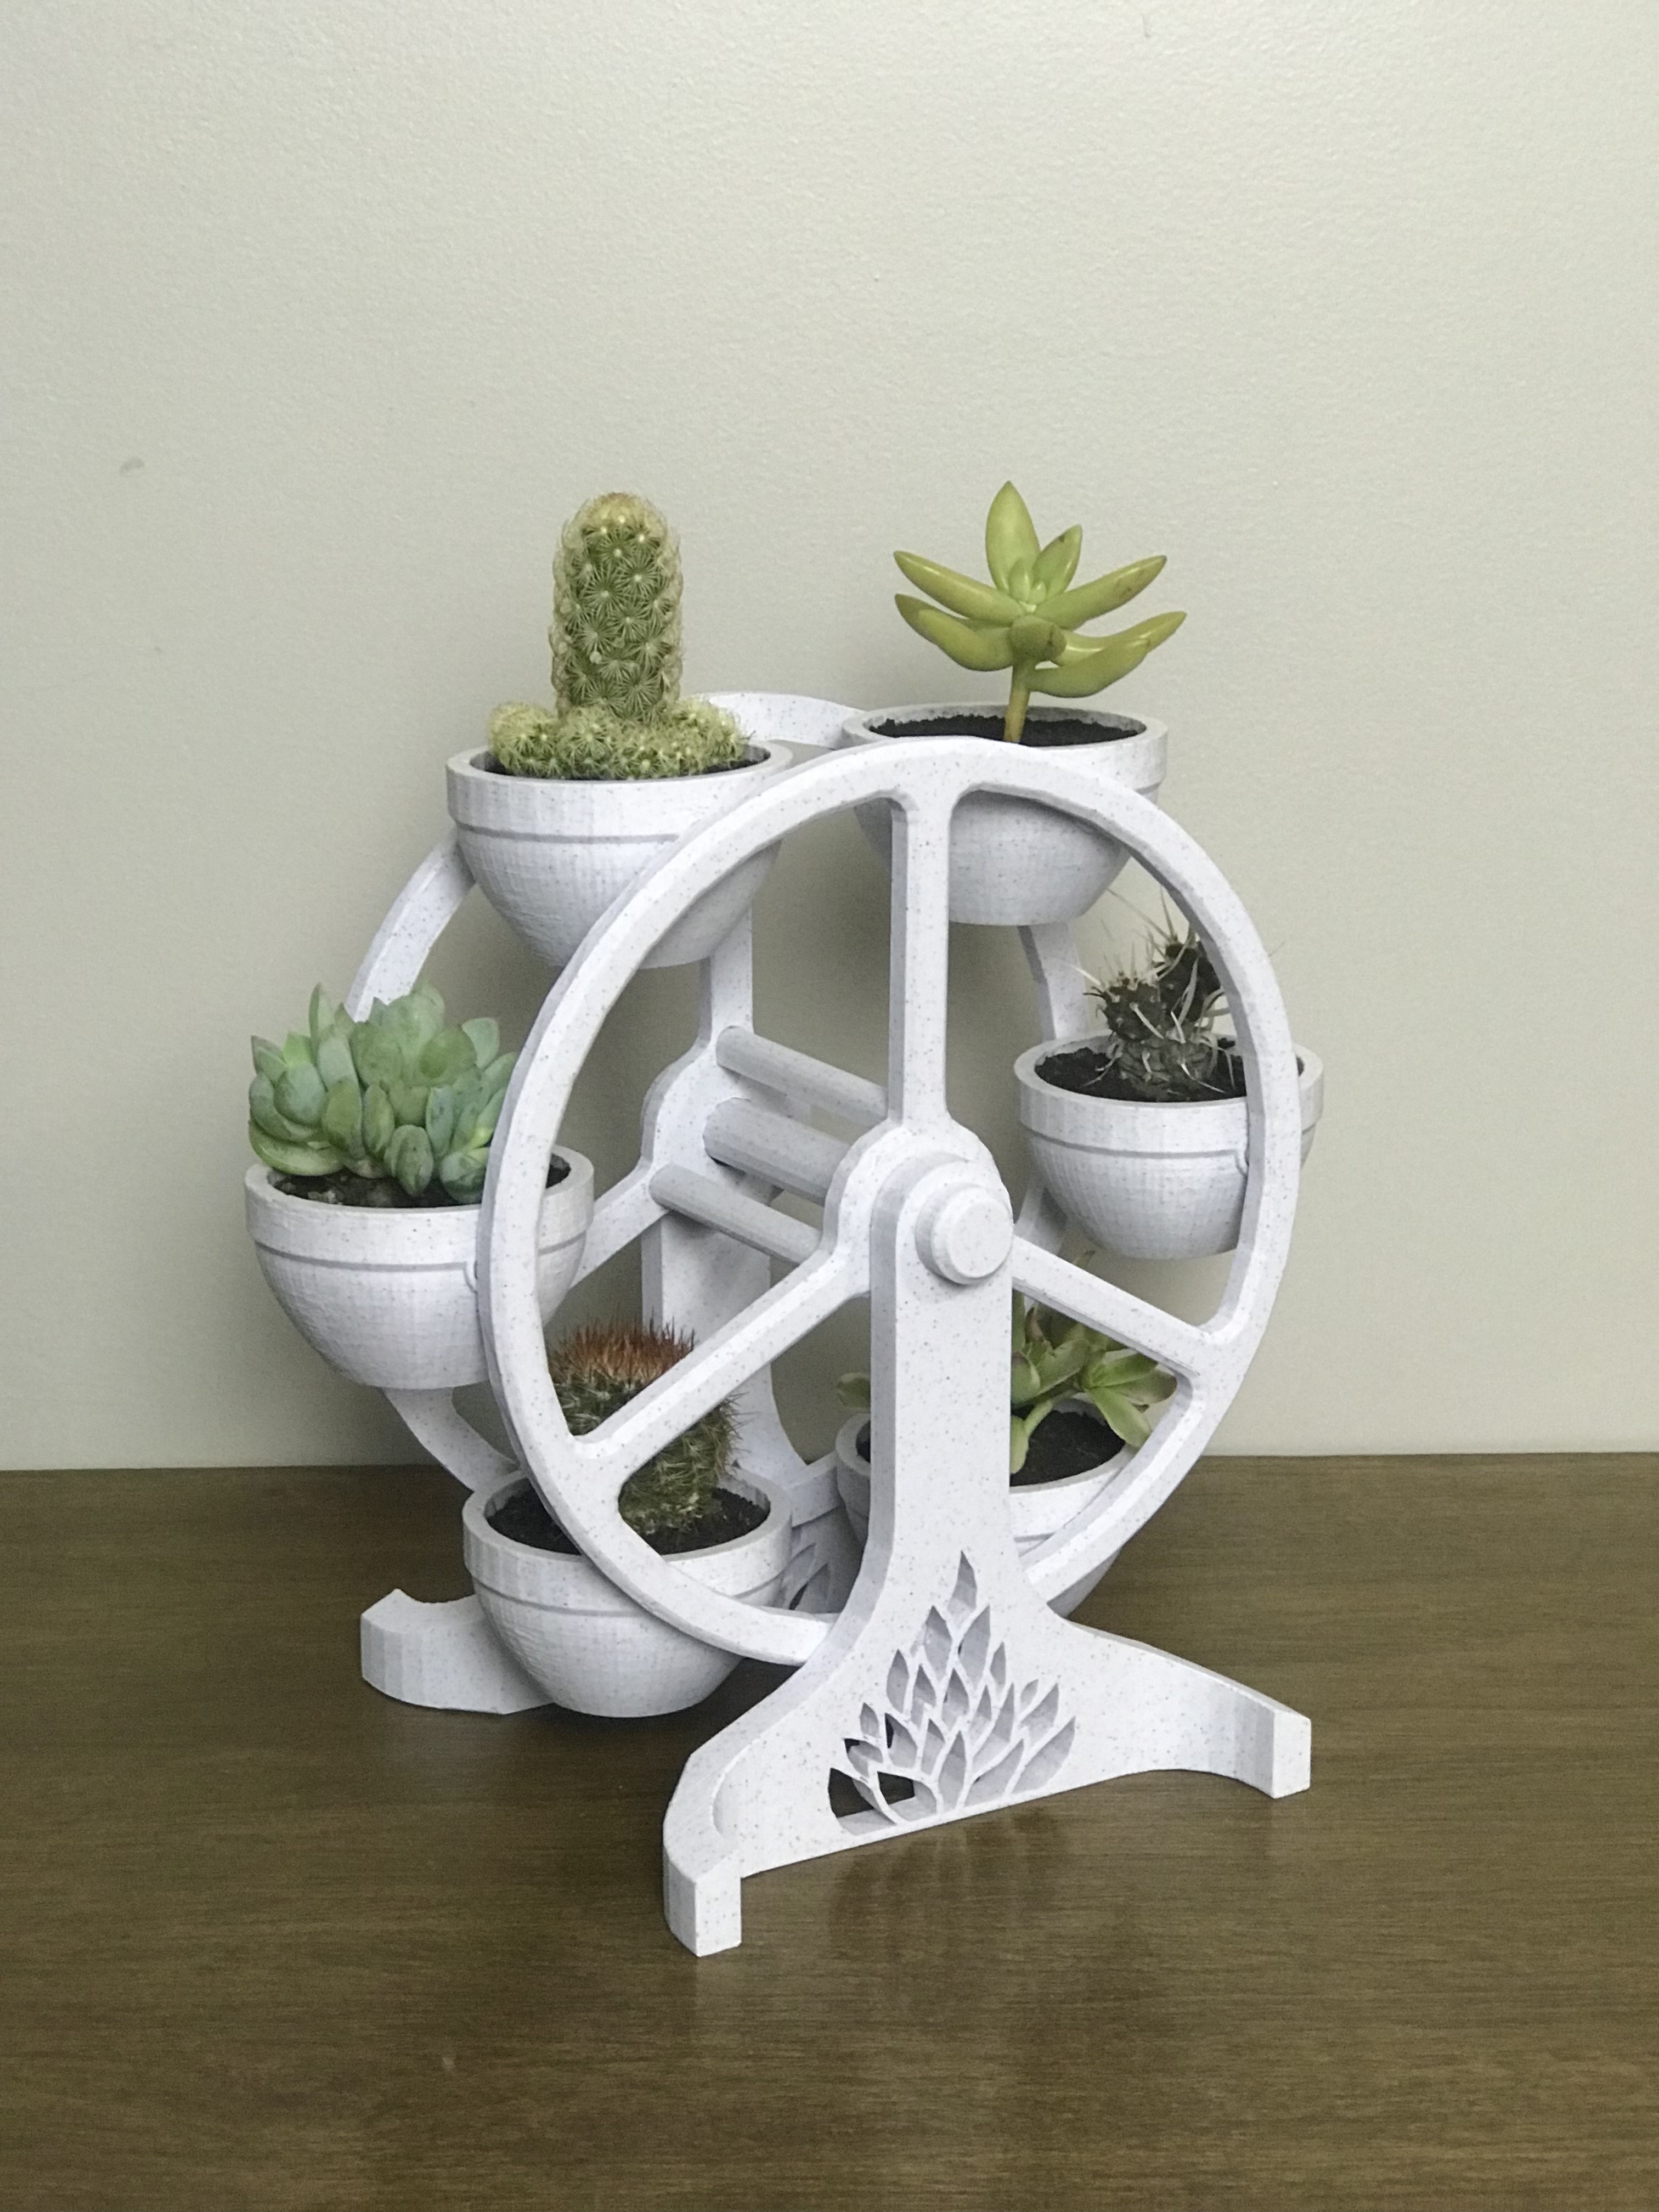
<p>Ferris wheel plant stand perfect for small succulents or cacti. Displays up to six plants that can be easily rearranged. <strong>No supports or hardware needed! </strong>Perfect addition to your plant collection or as a gift for someone else. Filament seen here is marble PLA.</p><p> </p><p><strong>Required Parts/Tools for Assembly:</strong></p><ul><li><strong>3D Printed Parts</strong><ul><li>2x - Wheel</li><li>2x - Leg</li><li>6x - Pot</li><li>1x - Axle</li><li>2x - Axle Cap</li><li>3x - Spacer</li></ul></li><li><strong>Tools (All Optional)</strong><ul><li>Hammer</li><li>Super Glue</li></ul></li></ul><p> </p><p><strong>Assembly Instructions:</strong></p><p>All of the parts that need to be rigidly mated should press-fit together nicely, but feel free to use super glue to ensure that they stay together. I recommend using a hammer to tap the press-fit parts together.</p><ul><li><strong>STEP 1:</strong> Print parts and gather tools if using.</li></ul><figure class="image image-style-align-center image_resized" style="width:50%;"><img src="https://media.printables.com/media/prints/225046/rich_content/f224bc68-5071-46b0-ac2c-4a5672e26e7b/main-image-2.jpg#%7B%22uuid%22%3A%22b7f76512-ceb4-4238-85e1-c4ccc907f961%22%2C%22w%22%3A3657%2C%22h%22%3A1962%7D"></figure><ul><li><strong>STEP 2:</strong> Lay one of the wheels flat on a surface with the pegs up and fit all three spacers into the holes near the center of the wheel. If using super glue, add a dab of it to the end of the spacers before inserting. Make sure they are seated well.</li></ul><figure class="image image_resized" style="width:50%;"><img src="https://media.printables.com/media/prints/225046/rich_content/a9602a56-07db-4128-b0be-8af0a12bb829/assembly-image-1.jpg#%7B%22uuid%22%3A%22e06e33eb-7762-457f-a872-b3ec727910ad%22%2C%22w%22%3A3024%2C%22h%22%3A4032%7D"></figure><ul><li><strong>STEP 3: </strong>Place the other wheel on top and align holes with the spacers as in the first wheel. Again, use super glue if desired and make sure they are seated well.</li></ul><figure class="image image-style-align-center image_resized" style="width:50%;"><img src="https://media.printables.com/media/prints/225046/rich_content/6cc2a7a2-b9d1-4bb6-b98b-9f605dbe886d/assembly-image-2.jpg#%7B%22uuid%22%3A%22cab7cf8b-c1ae-4190-a62c-b1214561f8cd%22%2C%22w%22%3A3024%2C%22h%22%3A4032%7D"></figure><ul><li><strong>STEP 4: </strong>Slide the axle through the two wheels and leave equal parts hanging out on either side. It should be a relatively snug fit to ensure the wheel doesn't spin undesirably, but it should still spin freely when pushed.</li></ul><figure class="image image_resized" style="width:50%;"><img src="https://media.printables.com/media/prints/225046/rich_content/673bbbc8-4ee3-4689-a0f2-84127b6dfdd8/assembly-image-3.jpg#%7B%22uuid%22%3A%229c959632-a65b-4451-a621-c04cd5543574%22%2C%22w%22%3A3024%2C%22h%22%3A4032%7D"></figure><ul><li><strong>STEP 5: </strong>Place both legs on the axle so that the curved parts of the legs face outward. This should be a snug fit.</li></ul><figure class="image image_resized" style="width:50%;"><img src="https://media.printables.com/media/prints/225046/rich_content/c3578b71-5407-45ff-9be8-844b9fdfc6b3/assembly-image-4.jpg#%7B%22uuid%22%3A%22617f5a1d-5b34-4556-976c-77846ca70737%22%2C%22w%22%3A3024%2C%22h%22%3A4032%7D"></figure><ul><li><strong>STEP 6: </strong>Press the axle caps on to the ends of the axles. If using super glue, you can place some on the inside of the caps before inserting. *<strong>CAUTION* If using super glue, make sure to place caps on at the same time and move on to step 7 quickly.</strong></li></ul><figure class="image image_resized" style="width:50%;"><img src="https://media.printables.com/media/prints/225046/rich_content/967d9db6-2380-4065-a7fc-75987674f7d4/assembly-image-5.jpg#%7B%22uuid%22%3A%220d24bf74-10a2-422a-81dd-33c1c8ca804f%22%2C%22w%22%3A3024%2C%22h%22%3A4032%7D"></figure><ul><li><strong>STEP 7: </strong>Place the Ferris wheel assembly on its side on one of the axle caps at the edge of a table or workbench and either use a hammer or press firmly on the axle cap that is facing up. This is a very important step as it aligns everything and makes sure it is all centered. For this reason I would definitely recommend using a hammer.</li></ul><figure class="image image_resized" style="width:50%;"><img src="https://media.printables.com/media/prints/225046/rich_content/9b52bda6-d561-4c88-bbaf-584fb503244b/assembly-image-6.jpg#%7B%22uuid%22%3A%22b0916b27-03fb-4343-a028-8136558fa785%22%2C%22w%22%3A3024%2C%22h%22%3A4032%7D"></figure><ul><li><strong>STEP 8: </strong>Prepare your plants! <3</li></ul><figure class="image image_resized" style="width:50%;"><img src="https://media.printables.com/media/prints/225046/rich_content/7e766f70-4962-48d6-ae8e-617880fe1a45/assembly-image-7.jpg#%7B%22uuid%22%3A%225e5a28d0-2b53-4dab-b664-dd4b39ff3d5d%22%2C%22w%22%3A4032%2C%22h%22%3A3024%7D"></figure><ul><li><strong>STEP 9: </strong>One-by-one, place the plant pots onto the wheel by lining up one side of the pot with a peg and then expanding the two wheels gently to slide the other side on the opposite peg. Rotate the wheel as you go along until you've placed all your plants on. </li></ul><figure class="image image_resized" style="width:50%;"><img src="https://media.printables.com/media/prints/225046/rich_content/db1b3ec7-dce3-42eb-9d70-9f7d119c5043/assembly-image-8.jpg#%7B%22uuid%22%3A%2273f11da1-5f1f-4d5a-8491-29ecf429d0d9%22%2C%22w%22%3A3024%2C%22h%22%3A4032%7D"></figure><ul><li><strong>STEP 10: </strong>Enjoy looking at your cute plants! </li></ul><p> </p><p><strong>Future of the Ferris Wheel Plant Stand:</strong></p><ul><li>Add optional motor so that the wheel can turn on its own. - INCOMPLETE</li><li>Add variation with looser tolerances so pots can rotate freely - INCOMPLETE</li><li>Add small washer to fix noise issues some have experiences - INCOMPLETE</li></ul><p> </p><p>As with any of my models, feel free to message me with any questions or suggestions for improving the design. I'd also love to see if you make this or alter it in any way :)</p>
With this file you will be able to print Ferris Wheel Plant Stand with your 3D printer. Click on the button and save the file on your computer to work, edit or customize your design. You can also find more 3D designs for printers on Ferris Wheel Plant Stand.